Pfaff hobby 1022 Owner's Manual - Page 41
lever 24 upward as far as it will go.
 |
View all Pfaff hobby 1022 manuals
Add to My Manuals
Save this manual to your list of manuals |
Page 41 highlights
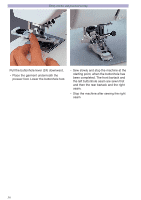
Utility stitches and practical sewing • In order to sew the next buttonhole turn the stitch pattern adjustment button counter-clockwise until the "reverse" symbol appears. Then return the stitch pattern adjustment button to "A". • The machine is now ready to sew the next buttonhole. • Once you have completed sewing all the buttonholes, push the buttonhole lever (24) upward as far as it will go. • By pulling the bobbin thread, bring the needle thread to the underside of the fabric. Tie off the threads. • Remove the button from the button holder. Tip: In order to prevent damaging the bartack by cutting open the buttonhole, insert a pin into the bartack. 37
-
 1
1 -
2
-
3
-
4
-
5
-
6
-
7
-
8
-
9
-
10
-
11
-
12
-
13
-
14
-
15
-
16
-
17
-
18
-
19
-
20
-
21
-
22
-
23
-
24
-
25
-
26
-
27
-
28
-
29
-
30
-
31
-
32
-
33
-
34
-
35
-
 36
36 -
 37
37 -
 38
38 -
 39
39 -
 40
40 -
 41
41 -
 42
42 -
 43
43 -
 44
44 -
 45
45 -
 46
46 -
47
-
48
-
49
-
50
-
51
-
52
-
53
-
54
-
55
-
56
-
57
-
58
-
59
-
60
-
61
-
62
-
63
-
64
-
65
-
66
-
67
-
68
-
69
-
70
-
71
-
72
 |
 |

Utility stitches and practical sewing
37
• In order to sew the next buttonhole turn
the stitch pattern adjustment button
counter-clockwise until the “reverse”
symbol appears. Then return the stitch
pattern adjustment button to “A”.
• The machine is now ready to sew the
next buttonhole.
• Once you have completed sewing all
the buttonholes, push the buttonhole
lever (24) upward as far as it will go.
• By pulling the bobbin thread, bring the
needle thread to the underside of the
fabric. Tie off the threads.
• Remove the button from the button
holder.
Tip:
In order to prevent damaging the
bartack by cutting open the buttonhole,
insert a pin into the bartack.