Pfaff hobbylock 2.5 Owner's Manual - Page 17
Stitch overview
 |
View all Pfaff hobbylock 2.5 manuals
Add to My Manuals
Save this manual to your list of manuals |
Page 17 highlights
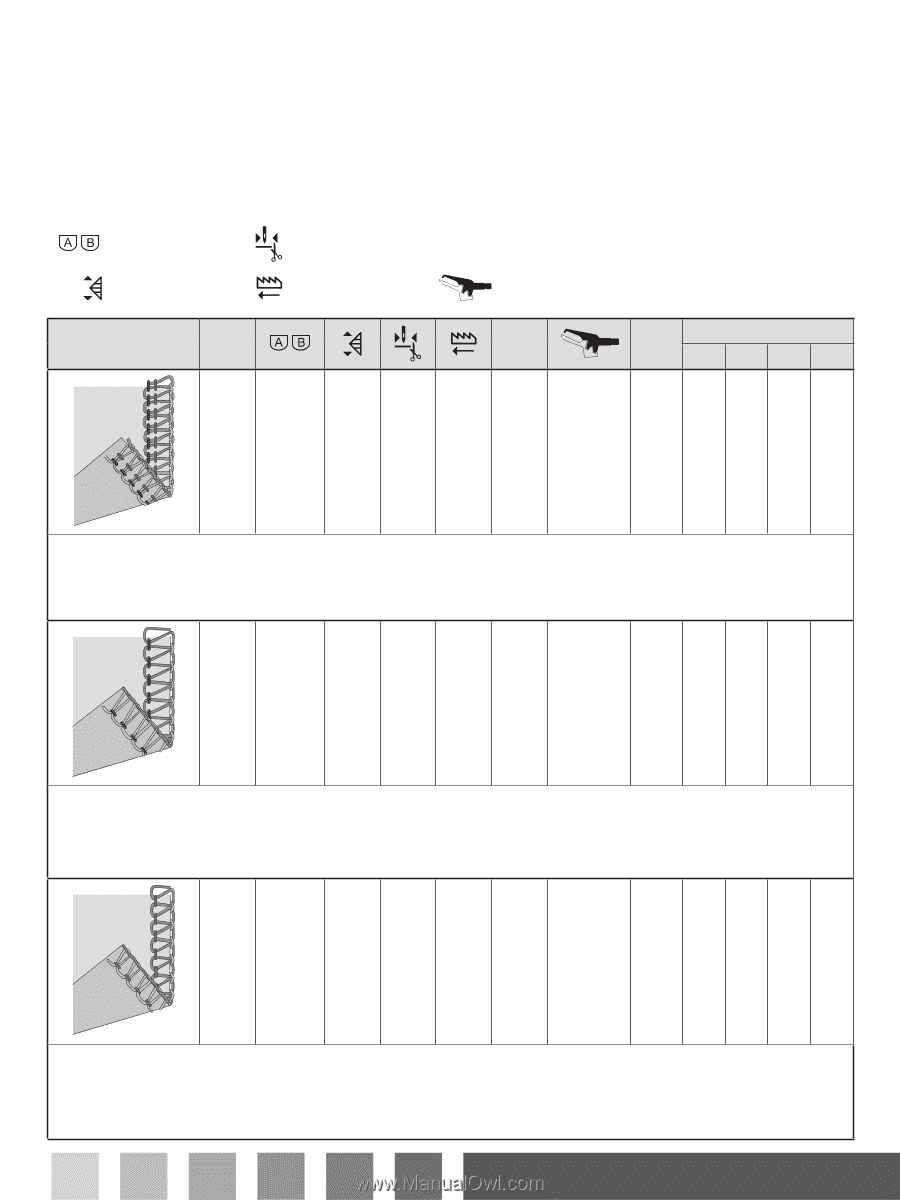
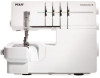
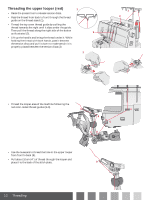
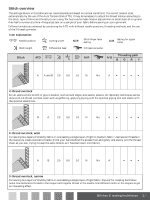
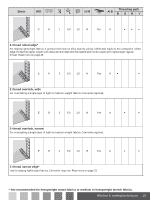
Stitch overview The settings shown in this table are our recommendations based on normal conditions. The correct tension is set automatically by the use of the Auto Tension Dial (ATD). It may be necessary to adjust the thread tension according to the stitch, type of fabric and thread you are using. For best results make tension adjustments in small steps of no greater than half a number at a time. Always test sew on a sample of your fabric before sewing on your garnment. Different stitches are obtained by combining the ATD with different needle positions, threading methods, and the use of the 2-thread converter. Icon explanation: Needle position Cutting width N/R Stitch finger lever setting A/B Setting for upper cutter Stitch length Differential feed 2-thread converter Stitch ATD N/R Threading path A/B BGR Y A A and B 2.5 6.0 1.0 N No A 4-thread overlock For all seams where stretch or give is needed, such as neck edges, side seams, sleeves, etc. Specialty techniques can be done with a 4-thread overlock seam such as gathering, applying piping with the optional piping foot and elastic with the optional elastic foot. B A 2.5 6.0 1.0 N No A• •• 3-thread overlock, wide For sewing two layers of stretchy fabric or overcasting a single layer of light to medium fabric. Use heavier threads in the loopers to create decorative braids. (Hold your hand behind the presser foot and gently and slowly pull the thread chain as you sew, trying to keep the same tension as it has been sewn onto fabric.) A B 2.5 6.0 1.0 N No A ••• 3-thread overlock, narrow For sewing two layers of stretchy fabric or overcasting a single layer of light fabric. Popular for creating decorative tucks. Use decorative threads in the loopers and regular thread in the needle. Use different colors in the loopers to get an interesting effect. Stitches & sewing techniques 17
-
 1
1 -
2
-
3
-
4
-
5
-
6
-
7
-
8
-
9
-
10
-
11
-
 12
12 -
 13
13 -
 14
14 -
 15
15 -
 16
16 -
 17
17 -
 18
18 -
 19
19 -
 20
20 -
 21
21 -
 22
22 -
23
-
24
-
25
-
26
-
27
-
28
-
29
-
30
-
31
-
32
 |
 |