Pfaff hobbylock 2.5 Owner's Manual - Page 7
Connecting the foot control and the, power supply, Setting up the spool stand, Setting up
 |
View all Pfaff hobbylock 2.5 manuals
Add to My Manuals
Save this manual to your list of manuals |
Page 7 highlights
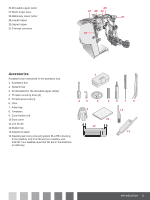
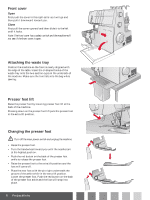
Connecting the foot control and the power supply Foot control to use with this machine: Type 4C-345B22 for USA/Canada Type 4C-345G22 for Europe Type 4C-345G25 for UK Type 4C-345G23 for Australia Before plugging your machine in, make sure the voltage is the same as indicated on the plate under the machine. Specifications vary from country to country. • Connect the foot control/electric power cord to the socket on the machine. • Plug the power cord plug into the electric outlet. • Push the power switch to "1" to turn on the machine. • Press the foot control to start sewing. Use the foot control to adjust the sewing speed. The harder you press, the faster the machine will sew. On the right side of the foot control is a speed control slide (A) for selecting full or half maximum speed. If you press the foot control to the bottom, the machine runs at the maximum speed set by the speed control slide. To stop the machine from sewing, remove your foot from the control. Note: Your machine is adjusted to provide the best stitch result at normal room temperature. Extreme hot and cold temperatures can affect the sewn result. • Push the power switch to "0" to turn off the machine. Note: When the front cover is open the safety switch is activated and prevents the machine from sewing, even if the foot control is pressed. A POLARIZED PLUG INFORMATION (FOR U.S.A. & CANADA ONLY) This appliance has a polarized plug (one blade wider than the other). To reduce the risk of electric shock, this plug is intended to fit in a polarized outlet only way. If the plug does not fit fully in the outlet, reverse the plug. If it still does not fit, contact a qualified electrician to install the proper outlet. Do not modify the plug in any way. Setting up the spool stand Insert the spool stand then push to right as illustrated. Setting up the telescopic thread stand Extend the telescopic thread stand to its full height, then turn until it clicks into place. Place the thread spools over the cone holders on the spool pin. If the machine is already threaded, straighten the threads to prevent tangling. Preparations 7
-
 1
1 -
 2
2 -
 3
3 -
 4
4 -
 5
5 -
 6
6 -
 7
7 -
 8
8 -
 9
9 -
 10
10 -
 11
11 -
 12
12 -
13
-
14
-
15
-
16
-
17
-
18
-
19
-
20
-
21
-
22
-
23
-
24
-
25
-
26
-
27
-
28
-
29
-
30
-
31
-
32
 |
 |
