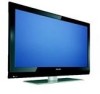
Philips 52PFL7432D User manual
Philips 52PFL7432D - 52" LCD TV Manual
 |
UPC - 609585131477
View all Philips 52PFL7432D manuals
Add to My Manuals
Save this manual to your list of manuals |
Philips 52PFL7432D manual content summary:
- Philips 52PFL7432D | User manual - Page 1
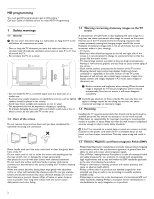
Card at once, or register online at www.philips.com/welcome to ensure: * Proof of Purchase OR BACK). NO USER-SERVICEABLE PARTS INSIDE. REFER SERVICING TO QUALIFIED SERVICE PERSONNEL. t This "bolt literature closely to prevent operating and maintenance problems. Warning:To reduce the risk of - Philips 52PFL7432D | User manual - Page 2
with the manufacturers instructions. 8. Do not from the top of the set and cause product damage and away from power lines. 10. Protect the power cord and supporting 12. Use only with a cart, stand, tripod SERVICE EQUIPMENT GROUND CLAMPS POWER SERVICE GROUNDING ELECTRODE SYSTEM (NEC ART 250, PART - Philips 52PFL7432D | User manual - Page 3
the TV menu settings 9 5.2.1 Adjust viewing and listening settings 9 5.2.2 Adjust Picture menu settings 10 5.2.3 Adjust Sound menu settings 11 5.2.4 Enjoy Ambilight 12 6 Adjust feature menu settings 13 6.1 Closed captions 13 6.2 Caption service 13 6.3 Digital caption service 13 6.4 Digital - Philips 52PFL7432D | User manual - Page 4
logo: present a problem if they are bright and stationary. Moving or low-contrast graphics are less likely to cause uneven aging of the screen; - Stock market stickers: presented at the bottom of the TV screen; - Shopping channel logos and pricing displays: bright and shown constantly or repeatedly - Philips 52PFL7432D | User manual - Page 5
mounting could result in severe injury or damage. Koninklijke Philips Electronics NV bears no responsibility for improper mounting or mounting steel cable with a lock. One end has to be fixed to the opening of the TV and locked with a special button.The other end is attached to a fixed point. ® - Philips 52PFL7432D | User manual - Page 6
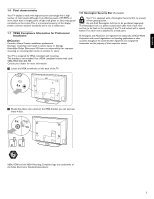
In L/R Analog audio for devices connected to a HDMI connector. 8 Digital Audio Out To connect a digital Home theater amplifier. 9 Digital Audio In 10 Audio Out L/R 11 Service UART For use only by authorized service personnel. ç For installers/integrators: Do not connect RS232 without level shifter - Philips 52PFL7432D | User manual - Page 7
digital TV.This means that a given broadcaster will have two channels on the air, one analog and one digital. - This connection will supply stereo sound to the TV up correctly (inside of case is marked.) CABLE OUT Set top box RF IN the TV using the best connection options. See Chapter 11.2 To - Philips 52PFL7432D | User manual - Page 8
TV channels. 14 MUTE Interrupt the sound or restore it. 15 Numeric buttons To select a TV channel. 16 PREV CH Press to alternate between the currently viewed channel and the previously viewed channel. 17 - Type the dash (-) for digital channels. 18 Ambilight - Ambilight: press to turn Ambilight - Philips 52PFL7432D | User manual - Page 9
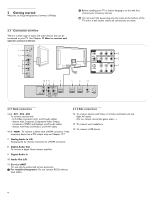
with the buttons on the left side of the TV. Equalizer See Chapter 5.2.3 Adjust Sound menu settings. - VOLUME + Clock Select to activate/deactivate the clock display on the screen. MENU 3.2 Widescreen picture format + CHANNEL - Avoid black bars on the sides or on top and bottom of - Philips 52PFL7432D | User manual - Page 10
of digital and analog channels found. ‹ Press the red color button to finish the First time installation procedure and to display the first stored TV channel. ç At any time you can change or reset your settings or adjust individual settings for Picture, Sound and Ambilight in the TV Settings menu - Philips 52PFL7432D | User manual - Page 11
your preferred picture, sound and ambilight settings - Features allows you to control the settings of special TV features - Installation allows you - to select your menu language; - to search for and store your TV channels; - to do a weak ATSC digital channel installation; - to set or adjust various - Philips 52PFL7432D | User manual - Page 12
to standard Picture Sound Ambilight Info Reset to standard Current Natural Vivid Movie TV menu TV settings Settings assistant Reset to standard Picture Sound Ambilight Info Picture Contrast Brightness Color Tint Sharpness Color temperature Perfect Pixel HD 120 Hz Clear LCD Dynamic contrast Noise - Philips 52PFL7432D | User manual - Page 13
120 Hz Clear LCD (if present) 120 Hz Clear LCD results in superior TV menu TV settings Settings assistant Reset to standard Picture Sound Ambilight Info Sound Equalizer Volume Balance Audio language Alternate audio Mono/Stereo Sound On smoothens the transitions on digital content. < Select On - Philips 52PFL7432D | User manual - Page 14
the TV to automatically turn to the best surround sound mode the broadcaster transmits. 5.2.4 Enjoy Ambilight < Use the cursor buttons to select Color, Relaxed, Moderate or Dynamic. - Color: this will show constant light according to the settings in the Color menu below. It allows manual fine - Philips 52PFL7432D | User manual - Page 15
and press the cursor right. > The Features menu is moved to the left panel. TV menu TV settings Features Installation Software update Info Features Closed captions Caption service Digital caption service Digital caption options Sleeptimer Child lock Set/Change PIN On timer Demo † Use the cursor - Philips 52PFL7432D | User manual - Page 16
from watching certain programs. ‡ Select Child lock. TV menu Features Closed captions Caption service Digital caption service Digital caption options Sleeptimer Child lock Set/Change PIN On timer Demo Info Child lock Lock after Channel lock TV ratings lock Movie ratings lock ® Press the cursor - Philips 52PFL7432D | User manual - Page 17
Picture Association of America). ‡ Select Movie ratings lock with the cursor down. A list appears, showing all valid MPAA content ratings. TV menu / Features Child lock Lock after Channel lock TV ratings lock Movie ratings lock Region ratings lock Info Movie ratings lock All NR G PG PG-13 R NC-17 - Philips 52PFL7432D | User manual - Page 18
digit buttons. All number combinations from 0000 to 9999 are valid numbers. Ò The Menu preferences menu reappears with a message confirming that the PIN has been created. TV menu Features ...... Set/Change PIN On timer Demo Info Demo Perfect Pixel HD Ambilight Settings Assistant 120 Hz Clear LCD - Philips 52PFL7432D | User manual - Page 19
TV menu Channel list Program guide USBdevice 1 ® Select TV menu and press the cursor right. > The TV menu is moved to the left. Ò Select Installation and press the cursor right. > The Installation menu is moved to the left panel. TV menu TV settings Features Installation Software update - Philips 52PFL7432D | User manual - Page 20
tune to and update all available channels, without altering the sorting of existing channels. TV menu / Installation Channel installation Autoprogram Installation update Weak channel installat.. Installation mode Channel edit Info Installation update Start now ç - New channels found will not - Philips 52PFL7432D | User manual - Page 21
connected to each particular input and output. ‡ Select Connections. Menu TV Installation Language Channel installation Preferences Connections Clock Reset AV settings Info Connections AV1 AV2 AV3 HDMI 1 HDMI 2 HDMI 3 Side AUDIO IN L/R DIGITAL AUDIO IN ® Press the cursor right to enter the list - Philips 52PFL7432D | User manual - Page 22
Installation menu. ® Press the cursor right to select the Auto clock mode. Ò Press the cursor right to instruct the TV to get the time automatically or manually. Info ® Press the cursor right. Ò Press the OK button to erase settings and reset them to their default values. ç Most of the TV channels - Philips 52PFL7432D | User manual - Page 23
LIST MENU FORMAT ç When the OK/LIST button is pressed the first time after you have finished the installation, it will bring up the full channel list. In other situations it will bring up the last selected channel list. All channels AV1 AV2 HDMI A 1 Analog channel 1 2 Digital channel 1 3 Digital - Philips 52PFL7432D | User manual - Page 24
9 Electronic Program Guide (only with Digital TV broadcasting) The Electronic Program Guide shows you detailed information about the current program and also about the next program (if this information is available). DEMO OPTION INFO OK LIST MENU MY CONTENT 10 Multimedia browser The - Philips 52PFL7432D | User manual - Page 25
to start a slide show or a loop playback of the files present. ≈Press the cursor left to keep music playing and switch back to the Multimedia menu. Ú Press one of the color buttons on the remote control to perform the corresponding function mentioned at the bottom of the screen. à The blue color - Philips 52PFL7432D | User manual - Page 26
Chapter 7.5 Select your connections. TV menu Installation Language Channel installation Preferences Connections Clock Reset AV settings Info Connections AV1 AV2 AV3 HDMI 1 HDMI 2 HDMI 3 Side AUDIO IN L/R DIGITAL AUDIO IN ç In case of Digital audio connection also link the DIGITAL AUDIO IN to the - Philips 52PFL7432D | User manual - Page 27
, 720p, 1080p and 1080i as specified by the Electronic Industries Association standard EIA770.3. Digital devices from different manufacturers have the possibility of differing output standards which may cause difficulties for the television to properly display. à DVI to HDMI - Your TV comes with - Philips 52PFL7432D | User manual - Page 28
Sound and Picture interruption ? See Chapter 12 Problems. DISPLAY SYNC. OUT L IN DIGITAL AUDIO + AV 1 HDMI 1 AV 2 HDMI 2 AV 3 R ANALOG AUDIO IN + HDMI 1 HDMI 2 HDMI 1 HDMI 2 HDMI 3 11.4 Connect a recorder (VCR / DVD-R) and a second A/V device 11.6 Connect a DVD player/DVD recorder, Set - Philips 52PFL7432D | User manual - Page 29
sound reproduction via all internal loudspeakers. 11.11 Connect digital source devices with Component Video Output connectors (YPbPr) This TV is capable of displaying 1080i, 1080p SAT / REC / Set top box CABLE DISPLAY SYNC. OUT IN DIGITAL AUDIO + AV 1 HDMI 1 AV 2 HDMI 2 AV 3 DIGITAL AUDIO IN AV - Philips 52PFL7432D | User manual - Page 30
AV 1 DVD / Set top box 11.12 Connect a Home Theater Amplifier 11.12.1 Digital Home Theater Amplifier L R AUDIO OUT DISPLAY SYNCHRONIZED DISPLAY SYNC. OUT L IN DIGITAL AUDIO + AV 1 HDMI 1 AV 2 HDMI 2 AV 3 R ANALOG AUDIO IN + HDMI 1 HDMI 2 HDMI 1 DIGITAL AUDIO OUT HDMI 2 11.13 Connect - Philips 52PFL7432D | User manual - Page 31
Also verify if you selected DIGITAL AUDIO IN or AUDIO IN L/R in the same Connections menu. No picture • Verify antenna connections at the bottom of the TV to see if they are properly connected to the TV. • Possible broadcast station trouble.Try another channel. • Adjust the contrast and brightness - Philips 52PFL7432D | User manual - Page 32
an uncompressed, all digital audio/video interface between the TV and any HDMI-equipped audio/video component, such as a set top box, DVD player and AV receiver. HDMI supports enhanced or highdefinition video plus two-channel digital audio. DVI (Digital Visual Interface) A digital interface standard - Philips 52PFL7432D | User manual - Page 33
slshow1.alb, summer_holiday_2004.ALB, test.alb, ... The following syntax should be used to create the text file: ‡ Press the MENU button on the remote control after having inserted a USB device and turned on the TV. Television Multimedia TV menu Channel list Program guide ® Select Multimedia and - Philips 52PFL7432D | User manual - Page 34
Philips TV - Digital camera and USB issues ç - The software of your TV is updatable. If you have problems first check if you have the latest software installed on your TV. The latest software, together with instructions, can be found on the Philips support website. Use the type number of your TV to - Philips 52PFL7432D | User manual - Page 35
TV (EDTV) 640x480p 60 Hz 720x480p 60 Hz 720x576p 50 Hz High Definition TV (HDTV) 1920x1080i 50/60 Hz 1920x1080p 24/25/30/35/60 Hz 1280x720p 50/60 Hz The HDMI to the HDMI input, the Digital audio output signal is muted. - Proper working is only guaranteed with HDMI compliant consumer products - Philips 52PFL7432D | User manual - Page 36
cursor right. > The Software update menu appears. TV menu Software update Update assistant Current software info Local updates Update assistant Start now ‡ Insert the USB memory device in the USB slot of the TV. ® The TV turns off.The screen stays black for about 10 seconds. Please, wait and do - Philips 52PFL7432D | User manual - Page 37
. Do not press more than once. 7.8.4 Local updates For Service use only. POWER POWER ç Do not use the POWER switch on the TV. ‹ The TV turns off.The screen stays black for about 10 seconds. Please, wait. ≈The TV turns back on again. The update is done. ÚOnce the upgrade is finished, use - Philips 52PFL7432D | User manual - Page 38
format 7 menu 10 Problems 29 R Recorder 26 Remote control 6 Recycling 30 Reset AV settings 20 S Safety warnings 2 Satellite receiver 27 Set top box 27 Sharpness 10 Sleeptimer 14 Software update 34 Sound menu 11 mode 12 T Time zone selection 20 Tint 10 Turn the TV on 7 TV menu settings 9 U USB - Philips 52PFL7432D | User manual - Page 39
the back and bottom of your TV. Model: 42PFL7432D/37; 47PFL7432D/37; 47PFL9732D/37 Serial No ENGLISH Regulatory Notices - Federal Communications Commission Notice This equipment has been tested and found to comply with the limits for a Class B digital device, pursuant to part 15 of the FCC Rules - Philips 52PFL7432D | User manual - Page 40
been manufactured from new, or serviceable used parts and is at least functionally equivalent or most comparable to the original product in Philips current inventory, or (3) refund the original purchase price of the product. Philips warrants replacement products or parts provided under this warranty
-
 1
1 -
 2
2 -
 3
3 -
 4
4 -
 5
5 -
 6
6 -
 7
7 -
8
-
9
-
10
-
11
-
12
-
13
-
14
-
15
-
16
-
17
-
18
-
19
-
20
-
21
-
22
-
23
-
24
-
25
-
26
-
27
-
28
-
29
-
30
-
31
-
32
-
33
-
34
-
35
-
36
-
37
-
38
-
39
-
40
 |
 |

Return your Product Registration Card or register online at
www.philips.com/welcome today to get the very most from your purchase.
Registering your model with PHILIPS makes you eligible for all of the valuable benefits listed below, so don’t miss out.
Complete and return your Product Registration Card at once,
or register online at www.philips.com/welcome
to ensure:
* Proof of Purchase
Returning the enclosed card guarantees that
your date of purchase will be on file, so no
additional paperwork will be required from
you to obtain warranty service.
* Product Safety Notification
By registering your product you’ll receive
notification - directly from the manufacturer -
in the rare case of a product recall or safety
defect.
* Additional Benefits of
Product Ownership
Registering your product guarantees that
you’ll receive all of the privileges to which
you’re entitled, including special money-saving
offers.
Congratulations on your purchase, and
welcome to the “family!”
Dear PHILIPS product owner:
Thank you for your confidence in PHILIPS.You’ve selected one of
the best-built,best-backed products available today.We’ll do
everything in our power to keep you happy with your purchase for
many years to come.
As a member of the PHILIPS “family,” you’re entitled to protection
by one of the most comprehensive warranties and outstanding
service networks in the industry.What’s more, your purchase
guarantees you’ll receive all the information and special offers for
which you qualify, plus easy access to accessories from our
convenient home shopping network.
Most importantly, you can count on our uncompromising
commitment to your total satisfaction.
All of this is our way of saying welcome - and thanks for investing in
a PHILIPS product.
P.S. To get the most from your PHILIPS purchase,be
sure to complete and return your Product
Registration Card at once, or register online at:
www.philips.com/welcome
For Customer Use
Enter below the Serial No., which is located on the rear of the
cabinet. Retain this information for future reference.
Model No.
Serial No.
Know these
safety
symbols
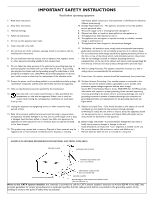
This “bolt of lightning” indicates uninsulated material within your
unit may cause an electrical shock. For the safety of everyone in
your household, please do not remove product covering.
The “exclamation point” calls attention to features for which you
should read the enclosed literature closely to prevent operating
and maintenance problems.
Warning
:To reduce the risk of fire or electric shock, this apparatus
should not be exposed to rain or moisture and objects filled with
liquids, such as vases, should not be placed on this apparatus.
CAUTION
:To prevent electric shock, match wide blade of plug to
wide slot, fully insert.
ATTENTION
: Pour éviter les chocs électriques, introduire la lame la
plus large de la fiche dans la borne correspondante de la prise et
pousser jusqu’au fond.
CAUTION
RISK OF ELECTRIC SHOCK
DO NOT OPEN
CAUTION: TO REDUCE THE RISK OF ELECTRIC SHOCK, DO NOT
REMOVE COVER (OR BACK). NO USER-SERVICEABLE PARTS
INSIDE. REFER SERVICING TO QUALIFIED SERVICE PERSONNEL.
t
s
Visit our World Wide Web Site at http://www.philips.com/welcome