Philips 52PFL7432D User manual - Page 21
Set your preferences, Select your connections
 |
UPC - 609585131477
View all Philips 52PFL7432D manuals
Add to My Manuals
Save this manual to your list of manuals |
Page 21 highlights
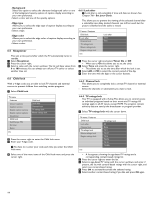
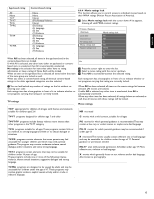
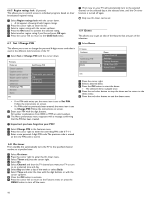
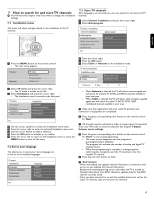
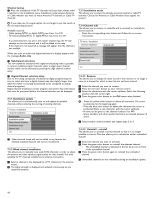
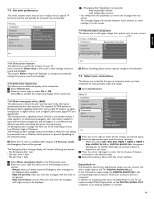
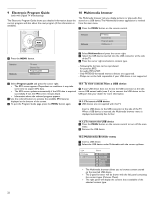
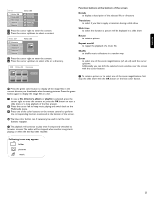
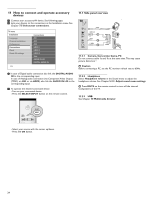
ENGLISH 7.4 Set your preferences This menu contains items that can set or adjust various special TV functions and that will typically be accessed only occasionally. TV menu Installation Language Channel installation Preferences Connections Clock Reset AV settings Preferences Location Volume bar Show emergency alerts Downloaded rating table Info ç - Emergency Alert Signalling is not possible: - with multimedia browser; - with analog video sources. - You always have the possibility to remove the message from the screen. - The message display will overlap whatever menu element or other message is on the screen. 7.4.4 Downloaded rating table This allows you to add region ratings lock options next to your current ones. TV menu / Installation Preferences Downloaded rating table Location Off Volume bar On Show emergency alerts Downloaded rating table 7.4.1 Select your location This allows you to select the location of your TV. If you choose for Retail shop it will result in fixed settings of picture, sound and ambilight. The location Home will give full flexibility to change any predefined settings for picture, sound and ambilight. Info ) Before activating, please ensure regional ratings are broadcasted 7.5 Select your connections 7.4.2 Select the volume bar This allows you to select the display of the volume bar. ‡ Select Volume bar. ® Press the cursor right to select On or Off. Select On to activate the temporarily display of the volume bar. 7.4.3 Show emergency alerts (EAS) This allows you to select the alert priority level of the information disseminated by the cable operator.The standard SCTE18 defines an Emergency Alert signalling method for use by cable TV systems to signal emergencies to digital devices such as digital Cable boxes, digital TVs and digital VCRs. The Emergency alert signalling scheme defined in the standard allows a cable operator to disseminate emergency alert information related to state and local-level emergencies and warnings in a cost-effective and efficient way, while minimizing disruption of programming. An Emergency alert message will have one of the following priorities: Low, Medium, High or Maximum. The Emergency alert message with priority High or Maximum will always be presented. Low or Medium will be present or ignored depending on the selected setting. ) When the TV clock is undefined (See Chapter 7.6 Set your clock), the Emergency Alert will be ignored. The Emergency Alert message display will contain following information: - The Emergency Alert text - The start time + date - The end time + date. This allows you to identify the type of accessory device you have connected to each particular input and output. ‡ Select Connections. Menu TV Installation Language Channel installation Preferences Connections Clock Reset AV settings Info Connections AV1 AV2 AV3 HDMI 1 HDMI 2 HDMI 3 Side AUDIO IN L/R DIGITAL AUDIO IN ® Press the cursor right to enter the list of types of external inputs. Ò Select the appropriate input with the cursor up/down. > When you select AV1, AV2, AV3, HDMI 1, HDMI 2, HDMI 3, Side, AUDIO IN L/R or DIGITAL AUDIO IN a list appears allowing you to identify which type of accessory device is attached to this input. † Press the cursor right again to enter the list of types of devices connected to the selected input. º Select the accessory device with the cursor up/down. ‡ Select Show emergency alerts in the Preferences menu. ® Press the cursor right and select one of the Emergency alerts options: - Always, when you always want the Emergency alert messages to be displayed when available; - Skip low priority, when you want the messages with low level to be ignored; - Skip low/medium priority, when you only want the messages with high priority to be displayed. Digital Audio In If an accessory device has a digital audio output, you can connect this with a single cable to the TV's DIGITAL AUDIO IN jack. In the Connections menu, assign the DIGITAL AUDIO IN to the corresponding external input to which your accessory device is connected. In addition to accepting audio input via Digital Audio In, the TV can output encoded Dolby Digital audio via the DIGITAL AUDIO OUT connector to an external amplifier or receiver. 19
-
 1
1 -
2
-
3
-
4
-
5
-
6
-
7
-
8
-
9
-
10
-
11
-
12
-
13
-
14
-
15
-
 16
16 -
 17
17 -
 18
18 -
 19
19 -
 20
20 -
 21
21 -
 22
22 -
 23
23 -
 24
24 -
 25
25 -
 26
26 -
27
-
28
-
29
-
30
-
31
-
32
-
33
-
34
-
35
-
36
-
37
-
38
-
39
-
40
 |
 |