Philips 52PFL7432D User manual - Page 6
Getting started
 |
UPC - 609585131477
View all Philips 52PFL7432D manuals
Add to My Manuals
Save this manual to your list of manuals |
Page 6 highlights
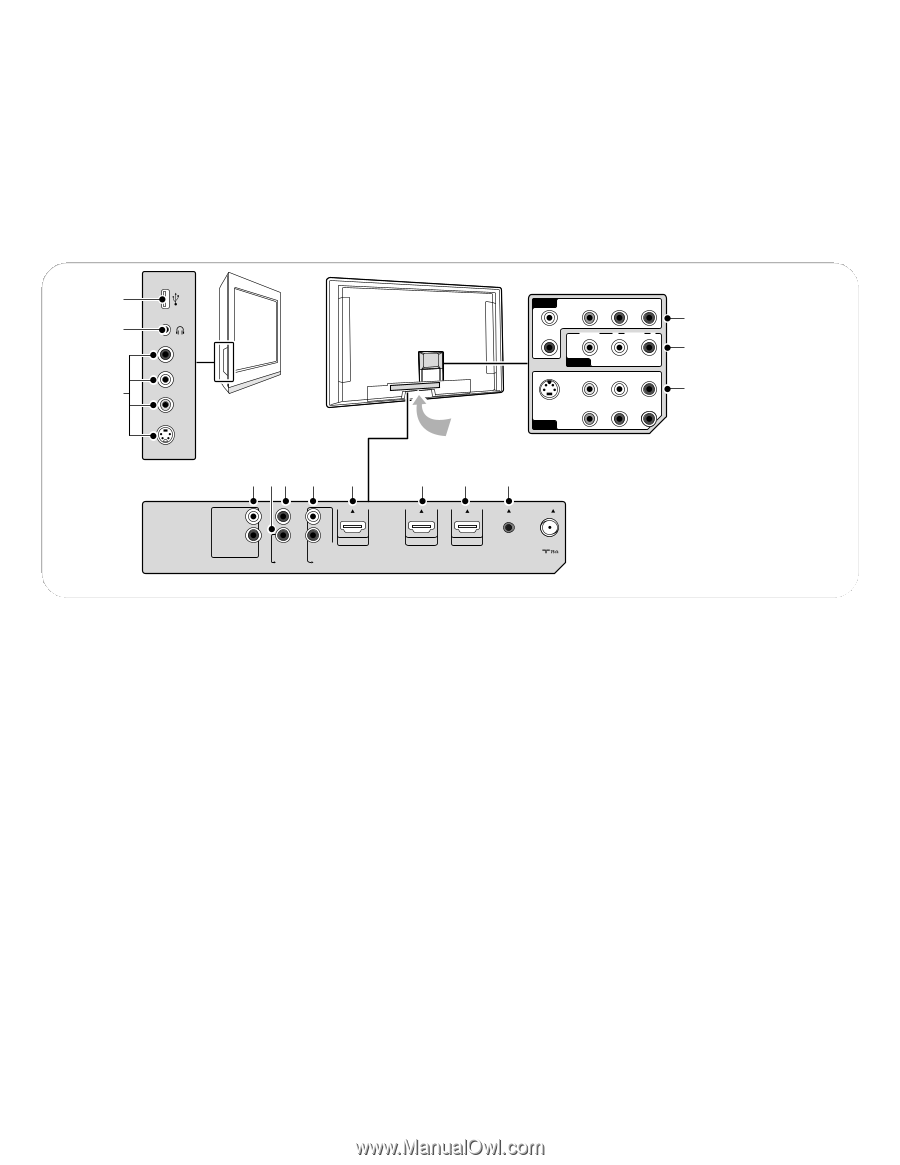
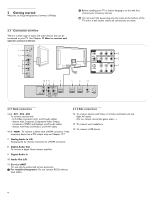
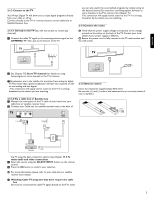
2 Getting started Welcome to the growing family of owners of Philips. 2.1 Connection overview There is a wide range of audio and video devices that can be connected to your TV. See Chapter 11 How to connect and operate accessory devices. à Before installing your TV or before hanging it on the wall, first connect your accessory devices. ) Do not insert the power plug into the mains at the bottom of the TV and in a wall socket before all connections are made. USB 14 13 12 R AUDIO L VIDEO S VIDEO 10 9 8 7 6 L R AUDIO OUT DISPLAY SYNCHRONIZED DISPLAY SYNC. OUT L IN DIGITAL AUDIO + AV 1 HDMI 1 AV 2 HDMI 2 AV 3 R ANALOG AUDIO IN + HDMI 1 HDMI 2 HDMI 1 AV 3 Y Pb Pr L 3 AUDIO VIDEO L AUDIO R R 2 AV 2 VIDEO L AUDIO R 1 S VIDEO Y Pb Pr AV 1 5 4 11 HDMI 2 HDMI 3 SERVICE UART ANTENNA 2.1.1 Back connections 1-2-3 AV1 - AV2 - AV3 To connect devices with - an S-Video connector and L and R audio cables - devices with 3 separate Component Video Output connectors (YPbPr) and Analog L and R audio cables - devices with Video and Audio L and R AV cables. 4-5-6 HDMI To connect a device with a HDMI connector. If the accessory device has a DVI output only, see Chapter 11.7. 7 Analog Audio In L/R Analog audio for devices connected to a HDMI connector. 8 Digital Audio Out To connect a digital Home theater amplifier. 9 Digital Audio In 10 Audio Out L/R 11 Service UART For use only by authorized service personnel. ç For installers/integrators: Do not connect RS232 without level shifter. 2.1.2 Side connections 12 To connect devices with Video or S-Video and Audio Left and Right AV cables. (For ex. camera, camcorder, game, audio,...) 13 To connect your headphone. 14 To connect a USB device. 4
-
 1
1 -
 2
2 -
 3
3 -
 4
4 -
 5
5 -
 6
6 -
 7
7 -
 8
8 -
 9
9 -
 10
10 -
 11
11 -
 12
12 -
13
-
14
-
15
-
16
-
17
-
18
-
19
-
20
-
21
-
22
-
23
-
24
-
25
-
26
-
27
-
28
-
29
-
30
-
31
-
32
-
33
-
34
-
35
-
36
-
37
-
38
-
39
-
40
 |
 |