Philips LC3136 User Manual - Page 31
Troubleshooting
 |
View all Philips LC3136 manuals
Add to My Manuals
Save this manual to your list of manuals |
Page 31 highlights
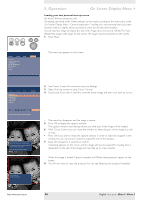
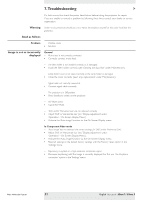
7.Troubleshooting > If a fault occurs, first check the points listed below before taking the projector for repair. If you are unable to remedy a problem by following these hints, consult your dealer or service organisation. Warning Under no circumstances should you try to repair the projector yourself as this could invalidate the guarantee. Read as follows Problem - Possible cause • Solution Image is not or incorrectly displayed General - Mains lead is not correctly connected. • Correctly connect mains lead. - The filter holder is not installed correctly or is damaged. • Install the filter holder correctly (see 'Cleaning the dust filter' under 'Maintenance'). - Lamp holder cover is not closed correctly or the lamp holder is damaged. • Close the cover correctly (see 'Lamp replacement' under 'Maintenance'). - Signal cable not correctly connected. • Connect signal cable correctly. - The projector is in Off position. • Press Standby to switch on the projector. - A/V Mute active. • Cancel A/V Mute. - 'Shift' and/or 'Horizontal size' are not adjusted correctly. • Adjust 'Shift' or 'Horizontal size' (see 'Display adjustment' under 'Operation' - 'On Screen Display Menu'). • Activate the 'Auto-image' function via the On Screen Display menu. In Component Video mode - 'Auto Image' has not selected the correct settings for 'Shift' and/or 'Horizontal Size'. • Adjust 'Shift' or 'Horizontal size' (see 'Display adjustment' under 'Operation' - 'On Screen Display Menu'). • Activate the 'Auto-image' function via the On Screen Display menu. • Reset all settings to the default factory settings with the 'Factory reset' option in the 'Settings' menu. - Keystoning is applied on a high resolution component signal. • Decrease keystoning until the image is correctly displayed. For this use the 'Keystone correction' option in the 'Settings' menu. Philips Multimedia Projector 31 English User guide bSure1 / bSure 2
-
 1
1 -
2
-
3
-
4
-
5
-
6
-
7
-
8
-
9
-
10
-
11
-
12
-
13
-
14
-
15
-
16
-
17
-
18
-
19
-
20
-
21
-
22
-
23
-
24
-
25
-
 26
26 -
 27
27 -
 28
28 -
 29
29 -
 30
30 -
 31
31 -
 32
32 -
 33
33 -
 34
34
 |
 |
