Pioneer CDJ800 Owner's Manual - Page 31
Lecture, boucle, Quick return, Loop playback
 |
UPC - 012562615103
View all Pioneer CDJ800 manuals
Add to My Manuals
Save this manual to your list of manuals |
Page 31 highlights
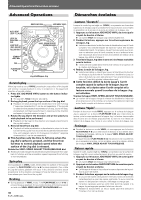
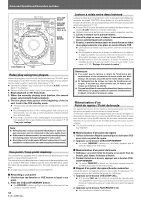
English Français BeforeAdOvpaenrcaetidngOp(Neraamtieosnsan/dDéFmunacrtcihoensséovfoPluarétess) ¶ When the PLAY/PAUSE button (6) is pressed once again to resume playback, the sound accelerates at the speed set with the VINYL SPEED ADJUST TOUCH/RELEASE dial. Quick return When the jog mode is set to [VINYL], pressing the surface of the jog dial returns playback instantly to the cue point. 1. Press the JOG MODE VINYL button so that the button indicator lights. ¶ The jog dial's [Vinyl] indicator also lights. 2. Press the QUICK RETURN button so that the button indicator lights. ¶ The jog dial display will shown the flashing cue point position indi- cator. 3. During playback, press the surface of the jog dial. ¶ If a cue point has been stored in memory, the playback will return instantly to the stored cue point; if no cue point has been stored in memory, the playback will not change. ¶ Playback will also return to the in-point (cue point) if the Jog dial is pressed during loop playback. ¶ During MP3 playback, quick return can be performed within the same folder. Loop playback 7 Defining a loop 1. Press the PLAY/PAUSE button (6) to begin playback. 2. During playback or pause, press the LOOP IN/REALTIME CUE button. ¶ This operation is not required if a prerecorded cue point has al- ready been set as the loop start point. 3. When playback reaches the desired loop-out point, press the LOOP OUT button. ¶ The AUTO BEAT LOOP 8 (1/1) button indicator lights. ¶ Playback will begin between the loop-in and loop-out points. ¶ During MP3 play, the loop can be set only between points set within the same track. ¶ When the loop has been set, the RELOOP/EXIT button lights. 7 Shorten the loop length When manual mode is used to create a loop during playback or pause, the AUTO BEAT LOOP 8 (1/1) button will light. Press one of the AUTO BEAT LOOP buttons (1, 2, 4 or 8). ¶ When the AUTO BEAT LOOP 1 (1/8) button is pressed, the button indicator lights and loop play begins between the loop-in point to a point 1/8 of the full length of the original loop. ¶ When the AUTO BEAT LOOP 2 (1/4) button is pressed, the button indicator lights, and loop play begins between the loop-in point to a point 1/4 of the full length of the original loop. ¶ When the AUTO BEAT LOOP 4 (1/2) button is pressed, the button indicator lights, and loop play begins between the loop-in point to a point 1/2 of the full length of the original loop. ¶ When the AUTO BEAT LOOP 8 (1/1) button is pressed, the button indicator lights, and loop play begins between the loop-in point to a point 1/1 (all) of the length of the original loop. After setting the loop, if you press one of the AUTO BEAT LOOP buttons while holding the LOOP IN/REALTIME CUE button depressed, the following operations will be performed: ¶ When AUTO BEAT LOOP 1 (1/8) button is pressed: 1/8 loop (1/ 64th of the initially created loop) ¶ When AUTO BEAT LOOP 2 (1/4) button is pressed: 1/4 loop (1/ 32nd of the initially created loop) ¶ When AUTO BEAT LOOP 4 (1/2) button is pressed: 1/2 loop (1/ 16th of the initially created loop). ¶ When AUTO BEAT LOOP 8 (1/1) button is pressed, 1/1 loop (1/ 8th of the initially created loop). ¶ When the RELOOP/EXIT button is pressed, loop play is canceled and the previous loop mode (auto/manual) is restored. Lecture à boucle 7 Définition d'une boucle 1. Appuyez sur le bouton PLAY/PAUSE (6) pour lancer la lecture. 2. Pendant la lecture ou la pause, appuyez sur le bouton LOOP IN/REALTIME CUE. ¶ Cette démarche n'est pas requise si un point de repère préenregistré a déjà été défini comme point initial de boucle. 3. Quand la lecture arrive au point final de boucle souhaité, appuyez sur le bouton LOOP OUT. ¶ Le voyant du bouton AUTO BEAT LOOP 8 (1/1) s'allume. ¶ La lecture s'accomplira entre le point initial de boucle et le point final de boucle. ¶ Pendant la lecture MP3, une boucle peut être définie uniquement entre deux points posés sur la même plage. ¶ Quand une boucle est définie, le bouton RELOOP/EXIT s'allume. 7 Réduction de la longueur d'une boucle Quand le mode manuel est utilisé pour créer une boucle pendant la lecture ou une pause, le bouton AUTO BEAT LOOP 8 (1/1) s'allume. Appuyez sur un des boutons AUTO BEAT LOOP (1, 2, 4 ou 8). ¶ Quand le bouton AUTO BEAT LOOP 1 (1/8) est actionné, le voyant du bouton s'allume et la lecture de la bouche s'accomplit entre le point initial de boucle jusqu'à un point à 1/8e de la longueur totale de la boucle originale. ¶ Quand le bouton AUTO BEAT LOOP 2 (1/4) est actionné, le voyant du bouton s'allume et la lecture de la bouche s'accomplit entre le point initial de boucle jusqu'à un point à 1/4 de la longueur totale de la boucle originale. ¶ Quand le bouton AUTO BEAT LOOP 4 (1/2) est actionné, le voyant du bouton s'allume et la lecture de la bouche s'accomplit entre le point initial de boucle jusqu'à un point à 1/2 de la longueur totale de la boucle originale. ¶ Quand le bouton AUTO BEAT LOOP 8 (1/1) est actionné, le voyant du bouton s'allume et la lecture de la bouche s'accomplit entre le point initial de boucle jusqu'à un point à 1/1 (tout) de la longueur totale de la boucle originale. Après la définition de la boucle, si vous appuyez sur un des boutons AUTO BEAT LOOP en maintenant enfoncé le bouton LOOP IN/REALTIME CUE, les opérations suivantes seront exécutées : ¶ Si le bouton AUTO BEAT LOOP 1 (1/8) est actionné : 1/8e de boucle (1/64e de la boucle initialement créée). ¶ Si le bouton AUTO BEAT LOOP 2 (1/4) est actionné : 1/4 de boucle (1/32e de la boucle initialement créée). ¶ Si le bouton AUTO BEAT LOOP 4 (1/2) est actionné : 1/2 de boucle (1/16e de la boucle initialement créée). ¶ Si le bouton AUTO BEAT LOOP 8 (1/1) est actionné : 1/1 de boucle (1/8e de la boucle initialement créée). ¶ Quand le bouton RELOOP/EXIT est actionné, la lecture de boucle est annulée et le mode de boucle antérieur (auto/manuel) est rétabli. 31 En/Fr
-
 1
1 -
2
-
3
-
4
-
5
-
6
-
7
-
8
-
9
-
10
-
11
-
12
-
13
-
14
-
15
-
16
-
17
-
18
-
19
-
20
-
21
-
22
-
23
-
24
-
25
-
 26
26 -
 27
27 -
 28
28 -
 29
29 -
 30
30 -
 31
31 -
 32
32 -
 33
33 -
 34
34 -
 35
35 -
 36
36 -
37
-
38
-
39
-
40
-
41
-
42
-
43
-
44
-
45
-
46
-
47
-
48
-
49
-
50
-
51
-
52
-
53
-
54
-
55
-
56
-
57
-
58
-
59
-
60
-
61
-
62
-
63
-
64
-
65
-
66
-
67
-
68
-
69
-
70
-
71
-
72
-
73
-
74
-
75
-
76
-
77
-
78
-
79
-
80
-
81
-
82
-
83
-
84
-
85
-
86
-
87
-
88
-
89
-
90
-
91
-
92
-
93
-
94
-
95
-
96
-
97
-
98
-
99
-
100
-
101
-
102
-
103
-
104
-
105
-
106
-
107
-
108
-
109
-
110
-
111
-
112
-
113
-
114
-
115
-
116
 |
 |