Pioneer DEH-P6300 Owner's Manual
Pioneer DEH-P6300 Manual
 |
View all Pioneer DEH-P6300 manuals
Add to My Manuals
Save this manual to your list of manuals |
Pioneer DEH-P6300 manual content summary:
- Pioneer DEH-P6300 | Owner's Manual - Page 1
ENGLISH FRANÇAIS Multi-CD/DAB control High power CD player with FM/AM tuner Syntoniseur FM/AM et lecteur de CD, "Puisance élevée", avec contrôleur pour lecteur de CD à chargeur/DAB Operation Manual DEH-P7300 DEH-P6300 Mode d'emploi DEUTSCH FRANÇAIS ITALIANO NEDERLANDS - Pioneer DEH-P6300 | Owner's Manual - Page 2
5 About This Manual 5 Important 5 About the Demo Mode 5 - Reverse Demo - Feature Demo Precaution 6 After-sales Service for Pioneer Products .......... 6 When using the 50-Disc Type Multi-CD Player 6 About the XM READY Mark 7 Remote Controller and Care 8 Using the Remote Controller 8 Battery - Pioneer DEH-P6300 | Owner's Manual - Page 3
- Handsfree Telephoning Function When using the DAB (Digital Audio Broadcasting) Tuner ........ 50 - About This Product's Indications - Operation - Available PTY Function - Dynamic Label Function CD Player and Care 55 Precaution 55 Built-in CD Player's Error Message 56 Specifications 57 FRAN - Pioneer DEH-P6300 | Owner's Manual - Page 4
"normal" can actually be loud and harmful to your hearing. Guard against this by setting your equipment at a safe level BEFORE your hearing adapts. To establish a safe level: • Start your volume control at a low setting. • Slowly increase the sound until you can hear it comfortably and clearly, and - Pioneer DEH-P6300 | Owner's Manual - Page 5
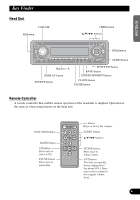
Controller A remote controller that enables remote operation of the head unit is supplied. Operation is the same as when using buttons on the head unit. FRANÇAIS ITALIANO NEDERLANDS FUNCTION button BAND button CD button Press once to select a CD. PAUSE button Press once to pause play. +/- button - Pioneer DEH-P6300 | Owner's Manual - Page 6
manual explains head unit operation. You can perform the same operations with the remote controller. is switched OFF while the ignition switch is set to ACC or ON cancels the Reverse Remember that if the Feature Demo continues operating when the car engine is switched OFF, it may drain battery power - Pioneer DEH-P6300 | Owner's Manual - Page 7
7 CANADA Pioneer Electronics of Canada, Inc. CUSTOMER SERVICE DEPARTMENT 300 Allstate Parkway Markham, Ontario L3R OP2 (905) 479-4411 1-877-283-5901 For warranty information please see the Limited Warranty sheet included with your product. When using the 50-Disc Type Multi-CD Player The available - Pioneer DEH-P6300 | Owner's Manual - Page 8
Pioneer service station regarding the XM tuner that can be connected to this product. For operation of the XM tuner, refer to the XM tuner owner's manual. Note: • XM Satellite Radio is developing a new band of radio in the U.S.A. The system will use direct satellite-to-receiver broadcasting - Pioneer DEH-P6300 | Owner's Manual - Page 9
Remove the battery if the remote controller is not used for a month or longer. • If the event of battery leakage, wipe the remote controller completely clean and install a new bat- tery. loading battery with its (+) and (-) poles facing in the proper directions. 8 FRANÇAIS ITALIANO NEDERLANDS - Pioneer DEH-P6300 | Owner's Manual - Page 10
Detaching and Replacing the Front Panel Theft Protection The front panel of the head unit is detachable to discourage theft. • Keep the front panel closed while driving. Detaching the Front Panel 1. Open the front panel. SELECT SFEQ 2. Grip the left side of the front panel and pull it gently - Pioneer DEH-P6300 | Owner's Manual - Page 11
no magazine is set in the Multi-CD player. * When the AUX (external input) is set to OFF. (Refer to page 43.) * When the Telephone standby is set to OFF. (Refer to page 45.) • When this product's blue/white lead is connected to the car's Auto-antenna relay control terminal, the car's Auto-antenna - Pioneer DEH-P6300 | Owner's Manual - Page 12
raise the volume level. • Roll counterclockwise to lower the volume level. • Indications on the right side of the display differ depending on the model. * DEH-P6300: * DEH-P7300: Volume level ASL effect level (when ASL is switched ON). (Refer to page 40.) 4. Turn the source OFF. EQ SOURCE DISP - Pioneer DEH-P6300 | Owner's Manual - Page 13
the tuning method by changing the length of time you press the 2/3 button. Manual Tuning (step by step) Seek Tuning 0.5 seconds or less 0.5 seconds or starts as soon as you release the button. • Stereo indicator " " lights when a stereo station is selected. ESPAÑOL DEUTSCH FRANÇAIS ITALIANO - Pioneer DEH-P6300 | Owner's Manual - Page 14
of Built-in CD Player Note: • Be sure to close the front panel after loading or ejecting a disc. Switching the Display Each press of the DISPLAY button changes the display in the following order: Playback mode A (Play time) = Disc Title = Playback mode B (Play time and DAB Information) Note: • If - Pioneer DEH-P6300 | Owner's Manual - Page 15
ENGLISH ESPAÑOL DEUTSCH Disc Loading Slot Note: • The Built-in CD player plays one standard 12 cm or 8 cm (single) CD at a time. Do not use an adapter when playing 8 cm CD. • Do not insert anything other than a CD into the CD Loading Slot. Precaution: • To avoid a malfunction, make sure that no - Pioneer DEH-P6300 | Owner's Manual - Page 16
Operation Basic Operation of Multi-CD Player This product can control a Multi-CD player (sold separately). Track -CD player cannot operate properly, an error message such as "ERROR-14" is displayed. Refer to the Multi-CD player owner's manual. • If there are no discs in the Multi-CD player magazine - Pioneer DEH-P6300 | Owner's Manual - Page 17
Setting Menu (refer to page 41) or Audio Menu (refer to page 33), they also make it easy to see which 5/∞/2/3 buttons you can use to switch functions ON/OFF, switch repeat selections and perform other operations. Indicator and corresponding buttons are shown below. 7 Head Unit 7 Remote Controller - Pioneer DEH-P6300 | Owner's Manual - Page 18
Basic Operation 2. Operate a mode (e.g. Repeat Play). 3 4 5 6 E B SELECT SFEQ 3. Cancel the Function Menu. SELECT SFEQ 3 4 5 6 E B FUNC AUDIO The button used and the operation it performs are indicated by the key guidance indicator. Press the 5 button to switch the key guidance - Pioneer DEH-P6300 | Owner's Manual - Page 19
Play (RDM) Scan Play (T.SCAN) Pause (PAUSE) 7 Multi-CD Player Function name (Display) Repeat Play (PMODE) Selecting Discs by Disc the Detailed Setting Menu In the Detailed Setting Menu, you can operate convenient, complex functions for each source. 1. Enter the Detailed Setting Menu. SELECT - Pioneer DEH-P6300 | Owner's Manual - Page 20
want to know about an operation, refer to the page number indicated in the chart. Note: • Tuner has no Detailed Setting Menu. 7 Built-in CD Player Function name (Display) Disc Title Input (TITLE) Button: Operation 1 5 or ∞: Select (Letter) 2 2 or 3: Select (Position) 3 3: Memory Page 22 7 Multi - Pioneer DEH-P6300 | Owner's Manual - Page 21
with the 2/3 buttons. FM : Local 1 Ô Local 2 Ô Local 3 Ô Local 4 AM : Local 1 Ô Local 2 Note: • The Local 4 setting allows reception of only the strongest stations, while lower settings let you receive progressively weaker stations. Best Stations Memory (BSM) The BSM function stores stations in - Pioneer DEH-P6300 | Owner's Manual - Page 22
Using the Built-in CD Player Repeat Play (RPT) Repeat Play plays the same track repeatedly. 5/∞ buttons. Scan Play (T.SCAN) Scan Play plays the first 10 seconds or so of each track on a CD in succession. 1. Press the FUNCTION button and select the Scan mode (T.SCAN) in the Function Menu. 2. Switch - Pioneer DEH-P6300 | Owner's Manual - Page 23
function ON/OFF by pressing the PAUSE button. Disc Title Input (TITLE) You can use "TITLE" to input up to 48 disc titles for CDs in the Built-in CD player. (Perform the same operation as (described) on page 27 under "Using Multi-CD Players".) Note: • After the title for 48 discs have been entered - Pioneer DEH-P6300 | Owner's Manual - Page 24
track Repeat Disc Repeat Display MCD TRK DISC Note: • If you select other discs during the repeat play, the repeat play range changes to Multi-CD player Repeat. • If you perform Track Search or Fast Forward/Reverse during One-track Repeat, the repeat play range changes to Disc Repeat. Random Play - Pioneer DEH-P6300 | Owner's Manual - Page 25
Scan Play ON with the 5 button. After selecting the desired repeat play range from those referred to in "Repeat Play" on page 23, switch Multi-CD Player Scan Play ON. 3. When you find the desired track (or disc), cancel the Scan Play with the ∞ button. If the Function Menu has been canceled - Pioneer DEH-P6300 | Owner's Manual - Page 26
search for the track you wish to play when a Multi-CD player is installed. You can use ITS to program automatic playback of up track you wish to program. 2. Select the ITS Programming mode (ITS) in the Detailed Setting Menu. (Refer to page 18.) 3. Program the desired track with the 5 button. Note: - Pioneer DEH-P6300 | Owner's Manual - Page 27
Title (English) Erase a Track Program 1. Select the track you wish to erase, during ITS Play. 2. Select the ITS Programming mode (ITS) in the Detailed Setting Menu. (Refer to page 18.) 3. Erase the track program with the ∞ button. ITS is canceled and playback of the next ITS-programmed track begins - Pioneer DEH-P6300 | Owner's Manual - Page 28
the disc title. 2. Select the Disc Title Input mode (TITLE) in the Detailed Setting Menu. (Refer to page 18.) Note: • When playing a CD TEXT disc on a CD TEXT compatible Multi-CD player, you cannot switch to this mode. • A CD TEXT disc is a CD featuring recorded text information such as Disc Title - Pioneer DEH-P6300 | Owner's Manual - Page 29
Discs by Disc Title List (T.LIST) Follow the procedures below to play a disc for which you have input the title in a MultiCD player or a CD TEXT disc on a CD TEXT compatible Multi-CD player. 1. Press the FUNCTION button and select the Disc Title List mode (T.LIST) in the Function Menu. 2. Select - Pioneer DEH-P6300 | Owner's Manual - Page 30
titles have not been input, "NO TITLE" is displayed. • You can only switch to Playback mode B when a DAB Tuner (e.g. GEX-P700DAB) is connected. Compression and DBE (COMP) Using the COMP (Compression) and DBE (Dynamic Bass Emphasis) functions enables Multi-CD player sound quality adjustment. Each - Pioneer DEH-P6300 | Owner's Manual - Page 31
CD TEXT Function (for CD TEXT compatible type) You can use these functions when playing a CD TEXT disc on a CD TEXT compatible Multi-CD player Artist Name = Playback mode B (Play Time and DAB Information) Note: • If certain text information is not recorded on a CD TEXT disc, "NO ~" (e.g. "NO Track - Pioneer DEH-P6300 | Owner's Manual - Page 32
rear output. (The bass boost is the same for both front and rear.) For both "FRT1" and "FRT2" the "H" setting provides a more pronounced effect than the "L" setting. 1. Select the desired SFEQ mode. SELECT SFEQ FRT1-H (front 1-high) = FRT1-L (front 1-low) = FRT2-H (front 2-high) = FRT2-L (front - Pioneer DEH-P6300 | Owner's Manual - Page 33
" on page 35.) 7 CUSTOM 1 A separate "CUSTOM 1" curve can be created for each source. (The Built-in CD player and Multi-CD player are set to the same Equalizer Curve Adjustment setting automatically.) If you make adjustments when a curve other than "CUSTOM 2" is selected, the equalizer curve - Pioneer DEH-P6300 | Owner's Manual - Page 34
, the Audio Menu is automatically canceled. • Audio Menu functions change depending on the Rear Output and Subwoofer Controller setting in the Initial Setting Menu. (Refer to "Setting the Rear Output and Subwoofer Controller" on page 44.) 1. Select the desired mode in the Audio Menu. SELECT SFEQ - Pioneer DEH-P6300 | Owner's Manual - Page 35
as it moves from left to right. Note: • When the Rear Output setting is "REAR SP:S.W", you cannot adjust front/rear speaker balance. (Refer to page 44.) EQ Mid/EQ High) You can adjust the currently selected equalizer curve settings as desired. 1. Press the AUDIO button and select the Equalizer - Pioneer DEH-P6300 | Owner's Manual - Page 36
Audio Adjustment Equalizer Curve Fine Adjustment You can adjust the center frequency and the Q factor (curve characteristics) of each currently selected curve band (EQ Low/EQ Mid/EQ High). Level (dB) Center frequency Q=2N Q=2W Frequency (Hz) 1. Press the AUDIO button for 2 seconds to select - Pioneer DEH-P6300 | Owner's Manual - Page 37
ENGLISH ESPAÑOL DEUTSCH FRANÇAIS Bass Adjustment (Bass) You can adjust the cut-off frequency and the Bass level. In "FRT1" mode, bass adjustment affects only the rear output: front output cannot be adjusted. 1. Press the AUDIO button and select the Bass mode (Bass) in the Audio Menu. 2. Select - Pioneer DEH-P6300 | Owner's Manual - Page 38
or 180˚("Rev."). 0˚ is the default phase. Note: • When the Subwoofer Controller setting is "S.W Control:EXT", you cannot switch the Subwoofer ON/OFF mode. In this case, this setting is not necessary. (Refer to page 44.) • Select the OFF setting when you do not want the Subwoofer to operate. 1. Press - Pioneer DEH-P6300 | Owner's Manual - Page 39
does not pass through this unit's low pass filter (for the Subwoofer), but is output through the RCA output. Note: • When the Subwoofer Controller setting is only "S.W Control:EXT", you can switch the Non Fading Output ON/OFF mode. (Refer to page 44.) 1. Press the AUDIO button and select the Non - Pioneer DEH-P6300 | Owner's Manual - Page 40
) in the Audio Menu. 2. Increase or decrease the out- put level with the 5/∞ buttons. The display shows "+6" - "-6". Note: • You can select the Non Fading Output setting mode only when Non Fading output is switched ON in the Non Fading Output ON/OFF mode. High Pass Filter (HPF) When you do not - Pioneer DEH-P6300 | Owner's Manual - Page 41
Built-in CD player and Multi-CD player are set to the same volume adjustment setting auto- matically. • External Unit 1 and External Unit 2 are set to the same volume adjustment setting automatically. Automatic Sound Levelizer (ASL) Function (for DEH-P7300) During driving, noise in the car changes - Pioneer DEH-P6300 | Owner's Manual - Page 42
2 seconds 3. Select a desired mode. SELECT SFEQ 3 4 5 6 E B FUNC AUDIO Each press changes the Mode ... 4. Operate a mode. 5. Cancel the Initial Setting Menu. SELECT SFEQ 3 4 5 6 E B FUNC AUDIO Note: • Holding down the FUNCTION button for 2 seconds also cancels the Initial - Pioneer DEH-P6300 | Owner's Manual - Page 43
page 47 for details concerning the clock display.) 1. Press the FUNCTION button and select the Time setting mode (CLOCK) in the Initial Setting Menu. 2. Select "Hour" or "Minute" with the 2/3 buttons. 3. Set as desired time with the 5/∞ buttons. As soon as you switch to "Minute", the seconds start - Pioneer DEH-P6300 | Owner's Manual - Page 44
mode when using external equipment with this product. 1. Press the FUNCTION button and select the AUX Setting mode (AUX) in the Initial Setting Menu. 2. Switch the AUX Setting ON/OFF with the 5/∞ buttons. Setting the Dimmer (DIM) To enable this product's display from being too bright at night, when - Pioneer DEH-P6300 | Owner's Manual - Page 45
In this case, you can select whether to use the Subwoofer controller's (Low Pass Filter, Phase) built-in "S.W Control:INT" or the auxiliary "S.W Control:EXT". * DEH-P6300 doesn't have RCA Rear output. Note: • Even if you change this setting, there is no output unless you switch the Non Fading Output - Pioneer DEH-P6300 | Owner's Manual - Page 46
select the Handsfree Telephoning mode (TEL 1) in the Initial Setting Menu. 2. Switch the Handsfree Telephoning ON/OFF with the 5/∞ buttons. Switching the Telephone Muting/Attenuation (TEL 2) (for DEH-P7300) When a call is made or received using a cellular telephone connected to this product, you can - Pioneer DEH-P6300 | Owner's Manual - Page 47
, the moving source icon disappears after the opening screen is displayed. 1. Press the FUNCTION button and select the Motion Screen mode (DISP) in the Initial Setting Menu. 2. Switch the Motion Screen ON/OFF with the 5/∞ buttons. 46 FRANÇAIS ITALIANO NEDERLANDS - Pioneer DEH-P6300 | Owner's Manual - Page 48
's display. • BGV stands for Back Ground Visual. • The LEVEL INDICATOR provides the indications below: * DEH-P7300 On the right: Audio signal treble level On the left: Audio signal bass level * DEH-P6300 On the right: Audio signal right channel level On the left: Audio signal left channel level 47 - Pioneer DEH-P6300 | Owner's Manual - Page 49
's Owner's Manual. Selecting the AUX Source • Select AUX. (Refer to page 10.) EQ SOURCE DISP 1 2 3 4 5 6 Each press changes the Source ... AUX Title Input (TITLE) The display title for AUX source can be changed. 1. Select the AUX Title Input mode (TITLE) in the Detailed Setting Menu - Pioneer DEH-P6300 | Owner's Manual - Page 50
DEH-P7300) Telephone Muting/Attenuation Function Sound from this system is muted or attenuated automatically when a call is made or received using a telephone connected to this product. When "Hands-Free:OFF" in the Handsfree Telephoning mode is selected in the Initial Setting Menu, - Pioneer DEH-P6300 | Owner's Manual - Page 51
light. ** If the set Announcement Support is received, the icon " ", " " lights. 7 DAB Status Indications Indicator Status EXTRA The currently received Service has a Secondary Service Component. TEXT The currently received Service has a Dynamic Label. DAB When DAB reception is possible - Pioneer DEH-P6300 | Owner's Manual - Page 52
with Function Menu (Refer to page 24.) This product does not have the following three functions. (Reference pages are in the Hide-away DAB Tuner's Operation Manual) • Service List Function (Refer to page 20.) • Language Filter Function (Refer to page 20.) • Using the PGM button (Refer to page 32 - Pioneer DEH-P6300 | Owner's Manual - Page 53
the FUNCTION button and select the PTY Search Setting mode (PTY) in the Function Menu. SELECT SFEQ 3 4 5 6 E B FUNC AUDIO 2. Select one from among the PTY. SELECT SFEQ 3. Start PTY Search. SELECT SFEQ DAB receives the desired PTY Service. Note: • The PTY method displayed is Narrow - Pioneer DEH-P6300 | Owner's Manual - Page 54
Service Component you're currently listening to. You can scroll the displayed information. Note: • The tuner automatically memorizes the three latest Dynamic Label received When viewing Dynamic Label, do not operate until you have parked your car safely. • If you press the 5 button, you return to the - Pioneer DEH-P6300 | Owner's Manual - Page 55
ENGLISH ESPAÑOL 7 Storing Dynamic Label in Memory 1. Perform "Dynamic Label Display" steps 1 and 2, and then select the Dynamic Label you want to store in memory. 2. Press one of buttons 1-6 for 2 seconds to store the desired Dynamic Label. (e.g. Press button 4 for 2 seconds.) EQ SOURCE DISP 1 - Pioneer DEH-P6300 | Owner's Manual - Page 56
CD Player and Care Precaution • Play only CDs bearing the Compact Disc Digital Audio mark. (If a CD features the top right mark on its disc title side, that disc is a CD TEXT disc. There are also some CD TEXT discs that do not feature the top right mark.) • This product is designed for use with - Pioneer DEH-P6300 | Owner's Manual - Page 57
Built-in CD Player's Error Message When problems occur with CD playback, an error message appears on the display. Refer to the table below to identify the problem, then take the suggested corrective action. If the error persists, contact your dealer or your nearest PIONEER Service Center. Message - Pioneer DEH-P6300 | Owner's Manual - Page 58
controls (Bass Frequency: 40/63/100/160 Hz Gain: ±12 dB (Treble Frequency: 2.5k/4k/6.3k/10k Hz Gain: ±12 dB HPF Frequency 50/80/125 Hz Slope 12 dB/oct. 57 Subwoofer output Frequency 50/80/125 Hz Slope 18 dB/oct. Gain 12 dB Phase Normal/Reverse CD player of channels 2 (stereo) FM tuner - Pioneer DEH-P6300 | Owner's Manual - Page 59
ENGLISH ESPAÑOL DEUTSCH FRANÇAIS ITALIANO NEDERLANDS 58 - Pioneer DEH-P6300 | Owner's Manual - Page 60
emploi .... 5 Quelques mots sur la démonstration 5 - Démonstration inverse - Démonstration des possibilités Précaution 6 Service après-vente des produits PIONEER .... 6 Lors de l'utilisation du lecteur de CD à changeur 50 disques 6 À propos de la marque XM READY 7 Remarques concernant le boîtier - Pioneer DEH-P6300 | Owner's Manual - Page 61
(Treble) - Mise en service de la correction physiologique (Loud non, de la source auxiliaire (AUX) - Réglage de la luminosité DAB (Radiodiffusion numérique 50 - Quelques mots sur les indications affichées - Fonctionnement - Fonction des PTY disponibles - Fonction d'étiquette dynamique Lecteur de CD - Pioneer DEH-P6300 | Owner's Manual - Page 62
qui est plus important, sans affecter votre ouïe sensible. Le son peut être décevant. Avec le temps, le "niveau de confort" de votre ouïe s'adapte aux volumes sonores plus élevés. Ainsi, les sons "normaux" peuvent en fait être forts et affecter votre ouïe. Protégezvous contre cela en réglant votre - Pioneer DEH-P6300 | Owner's Manual - Page 63
possibles au moyen des touches de l'élément central. DEUTSCH FRANÇAIS ITALIANO NEDERLANDS Touche FUNCTION Touche BAND Touche CD Appuyez une fois sur cette touche pour choisir un CD. Touche PAUSE Appuyez une fois sur cette touche pour commander une pause. Touche +/- Augmentez ou diminuez le - Pioneer DEH-P6300 | Owner's Manual - Page 64
Avant d'utiliser cet appareil Quelques mots concernant cet appareil Les fréquences d'accord de cet appareil sont attribuées pour une utilisation en Amérique du Nord. Il s'ensuit que l'utilisation de l'appareil dans d'autres régions peut donner lieu à des anomalies de réception. Quelques mots - Pioneer DEH-P6300 | Owner's Manual - Page 65
Pioneer aux adresses suivantes; N'envoyez pas le produit à réparer sans avoir, au préalable, contacté nos bureaux. 7 U.S.A. Pioneer Electronics Service, Inc. CUSTOMER SERVICE de l'utilisation du lecteur de CD à changeur 50 disques Les fonctions disponibles du lecteur de CD à changeur 50 disques sont - Pioneer DEH-P6300 | Owner's Manual - Page 66
revendeur ou du centre de service autorisé Pioneer le plus proche en ce qui concerne le tuner XM pouvant être connecté à cet appareil. Pour le fonctionnement du tuner XM, reportez-vous à son mode d'emploi. Remarque: • La radio satellite XM utilise une nouvelle bande radio aux États-Unis. Le système - Pioneer DEH-P6300 | Owner's Manual - Page 67
ENGLISH FRANÇAIS DEUTSCH Remarques concernant le boîtier de télécommande Utilisation du boîtier de télécommande Une télécommande est fournie avec cet appareil pour une utilisation pratique. • Pointez la télécommande vers le panneau avant pour l'utiliser. Précaution: • Ne rangez pas la télé - Pioneer DEH-P6300 | Owner's Manual - Page 68
avant à l'abri de la lumière directe du soleil et des températures élevées. Tonalité d'alarme La tonalité d'alarme retentit si la face avant n'est pas retirée dans les 5 secondes qui suivent la coupure de l'allumage. Remarque: • Il est possible de supprimer la tonalité d'alarme. (Reportez-vous à la - Pioneer DEH-P6300 | Owner's Manual - Page 69
qui suit: Touche TUNER : Téléviseur = Syntoniseur = Syntoniseur DAB (Digital Audio Broadcasting) = Hors service Touche CD : Lecteur de CD intégré = Lecteur de CD à chargeur = Hors service Remarque: • L'appareil extérieur fait référence à un appareil Pioneer (disponible dans le futur) qui, bien qu - Pioneer DEH-P6300 | Owner's Manual - Page 70
sur le côté droit de l'affichage diffèrent selon le modèle. * DEH-P6300: * DEH-P7300: Niveau de volume Niveau de l'effet ASL (quand la fonction ASL est en service). (Reportez-vous à la page 40.) 4. Mettez la source hors service. EQ SOURCE DISP 1 2 3 4 5 6 Appuyez pendant 1 seconde 11 - Pioneer DEH-P6300 | Owner's Manual - Page 71
appuyant plus ou moins longuement sur les touches 2/3. Accord manuel (pas à pas) Accord automatique (automatiquement) Pression égale FUNC AUDIO Fréquence Mise en mémoire des fréquences • Les mémoires associées aux touches 1 à 6 permettent de conserver les fréquences des stations. Gamme FM 1 - Pioneer DEH-P6300 | Owner's Manual - Page 72
utilisez uniquement le mode de lecture B quand un tuner DAB (par exemple le GEX-P700DAB) est connecté. Remarque: • Utilisez cette commande pour ouvrir la face avant afin de mettre en place ou d'éjecter un CD. (L'illustration de droite montre la face avant quand elle est ouverte.) Numéro de plage - Pioneer DEH-P6300 | Owner's Manual - Page 73
face avant est ouverte. Remarque: • Il n'est pas nécessaire de retirer le disque pour mettre le lecteur de CD en service, ou hors service. (Reportez-vous à la page 10.) • Ne conservez pas le disque partiellement introduit dans le lecteur (après son éjection) car - Pioneer DEH-P6300 | Owner's Manual - Page 74
ou chargeur 12 disques) • Vous pouvez choisir un disque directement grâce aux touches 1 à 6. Il vous suffit pour cela d'appuyer sur la touche Pendant ce temps, l'indication "Ready" s'affiche. • Si le lecteur de CD à chargeur ne fonctionne pas normalement, un message d'erreur tel que 15 - Pioneer DEH-P6300 | Owner's Manual - Page 75
à la page 33), est affiché, ces témoins permettent également de savoir aisément quelles touches 5/∞/2/3 vous pouvez utiliser pour mettre en service, ou hors service, une source, répéter une plage musicale et effectuer d'autres opérations. Les témoins et les touches correspondantes sont indiqués ci - Pioneer DEH-P6300 | Owner's Manual - Page 76
Opérations de base 2. Procédez aux réglages requis (par exemple, la répétition de la lecture). SELECT SFEQ 3 4 5 6 E B La touche utilisée et l'opération réalisée, sont alors indiquées sur l'appareil par - Pioneer DEH-P6300 | Owner's Manual - Page 77
) Examen rapide du disque (T.SCAN) Pause (PAUSE) 7 Lecteur de CD à chargeur Fonction (Indication affichée) Répétition de la lecture (PMODE) réglages détaillés Le menu des réglages détaillés permet d'avoir accès aux diverses fonctions propres à chaque source. 1. Affichez le menu des réglages dé - Pioneer DEH-P6300 | Owner's Manual - Page 78
glages détaillés Le tableau qui suit indique les fonctions correspondant aux diverses sources du menu des réglages détaillés. Ce tableau Le syntoniseur ne possède pas de menu des réglages détaillés. 7 Lecteur de CD intégré Fonction (Indication affichée) Frappe du titre d'un disque (TITLE) Touche - Pioneer DEH-P6300 | Owner's Manual - Page 79
. 1. Appuyez sur la touche FUNCTION puis choisissez le mode de BSM (BSM) grâce au menu des fonctions. 2. Mettez la mémoire des meilleurs stations en service au moyen de la touche 5. Les fréquences des stations dont le signal reçu par le syntoniseur est puissant sont sauvegardées par les mémoires - Pioneer DEH-P6300 | Owner's Manual - Page 80
CD intégré Répétition de la lecture (RPT) Dans le cas présent, la répétition de la lecture concerne une seule plage musicale. 1. Appuyez sur la touche FUNCTION puis choisissez le mode de répétition (RPT) grâce au menu des fonctions. 2. Mettez la répétition de la lecture en service, ou hors service - Pioneer DEH-P6300 | Owner's Manual - Page 81
la pause en service, ou hors service, au moyen des touches 5/∞. Remarque: • Vous pouvez aussi mettre en/hors service la fonction de pause d'un nouveau disque écraseront le plus ancien titre. • Si l'installation comporte un lecteur de CD à chargeur, le nombre de disques que vous pouvez titrer est - Pioneer DEH-P6300 | Owner's Manual - Page 82
de la lecture répétée parmi ceux mentionnés ci-dessus au paragraphe "Répétition de la lecture", mettez en service la foncion de lecture au hasard du lecteur de CD à chargeur. Indication affichée D.RANDOM RANDOM Possibilité de lecture Répétition d'un disque Répétition des disques d'un chargeur - Pioneer DEH-P6300 | Owner's Manual - Page 83
disques de tous les chargeurs, le lecteur s'intéresse aux 10 premières secondes de la première plage 2. Mettez la lecture d'examen rapide des disques en service au moyen de la touche 5. Après avoir choisi examen rapide des disques que contient le lecteur de CD à chargeur. 3. Lorsque se présente la - Pioneer DEH-P6300 | Owner's Manual - Page 84
ITS (Programmation en temps réel) Lorsque l'installation comporte un lecteur de CD à chargeur, la fonction ITS vous permet de ITS (ITS-P) grâce au menu des fonctions. 2. Mettez la lecture ITS en service, ou hors service, au moyen des touches 5/∞. Après avoir choisi le champ de la lecture répétée - Pioneer DEH-P6300 | Owner's Manual - Page 85
ENGLISH FRANÇAIS DEUTSCH Pour effacer un numéro de plage musicale 1. Pendant la lecture ITS, choisissez la plage musicale qui ne doit plus faire partie du programme. 2. Grâce au menu des réglages détaillés, choisissez le mode de programmation en temps réel (ITS). (Reportez-vous à la page 18.) 3. - Pioneer DEH-P6300 | Owner's Manual - Page 86
d'un titre de disque (TITLE). (Reportez-vous à la page 18.) Remarque: • Si vous écoutez un CD TEXT sur un lecteur de CD à chargeur compatible CD TEXT, vous ne pouvez pas faire usage de ce mode. • Un CD TEXT est un disque compact qui porte en outre des informations alphanumériques telles que le titre - Pioneer DEH-P6300 | Owner's Manual - Page 87
(T.LIST) Procédez de la manière indiquée ci-dessous pour écouter un disque d'un lecteur de CD à chargeur dont vous avez tapé le titre, ou un disque CD TEXT sur un lecteur compatible CD TEXT. 1. Appuyez sur la touche FUNCTION puis choisissez le mode d'affichage de la liste des titres des disques - Pioneer DEH-P6300 | Owner's Manual - Page 88
de la reproduction d'un CD TEXT sur un lecteur de CD à chargeur compatible CD TEXT (Reportez-vous à uniquement le mode de lecture B quand un tuner DAB (par exemple le GEX-P700DAB) est connecté. pour donner un son plus étoffé. Mise en/hors service de la fonction (COMP/DBE) 1. Appuyez sur la touche - Pioneer DEH-P6300 | Owner's Manual - Page 89
musicale = Nom de l'interprète de la plage musicale = Mode de lecture B (Durée de lecture et information DAB) Remarque: • Si certaines informations ne sont pas gravées sur le disque CD TEXT, "NO ~ " (par exemple "NO Track Title") s'affiche. • Vous utilisez uniquement le mode de lecture B quand un - Pioneer DEH-P6300 | Owner's Manual - Page 90
les graves et les aigus sont ajustés à votre goût. • Si vous changez le mode SFEQ, la fonction H.P.F. est mis automatiquement hors service. En met- tant en service la fonction H.P.F. après avoir choisi le mode SFEQ, vous pouvez utiliser de façon combinée la fonction H.P.F. et le mode SFEQ. 31 - Pioneer DEH-P6300 | Owner's Manual - Page 91
courbe d'égalisation" à la page 35.) 7 CUSTOM 1 Une courbe "CUSTOM 1" séparée peut être créée pour chaque source. (Le lecteur de CD intégré et le lecteur de CD à changeur sont réglés automatiquement sur le même réglage d'ajustement de courbe d'égalisation.) Si vous réalisez un ajustement quand une - Pioneer DEH-P6300 | Owner's Manual - Page 92
réglages sonores, choisissez le paramètre à régler. SELECT SFEQ 3 4 5 6 E B FUNC AUDIO Chaque pression change le mode ... 2. Procédez aux réglages requis. 3. Abandonnez le menu des réglages sonores. SELECT SFEQ 3 4 5 6 E B FUNC AUDIO Paramètres du menu des réglages sonores - Pioneer DEH-P6300 | Owner's Manual - Page 93
(Reportez-vous à la page 44.) • "Fad F/R 0" est la réglage convenable si l'installation ne comportant que 2 haut-parleurs. Réglage de la courbe d'égalisation (EQ Low/EQ Mid/EQ une courbe d'égalisation autre que "CUSTOM 2", la courbe "CUSTOM 1" set mise à jour. FRANÇAIS ITALIANO NEDERLANDS 34 - Pioneer DEH-P6300 | Owner's Manual - Page 94
le facteur Q qui convient au moyen des touches 5/∞. 2N += 1N += 1W += 2W Remarque: • Si vous modifiez une courbe d'égalisation autre que "CUSTOM 2", la courbe "CUSTOM 1" set mise à jour. 35 - Pioneer DEH-P6300 | Owner's Manual - Page 95
ENGLISH FRANÇAIS DEUTSCH Réglage des graves (Bass) Vous pouvez ajuster la fréquence de coupure et le niveau des graves. En mode "FRT1", l'ajustement des graves affecte uniquement la sortie arrière: la sortie avant ne peut pas être ajustée. 1. Appuyez sur la touche AUDIO puis choisissez le mode de - Pioneer DEH-P6300 | Owner's Manual - Page 96
défaut, la phase est normale (0 degré). Remarque: • Quand le réglage du contrôleur de l'enceinte d'extrêmes graves est sur "S.W Control:EXT", vous ne pouvez pas mettre en/hors service (ON/OFF) le mode de l'enceinte d'extrêmes graves. Dans ce cas, ce réglage n'est pas nécessaire. (Reportez-vous à la - Pioneer DEH-P6300 | Owner's Manual - Page 97
par les prises de sortie RCA. Remarque: • Quand le réglage du contrôleur de l'enceinte d'extrêmes graves n'est que "S.W Control:EXT", vous pouvez mettre en/hors service la sortie de ligne préamplifiée. (Reportez-vous à la page 44.) 1. Appuyez sur la touche AUDIO puis choisissez le mode de mise - Pioneer DEH-P6300 | Owner's Manual - Page 98
les enceintes avant ou arrière, mettez le filtre passe-haut en service. Seule les fréquences supérieures à celles de la plages choisies grâce au menu des réglages sonores 2. Mettez le filtre passe-haut en/hors service avec les touches 5/∞. 3. Choisissez la fréquence souhaitée avec les touches 2/3. - Pioneer DEH-P6300 | Owner's Manual - Page 99
CD à changeur est réglé automatique- ment sur la même valeur. • Le niveau d'écoute de l'appareil extérieur 1 et de l'appareil extérieur 2 est réglé automatiquement sur la même valeur. Fonction de réglage automatique du niveau d'écoute (ASL) (pour le DEH Mettez en service, ou hors service, le réglage - Pioneer DEH-P6300 | Owner's Manual - Page 100
de fonctionnement de base de ce produit. 1. Mettez la source hors service. 2. Affichez le menu des réglages initiaux. SELECT SFEQ 3 4 6 E B FUNC AUDIO Chaque pression change le mode ... 4. Procédez aux réglages requis. 5. Abandonnez le menu des réglages initiaux. SELECT SFEQ 3 - Pioneer DEH-P6300 | Owner's Manual - Page 101
régler les minutes, les secondes sont comptées à partir de 00. Réglage de la tonalité d'alarme (WARN) Vous pouvez mettre en service, ou hors service, la tonalité d'alarme. (Reportez-vous à la page 9, "Tonalité d'alarme".) 1. Appuyez sur la touche FUNCTION puis choisissez le mode de fonctionnement de - Pioneer DEH-P6300 | Owner's Manual - Page 102
. 1. Appuyez sur la touche FUNCTION puis choisissez le mode de fonctionnement de l'entrée auxiliaire (AUX) grâce au menu des réglages initiaux. 2. Mettez le réglage de l'entrée auxiliaire en service, ou hors service, au moyen des touches 5/∞. Réglage de la luminosité (DIM) Un réglage est prévu, qui - Pioneer DEH-P6300 | Owner's Manual - Page 103
:INT" ou l'auxiliaire "S.W Control:EXT". * Le DEH-P6300 ne possède pas de sortie arrière RCA. Remarque: • Même si vous changez ce réglage, aucun signal n'est présent en sortie aussi longtemps que vous n'avez pas mis en service la sortie sans équilibrage (reportez-vous à la page 38), ou la sortie - Pioneer DEH-P6300 | Owner's Manual - Page 104
touches 2/3. Utilisation, ou non, de la veille téléphonique (TEL 2) (pour le DEH-P7300) Si vous souhaitez utiliser le module téléphonique mains libres sans reproduire les autres sources de ce produit, mettez en service le mode de veille téléphonique. 1. Appuyez sur la touche FUNCTION puis choisissez - Pioneer DEH-P6300 | Owner's Manual - Page 105
l'affichage du fond (DISP) Vous pouvez choisir d'afficher, ou non, l'icône animé de la source pendant la lecture d'une source. Quand OFF (hors service) est choisi, l'icône animé de la source disparaît après que l'animation d'ouverture de la source est affiché. 1. Appuyez sur la touche FUNCTION puis - Pioneer DEH-P6300 | Owner's Manual - Page 106
en/hors service. Choix des indications affichées Vous pouvez changer l'affichage pour une image de film, etc. tout en écoutant la radio (par exemple affichage du DEH-P6300. • BGV signifie Back Ground Visual (fond visuel). • L'indicateur de niveau offre les indications ci-dessous: * DEH-P7300 Sur - Pioneer DEH-P6300 | Owner's Manual - Page 107
ENGLISH FRANÇAIS Utilisation de l'entrée AUX Un connecteur RCA IP-BUS tel que CD-RB20 ou CD-RB10 (vendus séparément) vous permet de relier cet appareil à un équipement doté d'une sortie RCA. Pour de plus amples détails concernant cette question, reportez- - Pioneer DEH-P6300 | Owner's Manual - Page 108
et de la sourdine/ atténuation audio téléphonique (pour le DEH-P7300) Fonction de sourdine/atténuation audio téléphonique Lorsque vous placez le mode des réglages initiaux, le mode de téléphone mains libres est mis en service. (Reportez-vous à la page 45.) Remarque: • Quand vous placez ou recevez un - Pioneer DEH-P6300 | Owner's Manual - Page 109
entre parenthèses s'éclairent. ** Si le support d'annonce choisi est reçu, l'icône " ", " " s'éclaire. 7 Indications d'état DAB Indication Etat EXTRA Le Service actuellement reçu comprend un Elément Secondaire de Service. TEXT Le Service actuellement reçu comprend une Etiquette dynamique - Pioneer DEH-P6300 | Owner's Manual - Page 110
ère. (Les pages de référence renvoient au mode d'emploi du syntoniseur DAB déporté.) • Changement d'étiquette (Reportez-vouz à la page 18.) sur une touche autre que la touche DISPLAY, l'affichage retourne aux témoins de l'étiquette de service. 7 Traitement des annonces à partir du menu des fonctions - Pioneer DEH-P6300 | Owner's Manual - Page 111
fonction. SELECT SFEQ 3 4 5 6 E B FUNC AUDIO 2. Choisissez un des types d'émission (PTY). SELECT SFEQ 3. Commandez la recherche PTY. SELECT SFEQ Le DAB reçoit le service PTY désiré. Remarque: • La méthode d'affichage PTY est étroite. La méthode large ne peut pas être choisie lors de - Pioneer DEH-P6300 | Owner's Manual - Page 112
Autres fonctions Fonction d'étiquette dynamique L'étiquette dynamique est une information textuelle relative à l'élément de service que vous êtes en train d'écouter. Vous avez la possibilité de faire défiler cette information. Remarque: • Le syntoniseur mémorise automatiquement les trois dernières - Pioneer DEH-P6300 | Owner's Manual - Page 113
ENGLISH FRANÇAIS 7 Mise en mémoire de l'étiquette dynamique 1. Procédez aux opérations 1 et 2 de "Affichage des étiquettes dynamiques" puis choisissez l'étiquette dynamique que vous désirez mettre en mémoire. 2. Appuyez, pendant 2 secondes, sur l'une des touches 1 à 6 - Pioneer DEH-P6300 | Owner's Manual - Page 114
CD porte sur la face étiquetée la marque la plus à droite, il s'agit d'un CD TEXT. Toutefois, certains disques CD • Lisez les précautions relatives aux disques CD-R avant d'utiliser de tels disques lecteur. En ce cas, mettez le lecteur hors service pendant environ une heure et si le disque est humide - Pioneer DEH-P6300 | Owner's Manual - Page 115
lecture d'un CD, un message d'erreur s'affiche. Pour déterminer la cause de l'anomalie, reportez-vous au tableau qui suit puis procédez aux actions correctives suggérées. Si ces opérations ne permettent pas de résoudre le problème qui se pose à vous, prenez contact avec le distributeur PIONEER ou un - Pioneer DEH-P6300 | Owner's Manual - Page 116
amplification 4,0 V/100 Ω (DEH-P7300) Niveau maximum/impédance de sortie de l'étage de préamplification 2,2 V/1 kΩ (DEH-P6300) Egaliseur (Egaliseur paramétrique /octave Gain 12 dB Phase Normal ou inverse Lecteur de CD Système Compact Disc Digital Audio Disques utilisables Disques compacts - Pioneer DEH-P6300 | Owner's Manual - Page 117
ENGLISH FRANÇAIS DEUTSCH FRANÇAIS ITALIANO NEDERLANDS 58 - Pioneer DEH-P6300 | Owner's Manual - Page 118
- Pioneer DEH-P6300 | Owner's Manual - Page 119
- Pioneer DEH-P6300 | Owner's Manual - Page 120
Col. Del Valle Mexico, D.F. C.P. 03100 TEL: 5-688-52-90 Published by Pioneer Corporation. Copyright © 2000 by Pioneer Corporation. All rights reserved. Publication de Pioneer Corporation. Copyright © 2000 Pioneer Corporation. Tous droits de reproduction et de traduction réservés.
-
 1
1 -
 2
2 -
 3
3 -
 4
4 -
 5
5 -
 6
6 -
 7
7 -
8
-
9
-
10
-
11
-
12
-
13
-
14
-
15
-
16
-
17
-
18
-
19
-
20
-
21
-
22
-
23
-
24
-
25
-
26
-
27
-
28
-
29
-
30
-
31
-
32
-
33
-
34
-
35
-
36
-
37
-
38
-
39
-
40
-
41
-
42
-
43
-
44
-
45
-
46
-
47
-
48
-
49
-
50
-
51
-
52
-
53
-
54
-
55
-
56
-
57
-
58
-
59
-
60
-
61
-
62
-
63
-
64
-
65
-
66
-
67
-
68
-
69
-
70
-
71
-
72
-
73
-
74
-
75
-
76
-
77
-
78
-
79
-
80
-
81
-
82
-
83
-
84
-
85
-
86
-
87
-
88
-
89
-
90
-
91
-
92
-
93
-
94
-
95
-
96
-
97
-
98
-
99
-
100
-
101
-
102
-
103
-
104
-
105
-
106
-
107
-
108
-
109
-
110
-
111
-
112
-
113
-
114
-
115
-
116
-
117
-
118
-
119
-
120
 |
 |

Multi-CD/DAB control High power CD player
with FM/AM tuner
Syntoniseur FM/AM et lecteur de CD, “Puisance élevée”,
avec contrôleur pour lecteur de CD à chargeur/DAB
Operation Manual
DEH-P7300
DEH-P6300
Mode d’emploi
ENGLISH
FRANÇAIS
DEUTSCH
FRANÇAIS
ITALIANO
NEDERLANDS