Pioneer DJM-T1 Owner's Manual - Page 16
Turn the [MASTER LEVEL] control. - 2 channel traktor dj mixer
 |
View all Pioneer DJM-T1 manuals
Add to My Manuals
Save this manual to your list of manuals |
Page 16 highlights
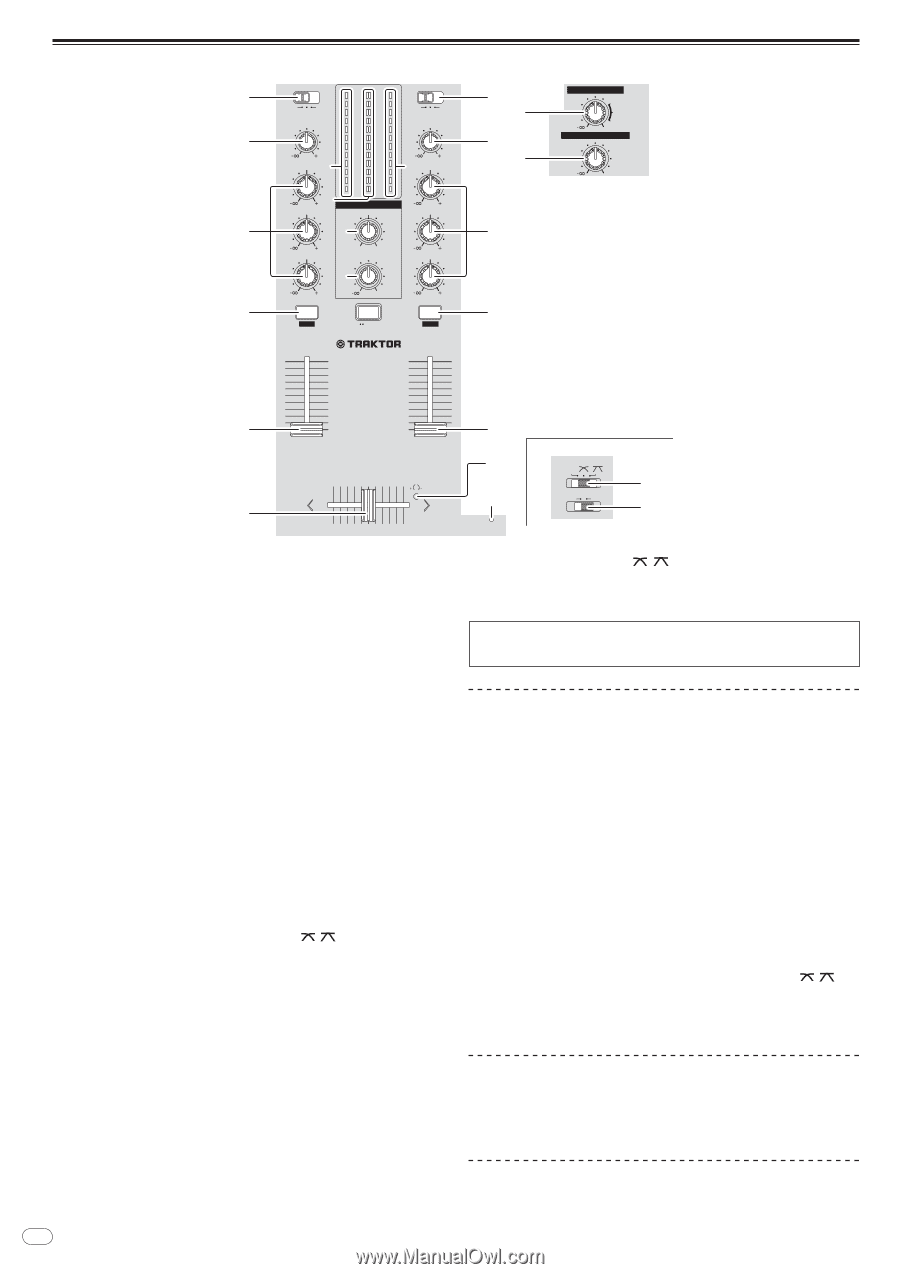
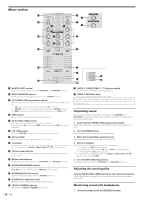
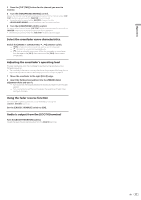
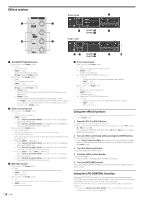
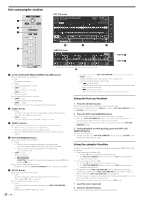
Mixer section 3 4 5 6 7 8 CD USB PHONO TRIM 9 9 HI a 6 MID 1 MASTER 2 OVER OVER 9 9 5 5 3 3 1 1 0 0 - 1 - 1 - 3 - 3 - 6 - 6 - 9 - 9 - 15 - 15 - 24 - 24 dB dB HEADPHONES MIXING CD USB PHONO TRIM 9 9 HI 6 MID b 6 LOW CUE MASTER LEVEL 6 LOW c 6 0 6 CUE TAP SHIFT LOCK CUE TAP 10 9 8 7 6 5 4 3 2 1 0 CH 1 2 CHANNEL TRAKTOR MIXER DJM -T1 10 9 8 7 6 5 4 3 2 1 0 CH 2 3 1 1 4 2 2 3 5 D SAMPLE LEVEL AU 6 CRO SAMP DE 7 d FEELING ADJ. e PLAY MO CROSS F. REVERSE MASTER 0 BOOTH MONITOR 0 CROSS F. CURVE THRU CROSS F. REVERSE ON OFF f g 1 MASTER LEVEL control Adjusts the audio level output from the [MASTER1] and [MASTER2] terminals. 2 BOOTH MONITOR control Adjusts the level of audio signals output from the [BOOTH] terminal. 3 CD, PHONO, USB input selector switch Select the input source of each channel from the components connected to this unit. - [CD]: Selects the DJ player connected to the [CD] terminals. - [PHONO]: Selects the analog player connected to the [PHONO] terminals. - [USB]: Selects the sound of the computer connected to the [USB] port. 4 TRIM control Adjusts the level of audio signals input in each channel. 5 EQ (HI, MID, LOW) controls These adjust the sound quality of the respective channels. These adjust the [HI] (high range), [MID] (middle range) and [LOW] (low range), respectively. 6 CUE (TAP) button Press the [CUE (TAP)] button for the channel you want to monitor. 7 Channel fader Adjusts the level of audio signals output in each channel. 8 Crossfader The sound of the respective channels is output according to the curve characteristics selected with the [CROSS F. CURVE (THRU, , )] selector switch. 9 Channel Level Indicator Displays the sound level of the respective channels before passing through the channel faders. a Master Level Indicator Displays the audio level output from the [MASTER1] and [MASTER2] terminals. b HEADPHONES MIXING control Adjusts the monitor volume balance between the sound of the channel whose [CUE (TAP)] button is pressed and the [MASTER] channel sound. c HEADPHONES LEVEL control Adjusts the audio level output from the [PHONES] terminal. d FEELING ADJ. adjustment hole This can be used to adjust the crossfader's operating load. e CROSS F. REVERSE indicator Lights when the [CROSS F. REVERSE] switch is on. 16 En f CROSS F. CURVE (THRU, , ) selector switch This switches the crossfader curve characteristics. g CROSS F. REVERSE switch Turns the crossfader reverse function on and off. Do not pull on the channel fader and crossfader knobs with excessive force. The knobs are not designed to be removed. Pulling the knobs strongly may result in damaging the unit. Outputting sound Set the volume of the power amplifiers connected to the [MASTER1] and [MASTER2] terminals to a suitable level. Note that loud sound will be produced if the volume is set too high. 1 Switch the [CD, PHONO, USB] input selector switch. Select the input source of each channel from the components connected to this unit. 2 Turn the [TRIM] control. Adjusts the level of audio signals input in each channel. 3 Move the channel fader away from you. Adjusts the level of audio signals output in each channel. 4 Set the crossfader. Switch the channel whose sound is output from the speakers. - Left edge: The [CH 1] sound is output. - Center position: The sound of [CH 1] and [CH 2] is mixed and output. - Right edge: The [CH 2] sound is output. ! This operation is not necessary when the [CROSS F. CURVE (THRU, , )] selector switch is set to [THRU]. 5 Turn the [MASTER LEVEL] control. Audio signals are output from the [MASTER1] and [MASTER2] terminals. Adjusting the sound quality Turn the [EQ (HI, MID, LOW)] controls for the respective channels. Refer to Specifications on page 30 for the range of sound that can be adjusted by each control. Monitoring sound with headphones 1 Connect headphones to the [PHONES] terminal.
-
 1
1 -
2
-
3
-
4
-
5
-
6
-
7
-
8
-
9
-
10
-
 11
11 -
 12
12 -
 13
13 -
 14
14 -
 15
15 -
 16
16 -
 17
17 -
 18
18 -
 19
19 -
 20
20 -
 21
21 -
22
-
23
-
24
-
25
-
26
-
27
-
28
-
29
-
30
-
31
-
32
 |
 |