Pioneer DJM-T1 Owner's Manual - Page 17
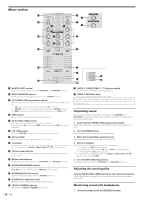
Booth - fader
 |
View all Pioneer DJM-T1 manuals
Add to My Manuals
Save this manual to your list of manuals |
Page 17 highlights
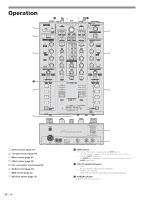
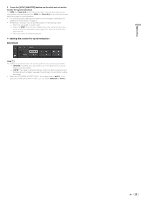
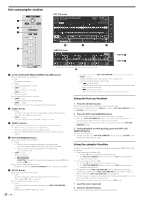
Operation 2 Press the [CUE (TAP)] button for the channel you want to monitor. 3 Turn the [HEADPHONES MIXING] control. Adjusts the monitor volume balance between the sound of the channel whose [CUE (TAP)] button is pressed and the [MASTER] channel sound. ! To monitor only the sound of the [MASTER] channel, turn the [HEADPHONES MIXING] control clockwise from the center position. 4 Turn the [HEADPHONES LEVEL] control. The sound of the channel whose [CUE (TAP)] button is pressed and the sound of the [MASTER] channel are mixed and output from the headphones. ! Monitoring is canceled when the [CUE (TAP)] button is pressed again. Select the crossfader curve characteristics. Switch the [CROSS F. CURVE (THRU, , )] selector switch. - [THRU]: Choose this when you do not want to use the crossfader. - [ ]: Set here for a curve that rises gradually. - [ ]: Sets an abruptly rising curve. (When the crossfader is moved away from the edge on the [CH 1] side, the sound of the [CH 2] side is output immediately.) Adjusting the crossfader's operating load The load (resistance) when the crossfader is operated can be adjusted using a flathead screwdriver. ! The crossfader's attenuation curve and the play at the two edges of the fader (the cut lag) can be adjusted. For details, see Changing this unit's settings on page 25. 1 Move the crossfader to the right ([CH 2]) edge. 2 Insert the flathead screwdriver into the [FEELING ADJ.] adjustment hole and turn it. - Turn clockwise: The load decreases (the resistance of fader movement gets weaker). - Turn counterclockwise: The load increases (the resistance of fader movement gets stronger). Using the fader reverse function The crossfader's operating direction can be reversed by turning the [CROSS F. REVERSE] switch on. Set the [CROSS F. REVERSE] switch to [ON]. Audio is output from the [BOOTH] terminal Turn the [BOOTH MONITOR] control. Adjusts the level of audio signals output from the [BOOTH] terminal. En 17
-
 1
1 -
2
-
3
-
4
-
5
-
6
-
7
-
8
-
9
-
10
-
11
-
 12
12 -
 13
13 -
 14
14 -
 15
15 -
 16
16 -
 17
17 -
 18
18 -
 19
19 -
 20
20 -
 21
21 -
 22
22 -
23
-
24
-
25
-
26
-
27
-
28
-
29
-
30
-
31
-
32
 |
 |
