Pioneer VSX-21 Operating Instructions - Page 26
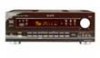
Front Panel
 |
UPC - 012562957067
View all Pioneer VSX-21 manuals
Add to My Manuals
Save this manual to your list of manuals |
Page 26 highlights
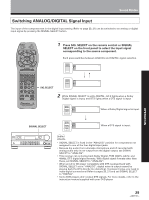
Names of Parts and Basic Operations Front Panel 1 2 3 4 56 7 8 9 0 AUDIO/VIDEO MULTI-CHANNEL RECEIVER STANDBY STANDBY/ON MPX CLASS MEMORY MODE STATION TUNING SELECT FREQUENCY / DTS DSP MODE Cinema Re - EQ SIGNAL SELECT MIDNIGHT DIGITAL NR MASTER VOLUME PHONES SPEAKERS LOUDNESS - BASS TREBLE + - + DIRECT TAPE 2 MONITOR R VCR 1 VCR 2 DVD/LD TV/SAT CD FM/AM MD/TAPE 1 VIDEO DVD 5.1CH DOWN UP S-VIDEO VIDEO INPUT VIDEO L AUDIO R TM * ( ) _ + 1 STANDBY/ON button Press to switch the receiver on or put in standby. 2 STANDBY indicator Lights when the receiver is in standby mode. (Please note that this receiver consumes a small amount of power (2.5 W) during the standby mode.) 3 CLASS button Press repeatedly to switch the preset station classes. (Refer to "Memorizing Frequency Tuned Stations" on page 38 and "Recalling the Memorizing Stations" on page 39) 4 MEMORY button Press to memorize a preset station. (Refer to "Memorizing Frequency Tuned Stations" on page 38) 5 MPX MODE button Press to switch between auto stereo and monaural ("MONO") reception of FM broadcasts. When the broadcast signal is weak, selecting "MONO" will improve the sound quality. 6 TUNING SELECT button Press to switch between STATION and FREQUENCY. 7 SPEAKERS button Press repeatedly to switch between A and B speaker systems as follows. 3 A 3 B 3 A+B 3 OFF 8 LOUDNESS button Switches the loudness on or off. Use to raise the level of the bass and treble so they can be more easily heard when listening at low volumes. 26 9 BASS (+/-) button Press to adjust low frequencies in the range of ±6. 0 Display (Refer to page 24) - TREBLE (+/-) button Used to adjust high frequencies in the range of ±6. = DIRECT button Switches direct playback on or off. Use to bypass the receiver's tone control circuitry or level control for higher fidelity to the program source. When DIRECT is ON, Dolby, DSP, LOUDNESS, DIGITAL NR and MIDNIGHT mode are automatically turned OFF. ~ Remote sensor Point the remote control toward the remote sensor to operate the receiver. ! /DTS button Press repeatedly to select the standard Dolby/DTS mode and the ADVANCED THEATER modes. (Refer to page 30, 32) @ SIGNAL SELECT button Use to select input signals for the digital components. First press DVD/LD, TV/SAT, MD/TAPE 1, CD or VCR 1 ((, Function buttons) to select the component, then press SIGNAL SELECT repeatedly to select one of the following: ANALOG : Selects the analog (R and L) audio signals. DIGITAL : Selects the digital audio signals. This receiver automatically detects and displays the format of the signal being input. AC-3 lights when Dolby Digital signals are input, and DTS lights when DTS signals are input. (AC-3 and DTS decoding is switched automatically.)
-
 1
1 -
2
-
3
-
4
-
5
-
6
-
7
-
8
-
9
-
10
-
11
-
12
-
13
-
14
-
15
-
16
-
17
-
18
-
19
-
20
-
 21
21 -
 22
22 -
 23
23 -
 24
24 -
 25
25 -
 26
26 -
 27
27 -
 28
28 -
 29
29 -
 30
30 -
 31
31 -
32
-
33
-
34
-
35
-
36
-
37
-
38
-
39
-
40
-
41
-
42
-
43
-
44
-
45
-
46
-
47
-
48
-
49
-
50
-
51
-
52
-
53
-
54
-
55
-
56
-
57
-
58
-
59
-
60
 |
 |
