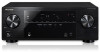
Pioneer VSX-522-K Owner's Manual
Pioneer VSX-522-K Manual
 |
View all Pioneer VSX-522-K manuals
Add to My Manuals
Save this manual to your list of manuals |
Pioneer VSX-522-K manual content summary:
- Pioneer VSX-522-K | Owner's Manual - Page 1
. • Receive free tips, updates and service bulletins on your new product • Improve product development Your input helps us continue to design products that meet your needs. • Receive a free Pioneer newsletter Registered customers can opt in to receive a monthly newsletter. Operating Instructions - Pioneer VSX-522-K | Owner's Manual - Page 2
the user to the presence of important operating and maintenance (servicing) instructions in the user is encouraged to try to correct the interference by one or more of the following measures: - Reorient or relocate the receiving antenna. - Increase the separation between the equipment and receiver - Pioneer VSX-522-K | Owner's Manual - Page 3
with the manufacturer's instructions. 8) Do one fitted. Replacement and mounting of an AC plug on the power supply cord of this unit should be performed only by qualified service MODEL NUMBER AND SERIAL NUMBER OF THIS EQUIPMENT ARE ON THE REAR OR BOTTOM. RECORD THESE NUMBERS ON YOUR ENCLOSED WARRANTY - Pioneer VSX-522-K | Owner's Manual - Page 4
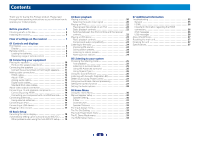
the Home Menu 30 Manual speaker setup 30 Speaker Setting 30 X.Over 31 Channel Level 31 Speaker Distance 32 The Input Assign menu 32 The Pre Out Setting 33 The Auto Power Down menu 33 The FL Demo Mode menu 33 The HDMI Setup menu 33 07 Additional information Troubleshooting 35 General 35 - Pioneer VSX-522-K | Owner's Manual - Page 5
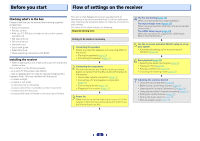
Flow of settings on the receiver Checking what's in the box Please check that you've received the following supplied accessories: • Setup microphone • Remote control • AAA size IEC R03 dry cell batteries (to confirm system operation) x2 • AM loop antenna • FM wire antenna • Warranty card • Quick - Pioneer VSX-522-K | Owner's Manual - Page 6
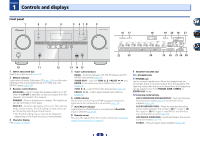
on (Acoustic Calibration EQ is automatically set to on after the Auto MCACC setup (page 18)). 3 Receiver control buttons SPEAKERS - Use to change the speaker system on or off. When the SP OFF is selected, no sound is output from the speakers connected to this receiver. DIMMER - Dims or brightens the - Pioneer VSX-522-K | Owner's Manual - Page 7
received AM/FM broadcast frequency. 19 Speaker indicators Shows if the speaker system is on or not (page 6). SPA means the speakers are switched on. SP means the speakers are switched off. 20 Sleep timer indicator Lights when the receiver is in sleep mode (page 8). 21 PRESET information or input - Pioneer VSX-522-K | Owner's Manual - Page 8
RETURN MUTE 11 15 16 1 2 3 DISP 17 12 4 5 6 CH 7 8 9 CH CLR 0 ENTER RECEIVER Controls and displays As for operating other devices, the remote control codes for the Pioneer products are preset. The settings cannot be changed. 1 SLEEP Press to change the amount of time before the - Pioneer VSX-522-K | Owner's Manual - Page 9
, no sound is output from the speakers connected to this receiver. DIMMER - Dims or brightens the display. The brightness can be controlled in four steps. 13 SOURCE Turns on or off the power of the Pioneer DVD/DVR units when BD, DVD, DVR/BDR or CD is selected using the input function buttons. 14 TV - Pioneer VSX-522-K | Owner's Manual - Page 10
up to a 7.1 ch surround system. • You can also connect one surround back speaker (SB) and enjoy a 6.1 ch surround system. To achieve the best possible surround sound, install your speakers as shown below. 5.1 channel surround system: 6.1 channel surround (Surround back) system: a R L C SW 120 SL - Pioneer VSX-522-K | Owner's Manual - Page 11
2 Connecting your equipment Connecting the speakers The receiver will work with just two stereo speakers (the front speakers in the diagram) but using at least three speakers is recommended, and a complete setup is best for surround sound. Make sure you connect the speaker on the right to the - Pioneer VSX-522-K | Owner's Manual - Page 12
proper direction. Note • Set the HDMI parameter in Setting the Audio options on page 28 to THRU (THROUGH) and set the input signal in Selecting the audio input signal on page 20 to HDMI, if you want to hear HDMI audio output from your TV (no sound will be heard from this receiver). • If the video - Pioneer VSX-522-K | Owner's Manual - Page 13
video cable for coaxial digital connections. outputs connection This receiver is not loaded with a video converter. When you use HDMI cables for connecting to the input device, the same cables should be used for connecting to the TV. The signals input from the analog (composite) video inputs - Pioneer VSX-522-K | Owner's Manual - Page 14
SAT/CBL IN GAME BD PRE OUT BD IN SUBWOOFER IN 1 IN 1 ASSIGNABLE (TV) (SAT/CBL) OPTICAL COAXIAL If the TV does not support the HDMI Audio Return Channel function, this connection is required to listen to the TV sound over the receiver. GAME IN MONITOR OUT SURR BACK/ L FRONT HEIGHT (Single - Pioneer VSX-522-K | Owner's Manual - Page 15
is connected to this receiver using an optical cable, first, switch to the DVD (DVD player) or SAT/CBL (set-top box), then press SIGNAL SEL to choose the audio signal O1 (OPTICAL1) (see Selecting the audio input signal on page 20 • You can only connect one component to the coaxial input terminal. If - Pioneer VSX-522-K | Owner's Manual - Page 16
as shown below. To improve reception and sound quality, connect external antennas (see Using connect an external FM antenna. For the best possible reception, suspend horizontally outdoors. Outdoor antenna antenna. 1 Push open the tabs, then insert one wire fully into each terminal, then release the - Pioneer VSX-522-K | Owner's Manual - Page 17
on the front panel of this receiver. • This receiver does not support a USB hub. • For instructions on playing the USB device, see Playing a USB device on page 23. AV RECEIVER VSX-522 HDMI iPod iPhone PRESET SOUND RETRIEVER ENTER USB 5 V 1A MCACC SETUP MIC iPod iPhone MASTER VOLUME Plugging - Pioneer VSX-522-K | Owner's Manual - Page 18
TV input to the input that connects this receiver to the TV through the corresponding composite cable. 3 Connect the microphone to the MCACC SETUP MIC jack on the front panel. Make sure there are no obstacles between the speakers and the microphone. AV RECEIVER VSX-522 HDMI iPod iPhone PRESET SOUND - Pioneer VSX-522-K | Owner's Manual - Page 19
MCACC setup will start automatically as shown. 1.Auto MCACC Now Analyzing Surround Analyzing Speaker System Speaker Distance Channel Level Acoustic Cal EQ Return A progress report is displayed on-screen while the receiver outputs more test tones to determine the optimum receiver settings for channel - Pioneer VSX-522-K | Owner's Manual - Page 20
system components and receiver. Start by switching on the playback component (for example a DVD player), your TV and subwoofer (if you have one), then the receiver (press RECEIVER). • Make sure the setup microphone is disconnected. 2 Switch the TV input to the input that connects this receiver - Pioneer VSX-522-K | Owner's Manual - Page 21
4 Basic playback • When digital input (optical or coaxial) is selected, this receiver can only play back Dolby Digital (page 13) and set the signal input to C1/O1 (digital). • Some DVD players don't output DTS signals. For more details, refer to the instruction manual supplied with your DVD player - Pioneer VSX-522-K | Owner's Manual - Page 22
or materials the user is legally permitted to reproduce. • Features such as the equalizer cannot be controlled using this receiver, and we recommend switching the equalizer off before connecting. 1 Switch on the receiver and your TV. See Connecting an iPod on page 17. 2 Switch the TV input so that - Pioneer VSX-522-K | Owner's Manual - Page 23
on page 17. 2 Switch the TV input so that it connects to the receiver. • Switch the TV input to the input that connects this receiver to the TV through the corresponding composite cable. 3 Press iPod/USB on the remote control to switch the receiver to the iPod/USB input. Loading appears in the OSD - Pioneer VSX-522-K | Owner's Manual - Page 24
manual one step at a time, press TUNE High speed tuning Press and hold TUNE / for high speed tuning. Release the button at the frequency you want. Improving FM sound If the TUNE or ST indicators don't light when tuning to an FM station because the signal is weak, set the receiver remote control - Pioneer VSX-522-K | Owner's Manual - Page 25
below for more on these decoding formats). Listening in surround sound ALC/ STANDARD ALC/ STANDARD SURR Using this receiver, you can listen to any source in surround sound. However, the options available will depend on your speaker setup and the type of source you're listening to. • If the - Pioneer VSX-522-K | Owner's Manual - Page 26
are heard according to the settings made in the Manual SP Setup (speaker setting, channel level, speaker distance), as well as with dual mono settings. You will hear sources according to the number of channels in the signal. Phase Control, Acoustic Calibration EQ, Sound Delay, Auto Delay, LFE - Pioneer VSX-522-K | Owner's Manual - Page 27
is effective when the speakers in the 7.1-channel surround system are set up as recommended in the example on page 10. • Depending on the positions of the speakers and the sound source, in some cases it may not be possible to achieve good results. In this case, set the setting to OFF. UP MIX - Pioneer VSX-522-K | Owner's Manual - Page 28
on a CD, for instance. When ON is selected, noise may be output during playback of non-PCM sources. Please select another input signal if this is a problem. Setting/What it does Option(s) DRC (Dynamic Range Control) Adjusts the level of dynamic range for movie soundtracks optimized for Dolby - Pioneer VSX-522-K | Owner's Manual - Page 29
right CINEMA) and left speakers) to 10 (center channel sent to the center speaker only). H.GAIN (Height Gain) Adjusts the output from the front height speaker when listening in DOLBY PLIIz HEIGHT mode. If set to H, the sound from the top will be more emphasized. L (Low) M (Mid) H (High) a. You - Pioneer VSX-522-K | Owner's Manual - Page 30
33). • HDMI Setup - Set the audio return channel function and set the HDMI input signal to Standby Through output or not during standby (see The HDMI Setup menu on page 33). Manual speaker setup This receiver allows you to make detailed settings to optimize the surround sound performance. You only - Pioneer VSX-522-K | Owner's Manual - Page 31
theater system. CAUTION • The test tones used in the Channel Level settings are output at high volume. 1 Select 'Manual SP Setup' from the Home Menu. 2 Select 'Channel Level' from the Manual SP Setup menu. 2.Manual SP Setup a.Speaker Setting b.X.Over c.Channel Level d.Speaker Distance 2c.Channel - Pioneer VSX-522-K | Owner's Manual - Page 32
the Manual SP Setup menu. Tip • You can change the channel levels at any time by press RECEIVER , then press CH SELECT and LEV +/- on the remote control. You can also press CH SELECT and use / to select the channel, and then use / to adjust the channel levels. Speaker Distance For good sound - Pioneer VSX-522-K | Owner's Manual - Page 33
2.Manual SP Setup 3.Input Assign 4.Pre Out Setting 5.Auto Power Down 6.FL Demo Mode 7.HDMI Setup 7.HDMI Setup ARC OFF Standby Through [ OFF ] Return Return 2 Choose the 'ARC' setting you want. When a TV supporting the HDMI Audio Return Channel function is connected to the receiver, the sound - Pioneer VSX-522-K | Owner's Manual - Page 34
when the ARC function is turned ON, causing power to turn ON and OFF and the input to switch from one to another. Since this unit does not guarantee synchronized operation based on the CEC function, we recommend that you turn OFF the HDMI CONTROL setting on the connected player. This unit may not - Pioneer VSX-522-K | Owner's Manual - Page 35
in the subwoofer output). After using the Auto MCACC setup, the speaker size setting (LARGE or SMALL) is incorrect. Low-frequency noise could have been caused by an air conditioner or motor. Switch off all appliances in the room and rerun the Auto MCACC setup. Can't operate the remote control - Pioneer VSX-522-K | Owner's Manual - Page 36
) for sending audio to the receiver. See the operating instructions for more on audio connections. Set the display volume to minimum when using this configuration. Note • Depending on the component, audio output may be limited to the number of channels available from the connected display unit - Pioneer VSX-522-K | Owner's Manual - Page 37
8.7 kg (19 lb 3 oz) Furnished Parts Microphone (for Auto MCACC setup 1 Remote control 1 Dry cell batteries (AAA size IEC R03 2 AM loop antenna 1 FM wire antenna 1 Warranty card 1 Quick start guide 1 Safety Brochure 1 These operating instructions (CD-ROM) Note • Specifications and the design - Pioneer VSX-522-K | Owner's Manual - Page 38
safe level BEFORE your hearing adapts. ESTABLISH A SAFE LEVEL: • Set your volume control at a low setting. • Slowly increase the sound until you can hear it comfortably and clearly, without distortion. • Once you have established a comfortable sound level, set the dial and leave it there. BE SURE TO - Pioneer VSX-522-K | Owner's Manual - Page 39
service location, to purchase replacement parts, operating instructions, or accessories, please go to one of following URLs : Pour enregistrer votre produit, trouver le service 479-4411 PIONEER EUROPE NV Haven 1087, Keetberglaan 1, B-9120 Melsele, Belgium TEL: 03/570.05.11 PIONEER ELECTRONICS
-
 1
1 -
 2
2 -
 3
3 -
 4
4 -
 5
5 -
 6
6 -
 7
7 -
8
-
9
-
10
-
11
-
12
-
13
-
14
-
15
-
16
-
17
-
18
-
19
-
20
-
21
-
22
-
23
-
24
-
25
-
26
-
27
-
28
-
29
-
30
-
31
-
32
-
33
-
34
-
35
-
36
-
37
-
38
-
39
 |
 |

Register your product on
http://www.pioneerelectronics.ca (Canada)
•
Protect your new investment
The details of your purchase will be on file for reference in the event of an insurance claim such as loss or theft.
•
Improve product development
Your input helps us continue to design products that meet your needs.
•
Receive a free Pioneer newsletter
Registered customers can opt in to receive a monthly newsletter.
•
Receive free tips, updates and service bulletins on your new product
AV Receiver
VSX-522
-K
Operating Instructions