Pioneer VSX-522-K Owner's Manual - Page 33
The Pre Out Setting, The Auto Power Down menu, The FL Demo Mode menu, The HDMI Setup menu - operating manual
 |
View all Pioneer VSX-522-K manuals
Add to My Manuals
Save this manual to your list of manuals |
Page 33 highlights
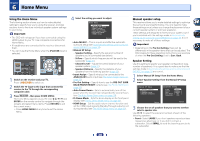
6 Home Menu The Pre Out Setting Specify either using the surround back speaker or the front height speaker connection with the PRE OUT SURR BACK/ FRONT HEIGHT outputs. An additional amplifier is required for the speaker connection. • Default setting: Surr. Back 1 Select 'Pre Out Setting' from the Home Menu. Home Menu 1.Auto MCACC 2.Manual SP Setup 3.Input Assign 4.Pre Out Setting 5.Auto Power Down 6.FL Demo Mode 7.HDMI Setup 4.Pre Out Setting Pre Out Surr. Back Return Return 2 Select which speaker to connect to the PRE OUT SURR BACK/FRONT HEIGHT outputs using Surr. Back - Connect the surround back speaker. • Height - Connect the front height speaker. 3 When you're finished, press RETURN. You return to the Home Menu. The Auto Power Down menu Set to automatically turn off the receiver after a specified time has passed (when the power has been on with no operation for several hours). • Default setting: OFF 1 Select 'Auto Power Down' from the Home Menu. Home Menu 1.Auto MCACC 2.Manual SP Setup 3.Input Assign 4.Pre Out Setting 5.Auto Power Down 6.FL Demo Mode 7.HDMI Setup 5.Auto Power Down OFF Return Return 2 Specify the amount of time to allow before the power is turned off (when there has been no operation). • You can select 2, 4 or 6 hours, or OFF (if no automatic shutoff is desired). 3 When you're finished, press RETURN. You return to the Home Menu. Important • If the Standby Through of the HDMI Setup is not set to OFF, the Auto Power Down setting will automatically be set to OFF and cannot be changed. The FL Demo Mode menu Set whether or not various demos are to be shown on the front panel display. 1 Select 'FL Demo Mode' from the Home Menu. Home Menu 1.Auto MCACC 2.Manual SP Setup 3.Input Assign 4.Pre Out Setting 5.Auto Power Down 6.FL Demo Mode 7.HDMI Setup 6.FL Demo Mode FL Demo ON Return Return 2 Choose ON or OFF for the demo display. 3 When you're finished, press RETURN. You return to the Home Menu. The HDMI Setup menu If your TV supports an audio return channel (ARC) function, connect your TV and this unit with an HDMI cable and the TV audio will be inputted into this unit via the HDMI terminal without the need for an audio cable to be connected. It is possible to transfer signals from an HDMI connected player to the TV even when this receiver's power is on standby. Important • Use a High Speed HDMI® Cable when using the ARC function. The ARC function may not operate properly with other HDMI cables. 1 Select 'HDMI Setup' from the Home Menu. Home Menu 1.Auto MCACC 2.Manual SP Setup 3.Input Assign 4.Pre Out Setting 5.Auto Power Down 6.FL Demo Mode 7.HDMI Setup 7.HDMI Setup ARC OFF Standby Through [ OFF ] Return Return 2 Choose the 'ARC' setting you want. When a TV supporting the HDMI Audio Return Channel function is connected to the receiver, the sound of the TV can be input via the HDMI terminal. • ON - The TV's sound is input via the HDMI terminal. • OFF - The TV's sound is input from the audio input terminals other than HDMI inputs. 3 Choose the 'Standby Through' setting you want. When the receiver is in standby, the HDMI input signal selected here will be output to the TV by HDMI. • LAST - The HDMI input signal selected previously will be output. • BD, DVD, SAT/CBL, GAME - The HDMI input signal selected here will be output. • OFF - Signal will not be output during standby. - If the Standby Through setting is not set to OFF, the power consumption during standby will increase. The Auto Power Down setting will also be automatically set to OFF. 33
-
 1
1 -
2
-
3
-
4
-
5
-
6
-
7
-
8
-
9
-
10
-
11
-
12
-
13
-
14
-
15
-
16
-
17
-
18
-
19
-
20
-
21
-
22
-
23
-
24
-
25
-
26
-
27
-
 28
28 -
 29
29 -
 30
30 -
 31
31 -
 32
32 -
 33
33 -
 34
34 -
 35
35 -
 36
36 -
 37
37 -
 38
38 -
39
 |
 |