Poulan 1400T User Manual - Page 15
General, Maintenance
 |
View all Poulan 1400T manuals
Add to My Manuals
Save this manual to your list of manuals |
Page 15 highlights
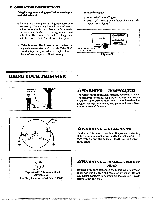
2. Installing Line on Spool To replace the Line on existing spool: 1).Follow "InstallingSpoolw/Line," steps"a-c." and remove any Line remaining on the spool. 2).Use a 40 foot length of Weed Eater .080"diameter trimmer Line. 3),Insert 1/16 to V8 inch of the end of the Line through the hole in the inner rim of the Spool. Figure 21. Allownomorethan 118inchofLinetoextendbeyond the rim toavoidinterferencewith thetappingaction. 4).Wrap the Line firmly and evenly onto Spool in a clockwise direction as shown by arrow on Spool. Figure 21. NOTE: The Line must be wrapped firmly and evenly for proper line feed. 5).Follow "Installing Spool w/Line, steps "d-h." b. If the Line breaks off or backs up in the Trimmer Head, follow "Installing Spool w/Line," steps "a-c." Pull slack in Line until the Line is tightly wound on Spool, leaving4-6 inches ofextended Line. Continue with steps "d-h." APPROXIMATELY 2 INCHESOF LINE CAN BE PULLED FROM THE TRIMMER HEAD EACH TIME THE TAP BUTTON IS PRESSED. • TAP RtTION Figure 20 VS" WRAP LINE ON SPOOL ASSHOWN BYARROW. Figure 21 GENERAL MAINTENANCE A. MAINTENANCE SAFETY I. Maintain thetoolaccordingto recommended procedures. Keep the trimmer line at the proper length. 2. Disconnect the spark plug before performing maintenance except for carburetor adjustments. 3. Makecarburetoradjustments with thedriveshaft housing supported to prevent the trimmer line from contacting any object. Hold the tool with your hand; do not use the optional shoulder strap for supper• 4. Keep others away when making carburetor adjustments. 5. Use only WEED EATER® flexible, non-metallic monofilament cutting line of the correct diameter. Never use wire, rope, string, etc. 6. Replacetrirrunerhead partsthatarecracked, chipped,or damaged in any way before using the tool. 7. Use only genuine WEED EATER® replacement parts as recommended by the manufacturer. 8. Inspect entire tool. Replace damaged parts. Check for fuel leaks. Make sure all fasteners are in place and securely fastened. 15
-
 1
1 -
2
-
3
-
4
-
5
-
6
-
7
-
8
-
9
-
 10
10 -
 11
11 -
 12
12 -
 13
13 -
 14
14 -
 15
15 -
 16
16 -
 17
17 -
 18
18 -
 19
19 -
 20
20
 |
 |
