Poulan 1400T User Manual - Page 18
Awarning, Preparation
 |
View all Poulan 1400T manuals
Add to My Manuals
Save this manual to your list of manuals |
Page 18 highlights
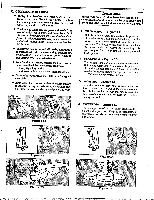
D. CARBURETOR ADJUSTMENTS AWARNING Make carburetor adjustments with the driveshaft housingsupported to prevent thetrimmer linefromcontactinganyobject.Hold thetool withyourhand; donot use the optional shoulder strap for support. AWARNING Keep others away when making carburetor adjustments. • Ifyou choosetoadjust thecarburetoryourself, it is recommended forbestresultstowait until you have run at least one full tank of fuel. Then, very carefully, follow the procedure below. • This is a complicated task and it is important to follow instructions in sequence as indicated. • Very small adjustments can affect engine performance. It is important to turn the screws a very small amount before making further adjustments. Each adjustment should be no more than the width of the slot in the adjusting screws. AWARNING The trimmer line will bespinningduringthis procedure. Wearyour protectiveequipmentand observe all safety instructions. 1. PREPARATION a. Use a fresh fuel mix. See "Fueling Your Engine?' b. Make sure the line extends to the length allowed by the line limiter to provide correct load on engine. c. Start the engine. Cut grass for 3 minutes to warm engine. Theenginemustbeat openninztemperature before carburetor adjustments can be performed correctly. d. Stopengineand removeairfilterby pulling it out with your fingers. Refer to "Specifications" for location. e. Turn Mixture Screw (Figure 31) clockwise ri► until fully closed, but do not overtighten to avoid damaging the needle seats. Open Mixture Screw one and one-eighth (1-1/8) turn counterclockwise . f. Turn Idle Speed Screw (Figure 31) clockwise rl► until it stops. Open Idle Speed Screw five (5) full turns counterclockwise Ir.. . E. AIR FILTER A dirty air filterdecreases the life and performanceofthe engine and increases fuel consumption. Clean the Air Filter: • Always after5 tanksof fuel or5hoursofoperation, whichever is less. • More frequently in dusty conditions. 18 2. Mixture Adjustment CAUTION: Do notoperateengineat fullthrottle for prolonged periods while making mixture screw adjustments as damage to the engine can occur. a. Support the drive shaft housing so that the trimmer head is off the ground and the line will not contact any object. tr. Start the engine and run it at full throttle. c. Turn the Mixture Screw slowly clockwise .-A until speed is reduced. Do not dwell at this position, butimmediately turn screw slowly counterclockwise r until the engine just begins to run roughly. Continue with "Idle Adjustment." 3. Idle Adjustment a. Allow engine to run at idle for about 30 seconds or until engine RPM stabilizes. b. Adjust the Idle Speed Screw until the engine idles without stalling. - Turn screw clockwise -S ifengine stalls. - Tian screw counterclockwise ilt-sse to slow engine down. 4.Check Acceleration Allow engine to idle, then squeeze trigger. Ifenginedoes not accelerate smoothly, readjust the Mixture Screw a small amount counterclockwise *wigs, until the engine accelerates smoothly. CAUTION: j If the engine does not operate accentingto theseinstructions afterrepeatingthe adjusting steps, do not use the tool. Take it to a qualified service dealer. 5.REINSTALLAIR FILTER Be sure filter is clean. See "Air Filter" for instructions. [CAUTION: Fitairfilterintothecornersof the housing to keep dirt€rom entering the engine and causing engine damage. 0 IDLE MIXTURE SPEED SCREW SCREW , 4-4 ptitVa$ .,1:ta AIR FILTER (removed) Figure 31 1. Pull the Air Filter from the engine with your fingers. For Air Filter location, see "Specifications?' 2. Wash in soap and water. CAUTION: Do not clean the air filter in gasoline or other flammable solvent to avoid creating a fire hazard. 3. Squeeze dry and replace. CAUTION: The air filter must be fitted into the corners of the housingto avoid engine damage.
-
 1
1 -
2
-
3
-
4
-
5
-
6
-
7
-
8
-
9
-
10
-
11
-
12
-
 13
13 -
 14
14 -
 15
15 -
 16
16 -
 17
17 -
 18
18 -
 19
19 -
 20
20
 |
 |
