Poulan 4400-4900-5400 User Manual - Page 3
G4ide.Bar., Adjusting
 |
View all Poulan 4400-4900-5400 manuals
Add to My Manuals
Save this manual to your list of manuals |
Page 3 highlights
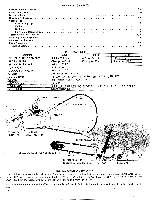
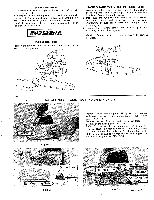
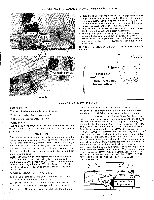
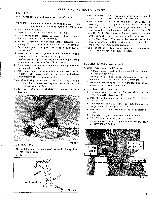
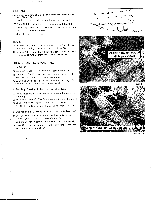
SAFETY FEATURES Your new chain saw is equipped with guard link safety chain to reduce kickback. A hand guard is provided to protect your hand from coming in contact with the cutting chain in the event your hand slips off the front handlebar or you lose control of the saw. Hand guards do not eliminate the possibility of injury as a result of kickback or loss of control. THIS SAW INTENDED FOR PROFESSIONAL USE ONLY. SPUR MOUNTING Position the Spur as shown over the holes and attach securely with the screws provided. HAND GUARD MOUNTING INSTRUCTIONS 1. Assemble the hand guard to the bend in the handlebar as shown. Be sure alignment pin on guard is inserted in hole in handlebar. Do not tighten the screws. 2. Make sure the hand guard is parallel to the handlebar. Alternately tighten each hand guard mounting screw maintaining an even gap between the hand guard and mounting cap. 3. Tighten the mounting screws until the hand guard and mounting cap are pulled together. Caution: Screws must be tightened evenly to prevent breakage. 0 It 1O 0 . INSTALLING THE GUIDE BAR AND SAFETY CHAIN 1. Remove the bar mounting nuts. Using the scrench packed with your saw, loosen the nuts by turning counterclock- wise. FIGURE 1. 4 2. Remove the bar clamp and outer guide bar plate. (Note position of the guide plates.) FIGURE 2. 3. Place "S" clip over the mounting studs and flush to the inner bar plate. Now mount the slotted end of the guide bar over the bar mounting studs and "S" clip and behind the clutch drum. Be sure to position the bar adjusting pin into 4 1, the hole in the guide bar. FIGURE 3. r • ttatil Figure 1 .;$ 4-1 Guide Plates Bar Mounting Nuts> Figure 2 I"S" Clip Bar Mounting Studs Clutch Drum G4ide.Bar. Adjusting in Hole Figure 3 (continued) 3
-
 1
1 -
 2
2 -
 3
3 -
 4
4 -
 5
5 -
 6
6 -
 7
7 -
 8
8 -
 9
9 -
10
-
11
-
12
-
13
 |
 |
