Poulan 4400-4900-5400 User Manual - Page 7
Poulan 4400-4900-5400 Manual
 |
View all Poulan 4400-4900-5400 manuals
Add to My Manuals
Save this manual to your list of manuals |
Page 7 highlights
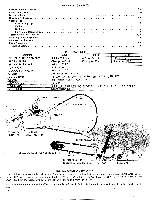
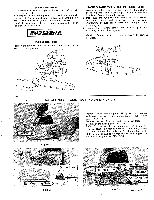
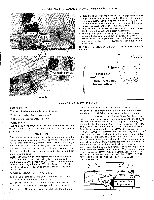
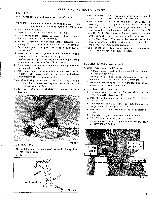
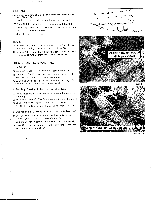
BOW INSTALLATION To install a bow guide to a standard guide bar model it is necessary to modify the bar clamp and saw body as shown below. 2 2t 6 Th e/ 1 9. Drill back corner of notch with a small drill before cutting out. (1 (Inside corner must be rounded to prevent cracking.) 4 0 9 8 Ref. Qty. No. Part No. Req. Description 1 4484 44126 *44127 2 51053 51132 * 51133 3 1325 4 1326 5 1615 6 625567 7 1725 8 1709 9 11276 22162 1. 13" Bow Guide (3/8 Pitch) 1 14" Bow Guide (3/8 Pitch) 1 14" Bow Guide (.404 Pitch) 1 P720-80 Chain (13" Bow 3/8 Pitch) 1 P720-87 Chain (14" Bow 3/8 Pitch) 1 P27-79 Chain (14" Bow .404 Pitch) 1 Spike - Left 1 Spike - Right 2 Locknut - % - 20 2 Screw - %-20 x 1% Hex Head 2 Locknut - 12-24 2 Screw - 12-24 x 5/8 Hex Head 1 Guard (13" Bow) 1 Guard (14" Bow) *NOTE: To use 14" bow guide and chain with .404 pitch, .062 gauge, it is necessary to install a .404 pitch sprocket which is included with the bow kit. BOW ASSEMBLY INSTRUCTIONS 1. Attach 1325 and 1326 spikes to bow guide with two (2) 625567 screws and two (2) 1615 locknuts. 2. Attach guard to bow guide with open side away from engine, using two (2) 1709 screws and two (2) 1725 locknuts. 3. Mount inner guide bar plate, bow guide, outer guide bar plate, chain, and bar clamp on saw making sure adjusting pin enters hole on bow guide. 4. Install mounting nuts finger tight, adjust chain tension, and tighten nuts. GER .44,c, Correct Entry Area Always begin cutting in the correct entry area of the how. Figure 13 LOOK OUT FOR KICKBACK 1. When the bow contacts an object in the danger area, (See Fig. 13) the bow is thrown upward with considerable force. THIS IS KICKBACK! 2. Hold the saw firmly with both hands. 3. Don't overreach. 4. Cut only at high engine speeds. 5. DO NOT REACH ABOVE WAIST HIGH. THE BOW IS TOO CLOSE TO YOUR FACE IN THIS POSITION. 6. Keep your chain sharp. A dull chain kicks back harder than a sharp chain. BE CAREFUL 1. DO NOT OPERATE WITHOUT THE SPIKES, GUARD, AND HAND GUARD PROPERLY ATTACHED. 2. Be sure the spikes are in place against the log before beginning the cut. (See Fig. 13) 3. Do not cut small limbs or brush with a bow. 4. Do not under buck with a bow. 5. Keep the chain tight and sharp.
-
 1
1 -
 2
2 -
 3
3 -
 4
4 -
 5
5 -
 6
6 -
 7
7 -
 8
8 -
 9
9 -
 10
10 -
 11
11 -
 12
12 -
13
 |
 |
