Poulan 4400-4900-5400 User Manual - Page 5
Felling, Direction
 |
View all Poulan 4400-4900-5400 manuals
Add to My Manuals
Save this manual to your list of manuals |
Page 5 highlights
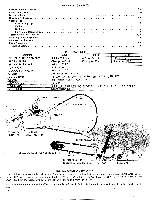
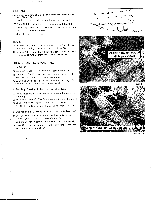
OPERATING INSTRUCTIONS (cont'd) STARTING Move bystanders and obstructions well out of reach! Check The Wind - If it is strong enough to move the top of the tree, DON'T CUT! Come back another day! WARNING: Chain will be moving when engine starts. Make sure chain is not touching anything before starting. 1. Pull Choke Knob out. 2. Move START-STOP Switch to START position. 3. Squeeze the throttle trigger, then press the throttle detent located on the left side of the handle. 4. Release Trigger but keep Throttle Detent depressed completely. This will open throttle slightly for easier starting. 5 Set saw on ground and place right foot in lower part of control handle. 6. Kneel on left knee, grasp Handlebar with left hand and Starter Handle with right hand. (See Figure 7). 7. Holding saw firmly, pull briskly on Starter Rope Handle until engine fires. (A single "pop" is sufficient). 8. After engine fires, push Choke Knob in and engine should run on next few pulls. Check The Lean - Tie a weight to a piece of string about 3 feet long. Hang the weight in your line of sight. The string is a good vertical line to help you judge the lean of the tree. The tree will try to fall the way it is leaning. (See Figure 8) Check The Weight Distribution - A tree is heavier on the side with the most limbs. It will try to fall on its heavy side. Clear The Work Area - You need a clean area all around the tree for good footing. Get everything out of the area where the tree will fall. People, pets, cars, etc. Find a Retreat Path - Know which way you are going when the tree starts to fall. Make sure it is clear. FELLING (Cutting down a tree) A Small Trees - Less than 8" across 9. After engine starts and runs a few seconds, give Throttle Trigger a light squeeze and Throttle Detent will release automatically, allowing engine to idle. Note: Overchoking engine will cause it to flood. Should engine flood, repeat starting instructions with Choke Knob pushed in until engine starts. 1. If there is doubt about the direction of fall, use "notch" method described in B. 2. Make a single felling cut on the side away from the direction of fall. Don't cut all the way through! 3. When the tree starts to fall, stop the saw, put the saw down and GET AWAY QUICKLY! 10. To stop engine move START-STOP Switch to STOP position. B Large Trees - 8" or larger across 1. The notch is very important. The tree wil l try to fall "into" the notch. (See Figure 9) 2. Make the bottom notch cut first, about 1/3 to 1/2 way into the tree. 3. Complete the notch with the slant cut. Remove the wedge of wood before going on. 4. The felling cut is next. Make it on the side opposite the notch. 5. It is made 2" higher than the bottom of the notch. 6. DO NOT try to cut through to the notch. 7. As the tree starts to fall, stop the saw, put the saw down and GET AWAY QUICKLY! CUTTING TIPS Figure 7 V Read the safety center spread frequently. Always keep your chain sharp. Plan Ahead is 2-• Felling Cut ymir Direction of Fall • t ee_ f Figure 8 Direction of Fall )0-
-
 1
1 -
 2
2 -
 3
3 -
 4
4 -
 5
5 -
 6
6 -
 7
7 -
 8
8 -
 9
9 -
 10
10 -
 11
11 -
12
-
13
 |
 |
