ProForm 250i Elliptical English Manual - Page 9
Tip: Avoid pinching the Main Wire 32.
 |
View all ProForm 250i Elliptical manuals
Add to My Manuals
Save this manual to your list of manuals |
Page 9 highlights
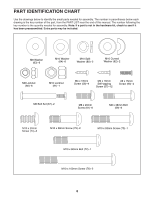
5. Tip: Avoid pinching the Main Wire (32). Slide the Upright (2) onto the Frame (1). 5 Attach the Upright (2) with an M10 x 53mm Screw (73), an M10 x 20mm Screw (74), two M10 Split Washers (80), and two M10 Curved Washers (62) as shown; do not fully tighten the Screws yet. Finish attaching the Upright (2) with an M10 x 60mm Bolt (72) and an M10 Locknut (91); do not fully tighten the Bolt yet. Make sure that the Locknut is in the hexagonal hole (B). Do not press the Accessory Tray (50) into place yet. Avoid pinching the Main Wire (32) 2 73 50 62 80 72 62 80 74 B 91 32 1 6. Insert the Upright Axle (18) into the Upright (2) and center it. 6 Using a plastic bag to keep your fingers clean, apply some of the included grease to both ends of the Upright Axle (18). Grease 2 18 Grease 9
-
 1
1 -
2
-
3
-
 4
4 -
 5
5 -
 6
6 -
 7
7 -
 8
8 -
 9
9 -
 10
10 -
 11
11 -
 12
12 -
 13
13 -
 14
14 -
15
-
16
-
17
-
18
-
19
-
20
-
21
-
22
-
23
-
24
-
25
-
26
-
27
-
28
-
29
-
30
-
31
-
32
 |
 |
