ProForm 380 F Elliptical English Manual - Page 9
Body Arm and the left Upper Body Leg 6
 |
View all ProForm 380 F Elliptical manuals
Add to My Manuals
Save this manual to your list of manuals |
Page 9 highlights
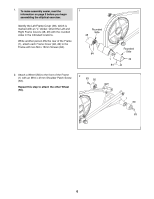
8. Attach the Left Pedal (12) to the left Pedal Arm (14) with three M10 x 70mm Patch Screws (75), three M10 Split Washers (78), and an M4 x 16mm Screw (84). Repeat this step on the right side of the elliptical exerciser. 8 12 14 78 78 75 84 14 13 9. Identify the Left Upper Body Arm (8), which is 9 marked with an "L" sticker. Orient the Left Upper Body Arm and the left Upper Body Leg (6) as shown; make sure that the hexagonal holes in the Left Upper Body Arm are in the indicated location. Slide the Left Upper Body Arm (8) onto the left Upper Body Leg (6). Attach the Left Upper Body Arm with two M6 x 38mm Button Bolts (76) and two M6 Locknuts (77); make sure that the Locknuts are inside the hexagonal holes. Repeat this step for the Right Upper Body Arm and the right Upper Body Leg (not shown). 8 77 76 Hexagonal Holes 6 9
-
 1
1 -
2
-
3
-
 4
4 -
 5
5 -
 6
6 -
 7
7 -
 8
8 -
 9
9 -
 10
10 -
 11
11 -
 12
12 -
 13
13 -
 14
14 -
15
-
16
-
17
-
18
-
19
-
20
-
21
-
22
-
23
-
24
 |
 |
