ProForm 625 Treadmill User Manual - Page 8
Pulse Bar 109. Next, insert the Wire Harness 34 into - belt
 |
View all ProForm 625 Treadmill manuals
Add to My Manuals
Save this manual to your list of manuals |
Page 8 highlights
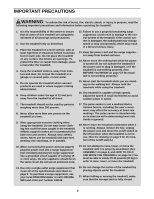
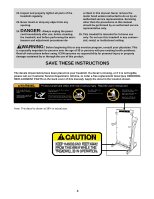
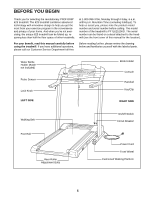
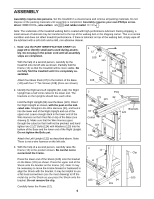
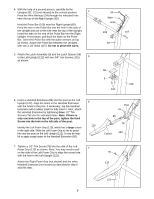
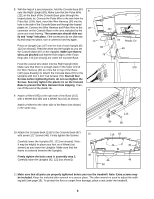
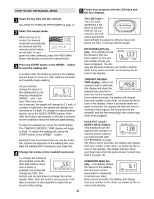
8. With the help of a second person, hold the Console Base (87) near the Right Upright (82). Make sure that the Pulse Wire (121) in the back of the Console Base goes through the looped plastic tie. Connect the Pulse Wire to the wire from the Pulse Bar (109). Next, insert the Wire Harness (34) into the hole in the side of the Console Base and through the looped plastic tie. Connect the Wire Harness and Pulse Wire to the connector on the Console Base in the area indicated by the arrow and inset drawing. The connectors should slide easily and "snap" into place. If the connectors do not slide easily and snap into place, turn a connector and try again. Press an Upright Cap (117) into the end of each Upright (82, 122 [not shown]). Feed the wires into the Upright as you set the Console Base (87) on the Uprights. Make sure that no wires are pinched and that the front edges of the Foam Grips (48, 110 [not shown]) are under the Console Base. Feed the excess wire down into the Right Upright (82). Make sure that there is enough slack in the lower end of the Wire Harness (34) so it lies flat on top of the Base (115) (see drawing 3). Attach the Console Base (87) to the Uprights with four 1 1/4" Tek Screws (79). Start all four Screws before tightening them; do not overtighten the Screws. Securely tighten the plastic tie on the Console Base to prevent the Wire Harness from slipping. Then, cut off the end of the plastic tie. 9. Attach a Wheel (95) to the right side of the Base (115) with a Wheel Bolt (86) and a Wheel Nut (15) as shown. Attach a Wheel to the other side of the Base (not shown) in the same way. 8 87 121 117 82 79 9 15 95 34 Plastic Tie 48 109 115 86 10. Attach the Console Back (116) to the Console Base (87) with seven 1/2" Screws (46). Firmly tighten the Screws. 10 Carefully lower the Uprights (82, 122 [not shown]). Note: It may be helpful to place your foot on a Wheel (not shown) as you lower the Uprights. Make sure that the frame is centered between the Uprights. 46 Firmly tighten the bolts used in assembly step 2. Carefully raise the Uprights (82, 122 [not shown]). 116 87 46 46 46 46 82 11. Make sure that all parts are properly tightened before you use the treadmill. Note: Extra screws may be included. Keep the included allen wrench in a secure place. The allen wrench is used to adjust the walking belt (see page 18). To protect the floor or carpet from damage, place a mat under the treadmill. 8
-
 1
1 -
2
-
 3
3 -
 4
4 -
 5
5 -
 6
6 -
 7
7 -
 8
8 -
 9
9 -
 10
10 -
 11
11 -
 12
12 -
 13
13 -
14
-
15
-
16
-
17
-
18
-
19
-
20
-
21
-
22
-
23
-
24
-
25
-
26
 |
 |
