RCA RTB1023 RTB1023 Product Manual - Page 8
Connecting to your TV - manual
 |
View all RCA RTB1023 manuals
Add to My Manuals
Save this manual to your list of manuals |
Page 8 highlights
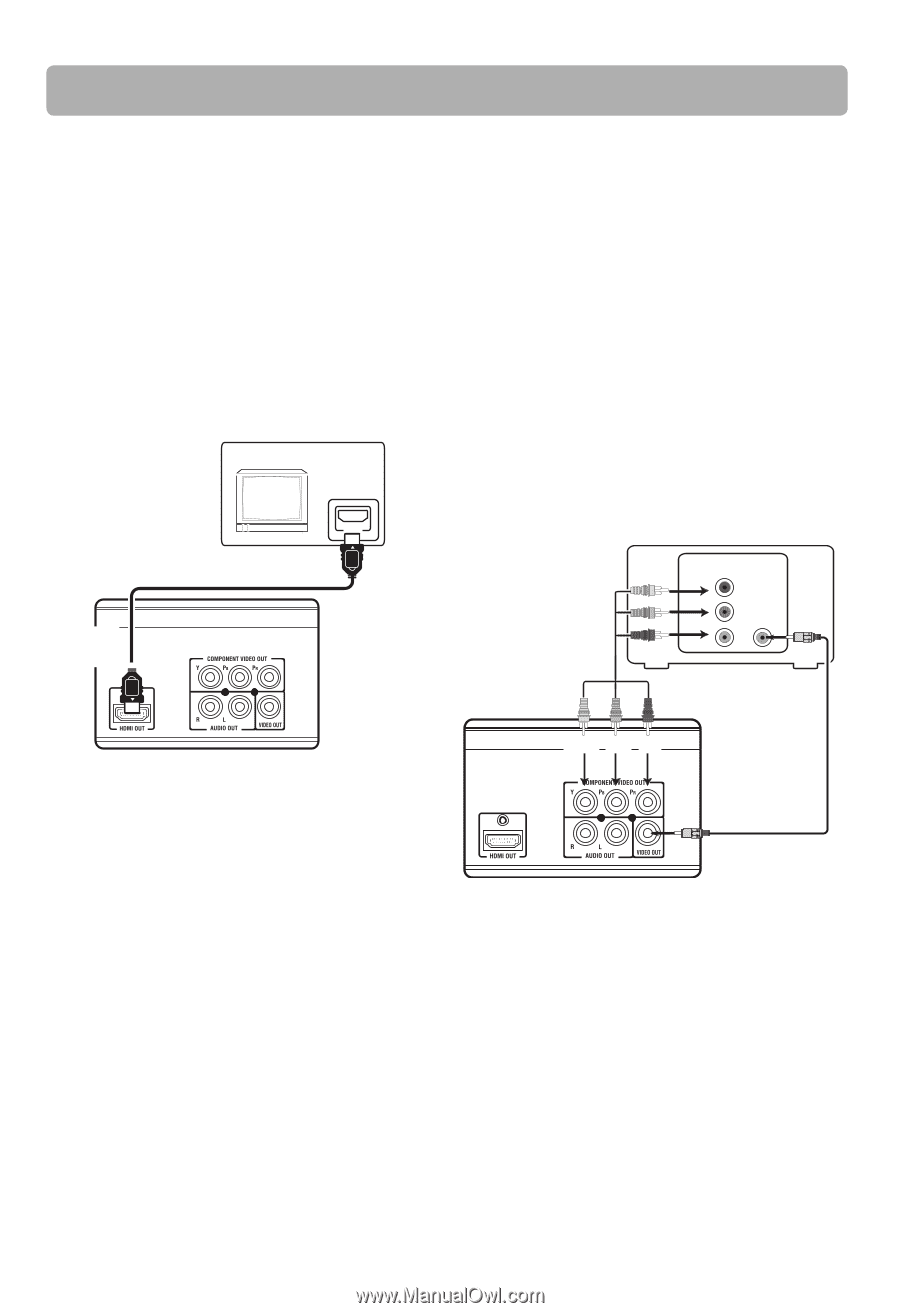
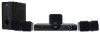
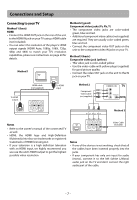
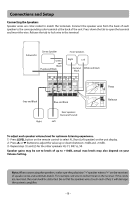
Connections and Setup Connecting to your TV Method 1 (best) HDMI • Connect the HDMI OUT jack on the rear of the unit to the HDMI IN jack on your TV using a HDMI cable (not included). • You can select the resolution of the player's HDMI output signals (HDMI Auto, 1080p, 1080i, 720p, 480p and 480i) to match your TV's resolution capabilities, please see instructions on page 20 for details. Method 1 TV To HDMI output HDMI cable (not supplied) HDMI To HDMI input Method 2 (good) Component video jacks (Pr, Pb, Y) • The component video jacks are color-coded green, blue and red. • Additional component video cables (not supplied) are required. They are usually color-coded green, blue and red. • Connect the component video OUT jacks on the unit to the component video IN jacks on your TV. Method 3 (basic) Composite video jack (yellow) • This video jack is color-coded yellow. • Use the video cable with yellow plugs (supplied) for good picture quality. • Connect the video OUT jack on the unit to the IN jack on your TV. Method 2 Component Video Cable (not supplied) VIDEO IN Y PB PR VIDEO IN TV Green Blue Red Method 3 Notes • Refer to the owner's manual of the connected TV as well. • HDMI, the HDMI logo and High-Definition Multimedia Interface are trademarks or registered trademarks of HDMI licensing LLC. • If your television is a high definition television with an HDMI input, we highly recommend you use use the unit's HDMI output to get the highest possible video resolution. Video Cable (included) Notes • If one of the devices is not working, check that all the cables have been inserted properly into the jacks. • If your component has only one input for audio (mono), connect it to the left (white L/Mono) audio jack on the TV and don't connect the right audio part of the cable. - 7 -
-
 1
1 -
2
-
 3
3 -
 4
4 -
 5
5 -
 6
6 -
 7
7 -
 8
8 -
 9
9 -
 10
10 -
 11
11 -
 12
12 -
 13
13 -
14
-
15
-
16
-
17
-
18
-
19
-
20
-
21
-
22
-
23
-
24
-
25
-
26
-
27
-
28
-
29
-
30
-
31
 |
 |