Radio Shack 15-2146 Owners Manual - Page 7
Using Channel Scan - owners manual
 |
UPC - 040293012991
View all Radio Shack 15-2146 manuals
Add to My Manuals
Save this manual to your list of manuals |
Page 7 highlights
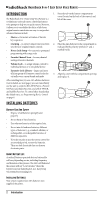
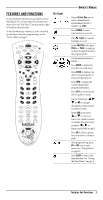
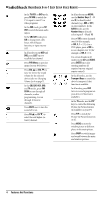
OWNER'S MANUAL VCR Code: Brand Name SEARCHING FOR YOUR CODE If your device does not respond to the remote control after trying all codes listed for your brand, or if your brand is not listed at all, try searching for your code: NOTE: Before performing a code search for a CD or DVD player or a VCR, turn on the device and insert the required media. 1. Press and hold SETUP until you hear the programming menu, then press 1. NOTE: If more than 15 seconds pass between key presses, the remote says "Goodbye" and exits programming. 2. Press 2. 3. At the prompt, press a device key (i.e., CBL/ SAT, AUX, TV, DVD, AUDIO, or VCR). 4. At the prompt, press a test key, such as POWER. NOTE: If your device or its original remote control does not have a Power key, select a different test function in this step (e.g., VOL+, Play, etc.). 5. At the prompt, aim the remote control at the device (e.g., TV) and press CH+ one or more times to try each code. Stop when a code performs the test function selected in step 4. If desired, use CH- to try a previous code. NOTE: In the search mode, the remote control will send IR codes from its library to the selected device, starting with the most popular code first. 6. To lock in the code, press SETUP once.The LED blinks twice and the remote plays "Success" and returns to the Device Programming options. 7. Repeat steps 2 through 6 to program another device or press and hold SETUP to exit programming. NOTE: Use the appropriate device key and test function key for the device you are searching for. CHECKING THE CODES If you have set up the remote control using the Searching For Your Code procedure (on page 7), you may need to find out which four-digit code is operating your equipment. To do so: 1. Press and hold SETUP until you hear the programming menu, then press 1. 2. Press 3. 3. At the prompt, press a device key (i.e., CBL/ SAT, AUX, TV, DVD, AUDIO, or VCR). The remote will state the code. 4. Write down the code digits in the appropriate code boxes on page 6. 5. Repeat steps 2 through 3 to hear another device's code or press and hold SETUP to exit programming. NOTE: Use the appropriate device key for the device you are noting. USING CHANNEL SCAN In the VCR, DVD, CBL/SAT, or TV mode, use the FAV SCAN key to start a 3-second scan of all channels. If programmed, use the FAV SCAN key to scan only your favorite channels (see "Programming Favorite Channel Scan" on page 7). 1. Press VCR, DVD, CBL/SAT, or TV to select that device. 2. Press FAV SCAN once.The LED will blink as each channel is changed. • If Favorite Channel Scan has been set up, scanning of favorite channels will start and cycle through stored channels for 3 minutes or until stopped by pressing any key. • If Favorite Channel Scan has not been set up, scanning will start with the current channel, then proceed to the next channel up and cycle through all channels for 3 minutes or until stopped by pressing any key. 3. To stop scanning channels at any time, press any key once. PROGRAMMING FAVORITE CHANNEL SCAN In the VCR, DVD, CBL/SAT, or TV mode, you can store a list of up to 10 favorite channels, in any order, that will be immediately scanned when you press FAV Scan (see "Using Channel Scan" on page 7). NOTE: You can only program Favorite Channels for one mode. After programming, if you press FAV Scan while in another mode, the remote control will start a normal channel scan instead (if applicable to the selected device). 1. Press and hold SETUP until you hear the programming menu, then press 2. NOTE: If more than 15 seconds pass between key presses, the remote says "Goodbye" and exits programming. 2. At the prompt, select a Favorite Channel Mode by pressing VCR, DVD, CBL/SAT, or TV. 3. At the prompt, use the Number Keys to enter a favorite channel number (e.g., 0 1 2), including +100 or Enter, if your device requires this. Using Channel Scan 7
-
 1
1 -
 2
2 -
 3
3 -
 4
4 -
 5
5 -
 6
6 -
 7
7 -
 8
8 -
 9
9 -
 10
10 -
 11
11 -
 12
12 -
13
-
14
-
15
-
16
-
17
-
18
-
19
-
20
-
21
-
22
-
23
-
24
-
25
-
26
-
27
-
28
-
29
-
30
-
31
-
32
-
33
-
34
-
35
-
36
-
37
-
38
-
39
-
40
-
41
-
42
-
43
 |
 |