Ricoh 4110N User Manual - Page 64
File Format: *PDF, JPEG, TIFF, JPEG_EXIF, Choice: *FTP, HTTP, CIFS
 |
UPC - 026649028038
View all Ricoh 4110N manuals
Add to My Manuals
Save this manual to your list of manuals |
Page 64 highlights
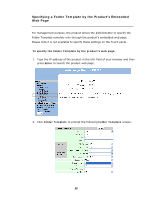
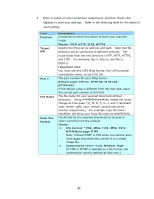
3. Enter or select an input parameter respectively, and then finally click Update to save your settings. Refer to the following table for the detail of each setting: Item Protocol Target URL Port # File Name Color File Format Description Choose the protocol you desire to store your scanned image. Choice: *FTP, HTTP, CIFS, HTTPS Specify the filing server address and path. Note that the directory will be varied due to different protocol. The route starts from the root directory in FTP, HTTP, HTTPS, and CIFS. For example, ftp://, http://, and file:\\, https://. Important note: You must use this CIFS filing format, file:\\IP\computer name\folder name, to set CIFS URL. The port number for your filing server. Default value: FTP:21, HTTP:80, CIFS:139, HTTPS:443 If the default value is different from the real case, input the correct port number in this field. The file name for your scanned document without extension. Using #Y#M#D#h#m#s#n makes file name change as time goes. (Y), M, D, h, m, s, and n represent year, month, date, hour, minute, second and series number respectively.) For example, type file name: test#D#n will bring your filing file name as test0500001 File format for the scanned documents to be sent in colors via filing from the product. Choice: 1. File Format: *PDF, JPEG, TIFF, JPEG_EXIF, MTIF(Multi-page TIFF) Note: Choose MTIFF or PDF when you need to scan multi-page document and convert it to a single image file. 2. Compression Level: *Low, Medium, High (If TIFF or MTIFF is selected as a file format, the compression Level is defined as Raw only.) 57
-
 1
1 -
2
-
3
-
4
-
5
-
6
-
7
-
8
-
9
-
10
-
11
-
12
-
13
-
14
-
15
-
16
-
17
-
18
-
19
-
20
-
21
-
22
-
23
-
24
-
25
-
26
-
27
-
28
-
29
-
30
-
31
-
32
-
33
-
34
-
35
-
36
-
37
-
38
-
39
-
40
-
41
-
42
-
43
-
44
-
45
-
46
-
47
-
48
-
49
-
50
-
51
-
52
-
53
-
54
-
55
-
56
-
57
-
58
-
 59
59 -
 60
60 -
 61
61 -
 62
62 -
 63
63 -
 64
64 -
 65
65 -
 66
66 -
 67
67 -
 68
68 -
 69
69 -
70
-
71
-
72
-
73
-
74
-
75
-
76
-
77
-
78
-
79
-
80
-
81
-
82
-
83
-
84
-
85
-
86
-
87
-
88
-
89
-
90
-
91
-
92
-
93
-
94
-
95
-
96
-
97
-
98
-
99
-
100
-
101
-
102
-
103
-
104
-
105
-
106
-
107
-
108
-
109
-
110
-
111
-
112
-
113
-
114
-
115
-
116
-
117
-
118
-
119
-
120
-
121
-
122
-
123
-
124
-
125
-
126
-
127
-
128
-
129
-
130
-
131
-
132
-
133
-
134
-
135
-
136
-
137
-
138
-
139
-
140
-
141
-
142
-
143
-
144
-
145
-
146
-
147
-
148
-
149
-
150
-
151
-
152
-
153
-
154
-
155
-
156
-
157
-
158
-
159
-
160
-
161
-
162
-
163
-
164
 |
 |
