Ricoh 4110N User Manual - Page 97
Faxing Your Scanned Document, Basic Operation
 |
UPC - 026649028038
View all Ricoh 4110N manuals
Add to My Manuals
Save this manual to your list of manuals |
Page 97 highlights
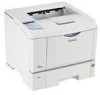
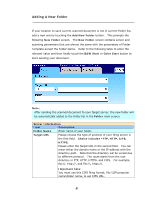
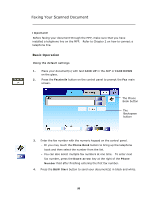
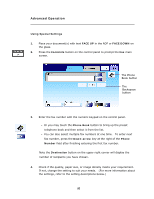
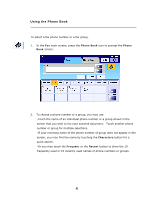
Faxing Your Scanned Document Important! Before faxing your document through the MFP, make sure that you have installed a telephone line on the MFP. Refer to Chapter 2 on how to connect a telephone line. Basic Operation Using the default settings 1. Place your document(s) with text FACE UP in the ADF or FACE DOWN on the glass. 2. Press the Facsimile button on the control panel to prompt the Fax main screen. The Phone Book button The Backspace button 3. Enter the fax number with the numeric keypad on the control panel. - Or you may touch the Phone Book button to bring up the telephone book and then select the number from the list. - You can also select multiple fax numbers at one time. To enter next fax number, press the Down-arrow key at the right of the Phone Number field after finishing entering the first fax number. 4. Press the B&W Start button to send your document(s) in black and white. 90
-
 1
1 -
2
-
3
-
4
-
5
-
6
-
7
-
8
-
9
-
10
-
11
-
12
-
13
-
14
-
15
-
16
-
17
-
18
-
19
-
20
-
21
-
22
-
23
-
24
-
25
-
26
-
27
-
28
-
29
-
30
-
31
-
32
-
33
-
34
-
35
-
36
-
37
-
38
-
39
-
40
-
41
-
42
-
43
-
44
-
45
-
46
-
47
-
48
-
49
-
50
-
51
-
52
-
53
-
54
-
55
-
56
-
57
-
58
-
59
-
60
-
61
-
62
-
63
-
64
-
65
-
66
-
67
-
68
-
69
-
70
-
71
-
72
-
73
-
74
-
75
-
76
-
77
-
78
-
79
-
80
-
81
-
82
-
83
-
84
-
85
-
86
-
87
-
88
-
89
-
90
-
91
-
 92
92 -
 93
93 -
 94
94 -
 95
95 -
 96
96 -
 97
97 -
 98
98 -
 99
99 -
 100
100 -
 101
101 -
 102
102 -
103
-
104
-
105
-
106
-
107
-
108
-
109
-
110
-
111
-
112
-
113
-
114
-
115
-
116
-
117
-
118
-
119
-
120
-
121
-
122
-
123
-
124
-
125
-
126
-
127
-
128
-
129
-
130
-
131
-
132
-
133
-
134
-
135
-
136
-
137
-
138
-
139
-
140
-
141
-
142
-
143
-
144
-
145
-
146
-
147
-
148
-
149
-
150
-
151
-
152
-
153
-
154
-
155
-
156
-
157
-
158
-
159
-
160
-
161
-
162
-
163
-
164
 |
 |