Samsung HLN437W User Manual (ENGLISH) - Page 29
Digital Natural Image engine, Selecting the Color Tone, Setting the Film Mode - no color
 |
UPC - 036725243712
View all Samsung HLN437W manuals
Add to My Manuals
Save this manual to your list of manuals |
Page 29 highlights
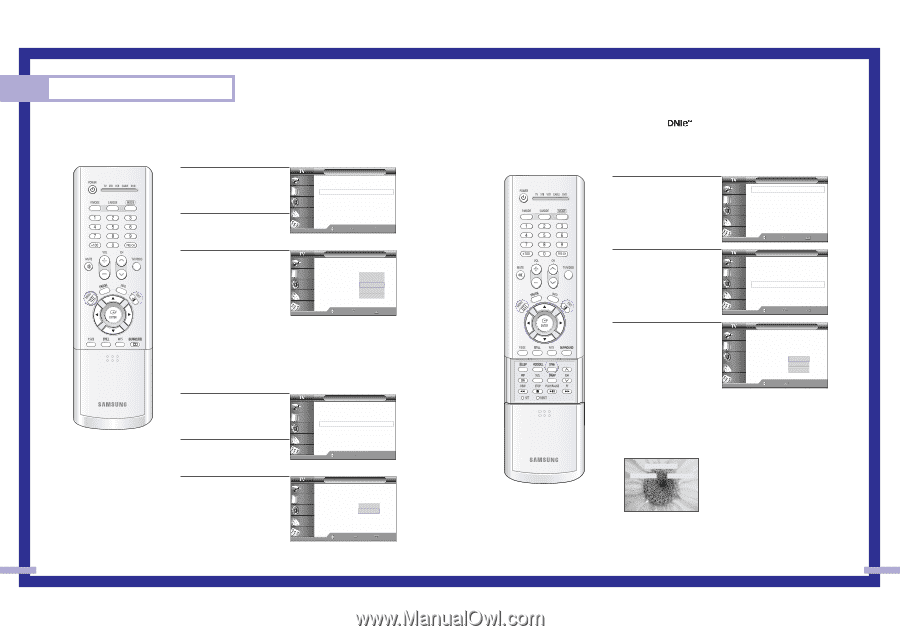
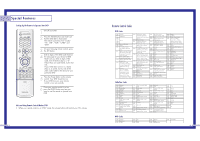
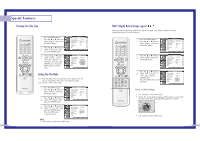
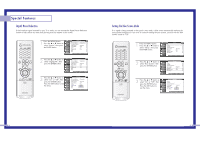
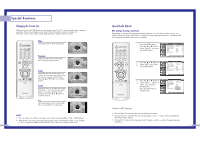
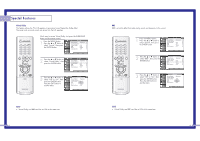
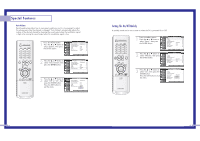
Special Features Selecting the Color Tone 1 Press the MENU button. Press the ... or † button to select "Picture", then press the ENTER button. 2 Press the ... or † button to select "Color Tone", then press the ENTER button. Input Picture Sound Channel Setup Picture Picture Mode : Dynamic √ Custom Picture √ Color Tone : Normal √ Film Mode : Off √ DNIe : On √ Digital NR : On √ Size √ PIP √ Move Enter Return 3 Press the ... or † button to select "Cool2", "Cool1", "Normal", "Warm1" or "Warm2", then press the ENTER button. Press the EXIT button to exit the menu. Input Picture Sound Channel Setup Picture Picture Mode Custom Picture Color Tone Film Mode DNIe Digital NR Size PIP : Dynamic : NoCromola2l : OffCool1 : ONnormal : OnWarm1 Warm2 Move Enter Return Setting the Film Mode On: Automatically senses and processes film signals from all sources and adjusts the picture for optimum quality. Off: Switches off the Film mode. 1 Press the MENU button. Press the ... or † button to select "Picture", then press the ENTER button. 2 Press the ... or † button to select "Film Mode", then press the ENTER button. Input Picture Sound Channel Setup Picture Picture Mode : Dynamic √ Custom Picture √ Color Tone : Normal √ Film Mode : Off √ DNIe : On √ Digital NR : On √ Size √ PIP √ Move Enter Return 3 Press the ... or † button to select "On" or "Off", then press the ENTER button. Press the EXIT button to exit the menu. Input Picture Sound Channel Setup NOTE • Film mode is supported in 480i only. Picture Picture Mode Custom Picture Color Tone Film Mode DNIe Digital NR Size PIP : Dynamic : Normal : OfOf ff : OnOn : On Move Enter Return 56 DNIeTM (Digital Natural Image engine) Samsung's New Technology enables an improved image with detail, contrast and white enhancement and 3D noise reduction. 1 Press the MENU button. Press the ... or † button to select "Picture", then press the ENTER button Input Picture Sound Channel Setup Picture Picture Mode : Dynamic √ Custom Picture √ Color Tone : Normal √ Film Mode : Off √ DNIe : On √ Digital NR : On √ Size √ PIP √ Move Enter Return 2 Press the ... or † button to select "DNIe", then press the ENTER button. Input Picture Sound Channel Setup Picture Picture Mode : Dynamic √ Custom Picture √ Color Tone : Normal √ Film Mode : Off √ DNIe : On √ Digital NR : On √ Size √ PIP √ Move Enter Return 3 Press the ... or † button to select "Off", "Demo" or "On", then press the ENTER button. Press the EXIT button to exit the menu. Input Picture Sound Channel Setup Picture Picture Mode Custom Picture Color Tone Film Mode DNIe Digital NR Size PIP : Dynamic : Normal : Off : OOnn : OOnff Demo Move Enter Return Guide to DNIe Settings • On: Switches on the DNIe mode. • Demo: The screen before applying DNIe appears on the right and the screen after applying DNIe appears on the left. DNIe DEMO DNIe ON DNIe OFF • Off: Switches off the DNIe mode. 57
-
 1
1 -
2
-
3
-
4
-
5
-
6
-
7
-
8
-
9
-
10
-
11
-
12
-
13
-
14
-
15
-
16
-
17
-
18
-
19
-
20
-
21
-
22
-
23
-
 24
24 -
 25
25 -
 26
26 -
 27
27 -
 28
28 -
 29
29 -
 30
30 -
 31
31 -
 32
32 -
 33
33 -
 34
34 -
35
-
36
-
37
-
38
-
39
-
40
-
41
-
42
-
43
-
44
-
45
-
46
-
47
-
48
 |
 |