Samsung MultiXpress SCX-8120 User Manual Ver.1.03 (English) - Page 107
Printing posters, Printing on both sides of the paper, Change the size of your document
 |
View all Samsung MultiXpress SCX-8120 manuals
Add to My Manuals
Save this manual to your list of manuals |
Page 107 highlights
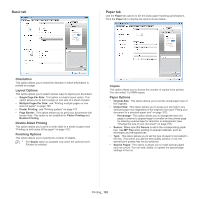
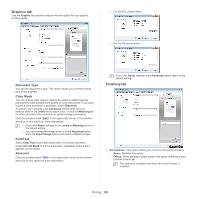
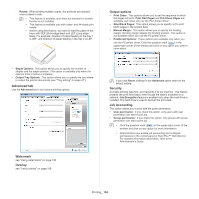
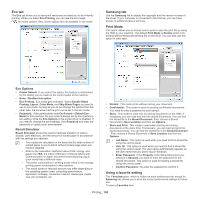
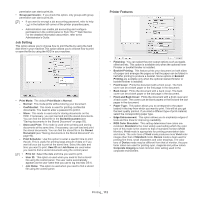
5. Select the page order from the Page Order drop-down list, if necessary. 6. Click the Paper tab, select the Original size, Source, and Type. 7. Click OK or Print until you exit the Print window. Printing posters This feature allows you to print a single-page document onto 4, 9, or 16 sheets of paper, for the purpose of pasting the sheets together to form one poster-size document. • Long Edge: This option is the conventional layout used in bookbinding. • Short Edge: This option is the conventional layout used in calendars. 1. To change the print settings from your software application, access Printing Preferences (see "Opening printing preferences" on page 101). 2. Click the Basic tab, select Poster Printing in the Type drop-down list. 3. Select the page layout you want. Specification of the page layout: 4. Select the Poster Overlap value. Specify Poster Overlap in millimeters or inches by selecting the radio button on the upper right of Basic tab to make it easier to paste the sheets together. • Reverse Double-Sided Printing: Check this option to reverse the print order when duplex printing. 4. Click the Paper tab, select the Original size, Source, and Type. 5. Click OK or Print until you exit the Print window. Change the size of your document You can change the size of a document to appear larger or smaller on the printed page by typing in a percentage for reduction or enlargement. 5. Click the Paper tab, select the Original size, Source, and Type. 6. Click OK or Print until you exit the Print window. 7. You can complete the poster by pasting the sheets together. Printing on both sides of the paper You can print on both sides of a paper; duplex. Before printing, decide how you want your document oriented. You can only use this feature with Letter-, Legal-, Oficio-, US Folio-, A4-, ISO B5-, JIS B5-, Statement-, Executive-, A5-, 8K-, 16K-, Ledger- or JIS B4-sized paper. Do not print on both sides of the special media, such as labels, envelopes, or thick paper. It may cause a paper jam or damage the machine. 1. To change the print settings from your software application, access Printing Preferences (see "Opening printing preferences" on page 101). 2. Click the Basic tab. 3. From the Double-Sided Printing section, select the binding option you want. • Printer Default: If you select this option, this feature is determined by the setting you've made on the control panel of the machine. This option is available only when you use the PCL printer driver. • None: Disables this feature. 1. To change the print settings from your software application, access Printing Preferences (see "Opening printing preferences" on page 101). 2. Click the Paper tab. 3. Select the actual paper size of the originals from the Original Size. 4. Enter the scaling rate in the Percentage input box. You can also click the up/down arrows to select the scaling rate. You cannot use this feature when you select a size of paper from the Output Size. 5. Select the Source and Type. 6. Click OK or Print until you exit the Print window. Fitting your document to a selected paper size This printer feature allows you to scale your print job to any selected paper size regardless of the document size. This option can be useful when you want to check fine details on a small document. Printing_ 107
-
 1
1 -
2
-
3
-
4
-
5
-
6
-
7
-
8
-
9
-
10
-
11
-
12
-
13
-
14
-
15
-
16
-
17
-
18
-
19
-
20
-
21
-
22
-
23
-
24
-
25
-
26
-
27
-
28
-
29
-
30
-
31
-
32
-
33
-
34
-
35
-
36
-
37
-
38
-
39
-
40
-
41
-
42
-
43
-
44
-
45
-
46
-
47
-
48
-
49
-
50
-
51
-
52
-
53
-
54
-
55
-
56
-
57
-
58
-
59
-
60
-
61
-
62
-
63
-
64
-
65
-
66
-
67
-
68
-
69
-
70
-
71
-
72
-
73
-
74
-
75
-
76
-
77
-
78
-
79
-
80
-
81
-
82
-
83
-
84
-
85
-
86
-
87
-
88
-
89
-
90
-
91
-
92
-
93
-
94
-
95
-
96
-
97
-
98
-
99
-
100
-
101
-
 102
102 -
 103
103 -
 104
104 -
 105
105 -
 106
106 -
 107
107 -
 108
108 -
 109
109 -
 110
110 -
 111
111 -
 112
112 -
113
-
114
-
115
-
116
-
117
-
118
-
119
-
120
-
121
-
122
-
123
-
124
-
125
-
126
-
127
-
128
-
129
-
130
-
131
-
132
-
133
-
134
-
135
-
136
-
137
-
138
-
139
-
140
-
141
-
142
-
143
-
144
-
145
-
146
-
147
-
148
-
149
-
150
-
151
-
152
-
153
-
154
-
155
-
156
-
157
-
158
-
159
-
160
-
161
-
162
-
163
-
164
-
165
-
166
-
167
-
168
-
169
-
170
-
171
-
172
-
173
-
174
-
175
-
176
-
177
-
178
 |
 |
