Samsung RS257BABB Service Guide - Page 5
Installation
 |
View all Samsung RS257BABB manuals
Add to My Manuals
Save this manual to your list of manuals |
Page 5 highlights
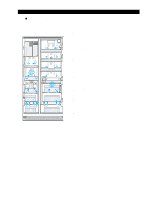
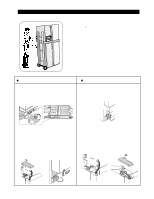
2. INSTALLATION 1) To protect refrigerator in movement Use less tphaadnd3e9d〃h,arnedmtoruvcekdaosorsshporwionr. If entrance width is to installation and reattach doors according to procedure below. 2) Remove all protective tape and pad in refrigerators. Connect water lines and power cord. Adjust the clearance between the doors. 3) Set the temperature control to the temperature and wait for an hour. The refrigerator should get slightly chilled and the motor runs smoothly. 4) Once the refrigerator temperature is sufficiently low You can store food in the refrigerator. After starting the refrigerator, it takes a few hours to reach the appropriate temperature. ● Removing Doors Open the freezer and refrigerator doors, and then take off the front leg cover assembly by turning the three screws counter-clockwise. Remove the screw from clamp disconnect, the water tube by pressing the coupler, and pulling the water tube away. ● Attaching Doors Insert the lower hinge in the bracket lower hinge. Attach the freezer door by inserting the hose in the lower side of the door into the hole in the lower hinge and pulling the hose down. With the door closed, remove the upper hinge cover using a screwdriver, and then disconnect the wires. Remove hinge screws and ground screw counter-clockwise, and take off the upper hinge. Take care removing the door to ensure that it does not fall on you. Remove the door from the lower hinge by carefully lifting the door so as not to damage the water tube. Remove the lower hinge from the lower hinge bracket by lifting the lower hinge. Insert the upper hinge shaft into the hole. After leveling between the upper hinge hole and the hole of the cabinet. Reattach hinge screws and screw in the clockwise direction. Connect the wires. Put the front part of the upper hinge cover on the front part of the upper hinge and reattach from the front part of the upper hinge cover first. 5
-
 1
1 -
 2
2 -
 3
3 -
 4
4 -
 5
5 -
 6
6 -
 7
7 -
 8
8 -
 9
9 -
 10
10 -
 11
11 -
12
-
13
-
14
-
15
-
16
-
17
-
18
-
19
-
20
-
21
-
22
-
23
-
24
-
25
-
26
-
27
-
28
-
29
-
30
-
31
-
32
-
33
-
34
-
35
-
36
-
37
-
38
-
39
-
40
-
41
-
42
-
43
-
44
-
45
-
46
-
47
-
48
-
49
-
50
-
51
-
52
-
53
-
54
-
55
-
56
-
57
-
58
-
59
-
60
-
61
-
62
-
63
-
64
-
65
-
66
 |
 |
