Samsung SMH1816B Installation Instructions - Page 14
C1. Adapting The Microwave, Blower For Outside Back, Exhaust - parts
 |
View all Samsung SMH1816B manuals
Add to My Manuals
Save this manual to your list of manuals |
Page 14 highlights
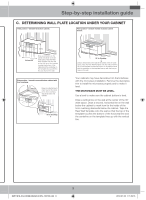
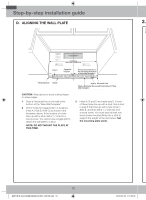
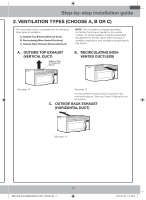
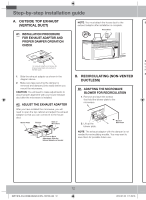
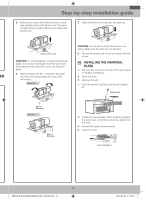
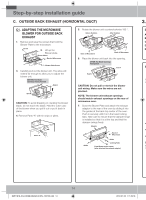
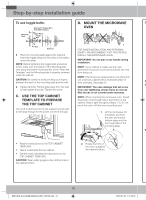
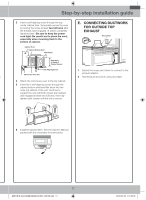
Step-by-step installation guide C. Outside back exhaust (horizontal duct) C1. Adapting the microwave blower for outside back exhaust 1. Remove and save the screws that hold the Blower Plate to the microwave. Screw 2. Lift up the Blower plate. Blower Motor Back of Microwave Blower Plate Screw 3. Carefully pull out the blower unit. The wires will extend far enough to allow you to adjust the blower unit. BEFORE: Fan Blade Openings Facing Forward End B End A CAUTION: To avoid breaking or cracking the blower blade, do not touch the blade. Hold the outer case of the blower when you pull it out or put it back in place. 4. Remove Parts "A" with tin snips or pliers. 5. Rotate the blower unit counterclockwise 180 °. Before Rotation After Rotation Back of Microwave Back of Microwave 6. Place the blower unit back into the opening. AFTER: Fan Blade Openings Facing Back End A End B CAUTION: Do not pull or stretch the blower unit wiring. Make sure the wires are not pinched. NOTE: The blower unit exhaust openings should match exhaust openings on the rear of microwave oven. 7. Close the Blower Plate and attach the exhaust adaptor to the rear of the oven by sliding it into the guides at the back top center of the oven. Push in securely until it is in the lower locking tabs. Take care to ensure that the damper hinge is installed so that it is at the top and that the damper swings freely. Adaptor Parts "A" Guide Back of Microwave Guide Locking Tabs From Blower motor screw (after attached the exhaust adaptor) 3. IN A B C D E. A Yo o • • • C yo no 14 SMH1816_XAA-DE68-03943A-02-EN_120725.indd 14 2012-07-25 �� 7:49:18
-
 1
1 -
2
-
3
-
4
-
5
-
6
-
7
-
8
-
 9
9 -
 10
10 -
 11
11 -
 12
12 -
 13
13 -
 14
14 -
 15
15 -
 16
16 -
 17
17 -
 18
18 -
 19
19 -
20
 |
 |
