Samsung SP-F10M User Manual - Page 37
Front, Upper, Remote Control Signal - led
 |
View all Samsung SP-F10M manuals
Add to My Manuals
Save this manual to your list of manuals |
Page 37 highlights
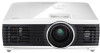
3-2 Front, Upper NAME 1.Indicators DESCRIPTION - STAND BY (Blue LED) - LED (Blue LED) - STATUS (Green/Red LED) Refer to the LED Indications. 2. Move / Select / / : Use to move or to select an item within a menu. Volume button 3. MENU button 4. SOURCE button 5. POWER button 6. Zoom Knob 7. Focus Ring 8. Lens 9. Remote Control Signal Receiver 10. Hole for attaching lens cap string : Use to adjust the volume. Use to display the Menu Screen. Use to select the external device signal. Use to turn the projector on or off. Use to enlarge or reduce image size. Use for Focus Adjustment. - - Using 3-2
-
 1
1 -
2
-
3
-
4
-
5
-
6
-
7
-
8
-
9
-
10
-
11
-
12
-
13
-
14
-
15
-
16
-
17
-
18
-
19
-
20
-
21
-
22
-
23
-
24
-
25
-
26
-
27
-
28
-
29
-
30
-
31
-
 32
32 -
 33
33 -
 34
34 -
 35
35 -
 36
36 -
 37
37 -
 38
38 -
 39
39 -
 40
40 -
 41
41 -
 42
42 -
43
-
44
-
45
-
46
-
47
-
48
-
49
-
50
-
51
-
52
-
53
-
54
-
55
-
56
-
57
-
58
-
59
-
60
-
61
-
62
-
63
-
64
-
65
-
66
-
67
-
68
-
69
-
70
-
71
-
72
-
73
-
74
-
75
-
76
-
77
-
78
-
79
-
80
-
81
-
82
-
83
-
84
-
85
-
86
-
87
-
88
-
89
-
90
-
91
-
92
 |
 |

Using
3-2
3-2
Front, Upper
NAME
DESCRIPTION
1.Indicators
- STAND BY (Blue LED)
- LED (Blue LED)
- STATUS (Green/Red LED)
Refer to the LED Indications.
2. Move
/ Select
/
Volume
button
/
: Use to move or to select an item within a menu.
: Use to adjust the volume.
3. MENU button
Use to display the Menu Screen.
4. SOURCE button
Use to select the external device signal.
5.
POWER
button
Use to turn the projector on or off.
6. Zoom Knob
Use to enlarge or reduce image size.
7. Focus Ring
Use for Focus Adjustment.
8. Lens
-
9. Remote Control Signal
Receiver
-
10. Hole for attaching lens
cap string
-