Sanyo PLC-XP100L Owners Manual - Page 14
RESET/ON/ALL-OFF switch, NO SHOW button - image size
 |
UPC - 086483068263
View all Sanyo PLC-XP100L manuals
Add to My Manuals
Save this manual to your list of manuals |
Page 14 highlights
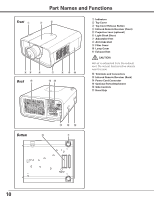
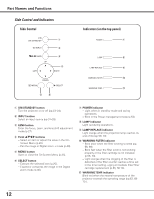
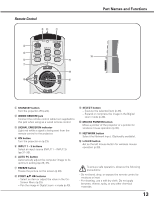
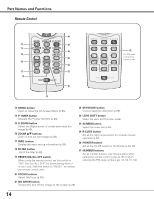
Part Names and Functions Remote Control @6 !3 @5 !4 @4 !5 @3 !6 @2 !7 @1 !8 @0 !9 @7 For PIN code and remote control code. !3 MENU button Open or close the On-Screen Menu (p.25). !4 P-TIMER button Operate the P-timer function (p.29). !5 D.ZOOM button Select the Digital zoom +/- mode and resize the image (p.40). !6 ZOOM ed buttons Zoom in and out the images (p.28). !7 INFO. button Display the input source information (p.28). !8 FILTER button Scroll the filter (p.29). !9 RESET/ON/ALL-OFF switch When using the remote control, set this switch to "ON." Set it to "ALL OFF" for power saving when it is not in use. Slide this switch to "RESET" to initialize the remote control code. @0 FOCUS buttons Adjust the focus (p.28). @1 NO SHOW button Temporarily turn off the image on the screen (p.29). @2 KEYSTONE button Correct keystone distortion (p.29). @3 LENS SHIFT button Select the Lens Shift function (p.28). @4 SCREEN button Select the screen size (p.28). @5 R-CLICK button Act as the right mouse button for wireless mouse operation (p.30). @6 POINTER button Act as the On-Off switch for the Pointer (p.29, 30). @7 Number buttons Act as number buttons. Use these buttons when setting the remote control codes (p.16) or when entering the PIN code numbers (pp. 23, 50, 51, 54). 14
-
 1
1 -
2
-
3
-
4
-
5
-
6
-
7
-
8
-
 9
9 -
 10
10 -
 11
11 -
 12
12 -
 13
13 -
 14
14 -
 15
15 -
 16
16 -
 17
17 -
 18
18 -
 19
19 -
20
-
21
-
22
-
23
-
24
-
25
-
26
-
27
-
28
-
29
-
30
-
31
-
32
-
33
-
34
-
35
-
36
-
37
-
38
-
39
-
40
-
41
-
42
-
43
-
44
-
45
-
46
-
47
-
48
-
49
-
50
-
51
-
52
-
53
-
54
-
55
-
56
-
57
-
58
-
59
-
60
-
61
-
62
-
63
-
64
-
65
-
66
-
67
-
68
-
69
-
70
-
71
-
72
-
73
-
74
-
75
-
76
-
77
-
78
-
79
-
80
-
81
 |
 |
