Sanyo PLV Z2000 Owners Manual - Page 39
Rename, Rename Window, Rename Item Selection Window, On-screen Keyboard
 |
View all Sanyo PLV Z2000 manuals
Add to My Manuals
Save this manual to your list of manuals |
Page 39 highlights
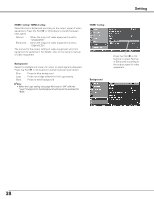
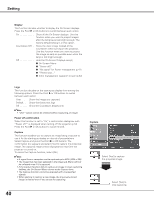
Rename This function is used to change the name of the Input or the User image. Select Rename and press the Point 8 or OK buttons. The Rename window appears. Use the Point ed buttons to choose either Input or User image and then press the Point 8 or OK buttons to display the rename item selection window. Rename Use the Point ed buttons to choose a desired item and press the Point 8 button to display on-screen keyboard. ✔Notes: • Custom is blank and check mark cannot be placed when an item is not renamed Use the Point ed7 8 buttons to select a desired character or function. Left-arrow key moves the cursor one position backward or deletes the preceding character. Convert key converts between uppercase and lowercase letters. The selected key will be framed red. Press the OK button to execute your selection. Press the RESET button to clear your entry. To complete the naming entry, press the MENU button. The confirmation dialog box appears. Select [Yes] and press the OK button, then the custom name is registered. The rename item selection window with a newly registered name under custom field appears. To cancel the naming entry, press the MENU button. The confirmation dialog box appears.Select [No] and press the OK button to continue. Another confirmation dialog box appears, and select [Yes] to cancel your entry. To return to the on-screen keyboard to change the custom name, press the MENU button. The confirmation dialog box appears. Select [No] and press the OK button to continue. Another confirmation dialog box appears, and select [No]. The on-screen keyboard with a newly entered custom name in the text field appears. You can correct or change the custom name. ✔Notes: • You cannot type characters when the length of the name exceeds the text field limit. Maximum length of the character you can type varies depending on the item or the type of characters. • Custom name cannot be registered when the text field is filled with spaces and no characters are entered. Select Rename and press the Point 8 or OK buttons. The Rename window appears. RENAME WINDOW Use the Point ed buttons to select Input or User image and Press the Point 8 or OK buttons to display the rename item selection window. RENAME ITEM SELECTION WINDOW Custom field ON-SCREEN KEYBOARD Select [Yes] and press the OK button to register the custom name. Convert key Text field Left arrow key Select [Yes] and press the OK button to cancel the naming entry. Select [No] and press the OK button, then another confrimation box appears. To complete the naming entry, press the MENU button. The confirmation dialog box appears. 39
-
 1
1 -
2
-
3
-
4
-
5
-
6
-
7
-
8
-
9
-
10
-
11
-
12
-
13
-
14
-
15
-
16
-
17
-
18
-
19
-
20
-
21
-
22
-
23
-
24
-
25
-
26
-
27
-
28
-
29
-
30
-
31
-
32
-
33
-
 34
34 -
 35
35 -
 36
36 -
 37
37 -
 38
38 -
 39
39 -
 40
40 -
 41
41 -
 42
42 -
 43
43 -
 44
44 -
45
-
46
-
47
-
48
-
49
-
50
-
51
-
52
-
53
-
54
-
55
-
56
-
57
-
58
-
59
-
60
 |
 |
