Seagate Mirra Personal Server Installation Guide (Mac) - Page 7
Web Access - login
 |
View all Seagate Mirra Personal Server manuals
Add to My Manuals
Save this manual to your list of manuals |
Page 7 highlights
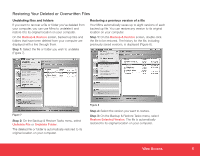
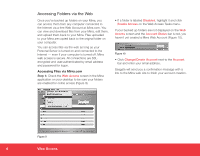
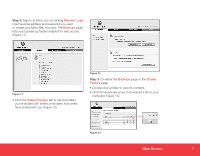
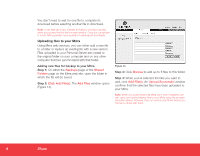
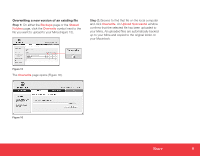
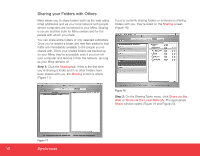
Step 2: Sign in at Mirra.com by clicking Member Login. Use the email address and password you used to create your Mirra Web Account. The Backups page lists your backed up folders enabled for web access (Figure 11). Figure 11 • Click the Shared Folders tab to see the folders you've shared with others and folders that others have shared with you (Figure 12). Figure 12 Step 3: On either the Backups page or the Shared Folders page, • Double-click a folder to view its contents. • Click the download arrow to download a file to your computer (Figure 13). Figure 13 Web Access 7
-
 1
1 -
 2
2 -
 3
3 -
 4
4 -
 5
5 -
 6
6 -
 7
7 -
 8
8 -
 9
9 -
 10
10 -
 11
11 -
 12
12 -
13
-
14
-
15
-
16
-
17
-
18
-
19
-
20
 |
 |

7
Web Access
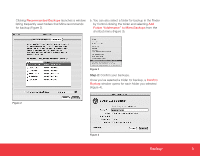
Step 2:
Sign in at
Mirra.com
by clicking
Member Login
.
Use the email address and password you used
to create your Mirra Web Account. The
Backups
page
lists your backed up folders enabled for web access
(Figure 11).
Figure 11
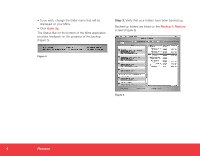
• Click the
Shared Folders
tab to see the folders
you’ve shared with others and folders that others
have shared with you (Figure 12).
Figure 12
Step 3:
On either the
Backups
page or the
Shared
Folders
page,
• Double-click a folder to view its contents.
• Click the download arrow to download a file to your
computer (Figure 13).
Figure 13