Seagate Mirra Personal Server Installation Guide (Windows) - Page 12
Synchronizing Folders
 |
View all Seagate Mirra Personal Server manuals
Add to My Manuals
Save this manual to your list of manuals |
Page 12 highlights
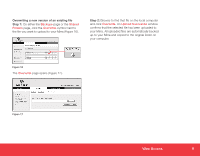
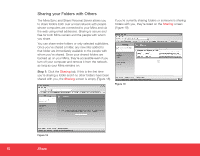
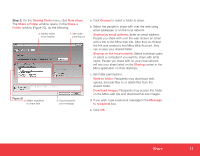
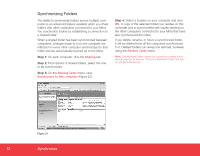
Synchronizing Folders The ability to synchronize folders across multiple computers is an advanced feature available when you share folders with other computers connected to your Mirra. You synchronize folders by establishing a connection to a shared folder. When a shared folder has been synchronized between computers, changes made to it on one computer are reflected on every other computer synchronized to that folder and are automatically backed up to the Mirra. Step 1: On each computer, click the Sharing tab. Step 2: From the list of shared folders, select the one to be synchronized. Step 3: On the Sharing Tasks menu, click Synchronize to this computer (Figure 21). Step 4: Select a location on your computer and click OK. A copy of the selected folder now resides on this computer and is synchronized with copies residing on the other computers connected to your Mirra that have also synchronized the folder. If you delete, rename, or move a synchronized folder, it will be deleted from all the computers synchronized to it. Deleted folders can always be restored, however, using the Restore Tasks menu. Note: Synchronized folders cannot be copied into a folder that is already selected for backup. Choose a destination folder that has not yet been backed up. Figure 21 12 Synchronize
-
 1
1 -
2
-
3
-
4
-
5
-
6
-
 7
7 -
 8
8 -
 9
9 -
 10
10 -
 11
11 -
 12
12 -
 13
13 -
 14
14 -
 15
15 -
 16
16 -
 17
17 -
18
-
19
-
20
 |
 |
