Seiko 6A32 Technical Guide - Page 14
<Reassembly>, <Disassembly>
 |
View all Seiko 6A32 manuals
Add to My Manuals
Save this manual to your list of manuals |
Page 14 highlights
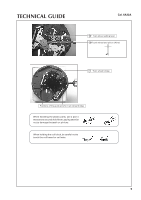
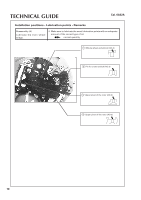
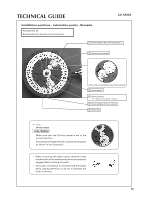
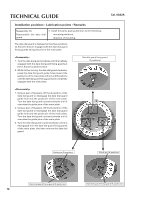
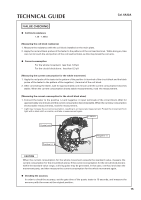
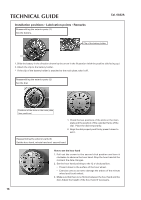
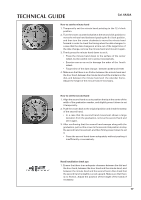
TECHNICAL GUIDE Cal. 6A32A Installation positions • Lubrication points • Remarks Reassembly (9) Reassemble the date dial guard. ❇ Install the parts, paying attention to the following: mounting positions, direction of mounting. The date dial guard is fastened at the three positions (A, B and C) that are engaged with the date dial guard fixing guards and guide pins of the main plate. 1. Turn the date dial guard clockwise until it is halfway engaged with the date dial guard fixing guards at the A, B and C positions each. 2. While further turning the date dial guard clockwise, press the date dial guard guide holes toward the guide pins of the main plate at the A and B positions until the date dial guard fixing guards are completely engaged with the main plate. Date dial guard fixing guard (C positions) 1. Using a pair of tweezers, lift the A position of the date dial guard to disengage the date dial guard guide hole and the guide pin of the main plate. Turn the date dial guard counterclockwise until it overrides the guide pins of the main plate. 2. Using a pair of tweezers, lift the B position of the date dial guard to disengage the date dial guard guide hole and the guide pin of the main plate. Turn the date dial guard counterclockwise until it overrides the guide pins of the main plate. 3. Turn the date dial guard counterclockwise until it is disengaged from the date dial guard fixing guards of the main plate. And then remove the date dial B guard. C A Guide pin (B position) Guide pin (A position) Date dial guard fixing guard (B positions) 14 Date dial guard fixing guard (A positions)
-
 1
1 -
2
-
3
-
4
-
5
-
6
-
7
-
8
-
 9
9 -
 10
10 -
 11
11 -
 12
12 -
 13
13 -
 14
14 -
 15
15 -
 16
16 -
 17
17 -
 18
18 -
 19
19 -
20
-
21
-
22
-
23
-
24
 |
 |
