Sharp MX-M450NA Operation Manual - Page 122
Procedure for adding inserts, of the [INSERTION TYPE A SETTING] key
 |
View all Sharp MX-M450NA manuals
Add to My Manuals
Save this manual to your list of manuals |
Page 122 highlights
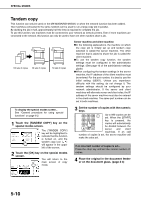
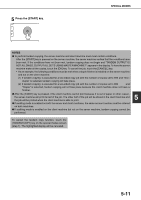
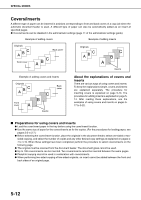
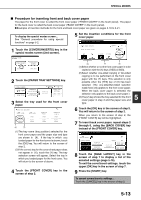
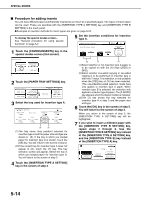
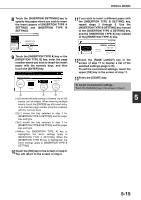
SPECIAL MODES ■ Procedure for adding inserts You can have different paper automatically inserted as an insert at a specified pages. Two types of insert paper can be used. These are specified with the [INSERTION TYPE A SETTING] key and [INSERTION TYPE B SETTING] in the touch panel. ●Examples of insertion methods for insert paper are given on page 5-22. To display the special modes screen... See "General procedure for using special functions" on page 5-2. 1 Touch the [COVERS/INSERTS] key in the special modes screen (2nd screen). 5 Set the insertion conditions for insertion type A . INSERTION TYPE A SETTING PRINT ON INSERT SHEETS YES NO 1-SIDED CANCEL OK PAPER TRAY 2-SIDED TRAY2 81/2x11 PLAIN SPECIAL MODES COVERS/INSERTS TRANSPARENCY INSERTS BOOK COPY CARD SHOT 2 Touch the [PAPER TRAY SETTINGS] key. COVERS/INSERTS FRONT COVER BACK COVER INSERTION TYPE A SETTING INSERTION TYPE B SETTING CANCEL OK INSERTION SETTINGS PAPER TRAY SETTINGS PAGE LAYOUT 3 Select the tray used for insertion type A. PAPER TRAY SETTINGS FRONT COVER BACK COVER TRAY2 81/2x11 PLAIN TRAY2 81/2x11 PLAIN INSERTION TYPE A TRAY2 81/2x11 PLAIN OK INSERTION TYPE B TRAY2 81/2x11 PLAIN (X) (Y) (1)The tray name (tray position) selected for insertion type A and the paper size and type are shown in (X). If the tray in which you loaded paper for insertion type A is shown, touch the [OK] key. You will return to the screen of step 2. (2)If the correct tray for insertion type A does not appear in (X), touch the (Y) key. The tray selection screen will appear. Select the tray in which you loaded paper for insertion type A. You will return to the screen of step 2. (X) (Y) (Z) (1)Select whether or not insertion type A paper is to be copied on with the (X) keys ([YES] or [NO]). (2)Select whether one-sided copying or two-sided copying is to be performed on insertion type A with the (Y) keys. This selection is only possible when the [YES] key of (X) has been selected. (The one-sided/two-sided selection made here only applies to insertion type A paper. When insertion type B is selected, the selection only applies to insertion type B paper.) The [2-SIDED] key appears when the duplex module is installed. (3)The (Z) key shows the tray selected for insertion type A in step 3 and the paper size and type. 6 Touch the [OK] key in the screen of step 5. You will return to the screen of step 2. When you return to the screen of step 2, the [INSERTION TYPE A SETTING] key will be highlighted. 7 If you wish to insert a different paper with the [INSERTION TYPE B SETTING] key, repeat steps 2 through 6. Use the [INSERTION TYPE B SETTING] key instead of the [INSERTION TYPE A SETTING] key, and the [INSERTION TYPE B] key instead of the [INSERTION TYPE A] key. TS INSERTION TYPE A SETTING INSERTION TYPE B SETTING OK CANCEL OK INSERTION SETTINGS PAPER TRAY SETTINGS PAGE LAYOUT 4 Touch the [INSERTION TYPE A SETTING] key in the screen of step 2 5-14
-
 1
1 -
2
-
3
-
4
-
5
-
6
-
7
-
8
-
9
-
10
-
11
-
12
-
13
-
14
-
15
-
16
-
17
-
18
-
19
-
20
-
21
-
22
-
23
-
24
-
25
-
26
-
27
-
28
-
29
-
30
-
31
-
32
-
33
-
34
-
35
-
36
-
37
-
38
-
39
-
40
-
41
-
42
-
43
-
44
-
45
-
46
-
47
-
48
-
49
-
50
-
51
-
52
-
53
-
54
-
55
-
56
-
57
-
58
-
59
-
60
-
61
-
62
-
63
-
64
-
65
-
66
-
67
-
68
-
69
-
70
-
71
-
72
-
73
-
74
-
75
-
76
-
77
-
78
-
79
-
80
-
81
-
82
-
83
-
84
-
85
-
86
-
87
-
88
-
89
-
90
-
91
-
92
-
93
-
94
-
95
-
96
-
97
-
98
-
99
-
100
-
101
-
102
-
103
-
104
-
105
-
106
-
107
-
108
-
109
-
110
-
111
-
112
-
113
-
114
-
115
-
116
-
 117
117 -
 118
118 -
 119
119 -
 120
120 -
 121
121 -
 122
122 -
 123
123 -
 124
124 -
 125
125 -
 126
126 -
 127
127 -
128
-
129
-
130
-
131
-
132
-
133
-
134
-
135
-
136
-
137
-
138
-
139
-
140
-
141
-
142
-
143
-
144
-
145
-
146
-
147
-
148
-
149
-
150
-
151
-
152
-
153
-
154
-
155
-
156
-
157
-
158
-
159
-
160
-
161
-
162
-
163
-
164
-
165
-
166
-
167
-
168
-
169
-
170
-
171
-
172
-
173
-
174
-
175
-
176
-
177
-
178
-
179
-
180
-
181
-
182
-
183
-
184
-
185
-
186
-
187
-
188
-
189
-
190
-
191
-
192
-
193
-
194
-
195
-
196
-
197
-
198
-
199
-
200
 |
 |