Sharp PN-G655U PNG655U Operation Manual - Page 9
Supplied Accessories, Part Names - power supply
 |
View all Sharp PN-G655U manuals
Add to My Manuals
Save this manual to your list of manuals |
Page 9 highlights
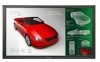
ENGLISH Supplied Accessories If any component should be missing, please contact your dealer. � Liquid Crystal Display: 1 � Remote control unit: 1 � Power cord (Approx. 13.1 feet [4 m]): 1 � "AA" size battery: 2 � CD-ROM (Utility Disk for Windows): 1 � Operation manual: 1 � Stand hole protection cover: 2 * Sharp Corporation holds authorship rights to the Utility Disk program. Do not reproduce it without permission. * For environmental protection! Do not dispose of batteries in household waste. Follow the disposal instructions for your area. Front view Part Names 1 6 23 45 1. LCD panel 2. Remote control sensor (See page 12.) 3. Power LED (See page 14.) 4. Power switch (See page 14.) 5. Input switch (See page 15.) 6. Temporary Stand (See page 13.) TIPS • Use a pointed object such as a pen tip to press the switches at the front of the monitor. 7E
-
 1
1 -
2
-
3
-
 4
4 -
 5
5 -
 6
6 -
 7
7 -
 8
8 -
 9
9 -
 10
10 -
 11
11 -
 12
12 -
 13
13 -
 14
14 -
15
-
16
-
17
-
18
-
19
-
20
-
21
-
22
-
23
-
24
-
25
-
26
-
27
-
28
-
29
-
30
-
31
-
32
-
33
-
34
-
35
-
36
-
37
-
38
-
39
-
40
-
41
-
42
-
43
-
44
-
45
-
46
-
47
-
48
-
49
-
50
-
51
-
52
-
53
-
54
-
55
-
56
-
57
-
58
-
59
-
60
-
61
-
62
-
63
-
64
-
65
-
66
-
67
-
68
-
69
-
70
-
71
-
72
-
73
-
74
-
75
-
76
 |
 |
