Singer One Instruction Manual 7 - Page 35
puntadas. Parar
 |
View all Singer One manuals
Add to My Manuals
Save this manual to your list of manuals |
Page 35 highlights
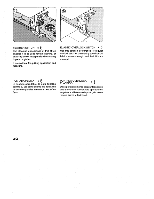
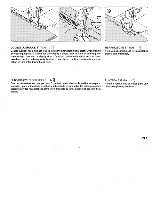
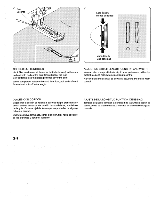
(2) 2.4 PROCEDURE 1. Stitch forward to the end of buttonhole mark. Stop sewing at the left stitch and raise needle. PROCEDIMIENTO 1. Coser hacia adelante hasta el final de la marca del ojal. Parar de coser a la izquierda y elevar la aguja. 2. Bartack 4 or 5 stitches. Stop sewing at the left stitch and raise needle to its highest position. 2. Atacar 4 6 5 puntadas. Parar de coser a la izquierda y levantar la aguja hasta la posicion mas alta. 3 1U 24 3. Stitch forward to the end of buttonhole mark to complete buttonhole. 3. Pespuntear hacia adelante hasta el final de la marca del ojal hasta completarlo. 4. Bartack 4 or 5 stitches. Stop sewing at the right stitch and raise needle. 4. Atacar 4 6 5 puntadas. Parar de coser a la derecha y elevar la aguja. 33
-
 1
1 -
2
-
3
-
4
-
5
-
6
-
7
-
8
-
9
-
10
-
11
-
12
-
13
-
14
-
15
-
16
-
17
-
18
-
19
-
20
-
21
-
22
-
23
-
24
-
25
-
26
-
27
-
28
-
29
-
 30
30 -
 31
31 -
 32
32 -
 33
33 -
 34
34 -
 35
35 -
 36
36 -
 37
37 -
 38
38 -
 39
39 -
 40
40
 |
 |
