Sonos ZonePlayer 90 User Guide - Page 8
Line-In, Line-in encoding settings - setup
 |
View all Sonos ZonePlayer 90 manuals
Add to My Manuals
Save this manual to your list of manuals |
Page 8 highlights
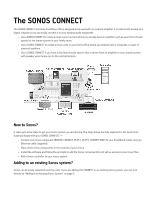
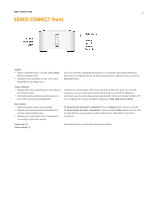
6 User Guide 3. If you are making a wireless connection, skip this step and continue on to step 4. If you are making a wired connection, connect a standard Ethernet cable from your router or another Sonos component (or a live network wall plate if you have built-in wiring) to one of the Ethernet switch connections on the back of the new Sonos component. 4. Choose one of the following options: • Using a handheld Sonos controller, select Settings -> Add a Zone from the Music Menu and follow the on-screen prompts to add this component to your Sonos system. • Using the Sonos Controller for Mac or PC, select Zones -> Add a Zone and follow the prompts to add this component to your Sonos system. For additional information on connecting audio devices, please go to our Web site at http://faq.sonos.com/cables. Line-In You can easily stream an external source such as a CD player or portable music player through Sonos using the audio-in connections on your Sonos component. The device will be automatically detected as soon as you plug it in. • Use a standard RCA cable to plug an external source like a CD player into the analog Audio In connections on the back of your SONOS CONNECT. • If you are connecting a portable music player to the SONOS CONNECT, you will need a 1/8 inch mini-stereo to RCA audio cable instead. Plug the mini-stereo end into the portable device and the RCA end into the Audio In connection on the Sonos component. Using a handheld Sonos controller: • To play music from this line-in source, select Line-In from the Music menu, select the source, and select Play Now. • To change the name of this device, select Settings -> ZonePlayer Settings. Select the Sonos component this source is connected to, and then touch Line-In Source Name. Select a new name from the list, or type a unique name. • To change the line-in level, select Settings -> ZonePlayer Settings. Select the Sonos component this source is connected to, and then touch Line-In Source Level. Select a new level. Using the Sonos Controller for Mac or PC: • To play music from this line-in source, select the Line-In tab from the Music Library, select the source, and click Play Now. • To change the settings for this device, select the Line-In tab from the Music Library, select the source, and click Setup. Select the Line-In tab to make changes. A default (typical) line-in level is automatically assigned when you select a source name, but if the volume sounds too low, you can select a higher line level for this device. (You may experience sound distortion at higher volume levels if you set the level too high.) Line-in encoding settings When you have line-in music sources attached to a Sonos component, line-in encoding determines how Sonos will encode the data coming in from these sources. Your Sonos system defaults to automatic in order to provide the optimal playback experience. Sonos recommends you do not change this default. However, if you decide to make a change, we recommend the following usage guidelines:
-
 1
1 -
2
-
 3
3 -
 4
4 -
 5
5 -
 6
6 -
 7
7 -
 8
8 -
 9
9 -
 10
10 -
 11
11 -
 12
12 -
 13
13 -
14
 |
 |
