Sony DCR-TRV22 PIXELA ImageMixer v1.5 Instruction Manual - Page 177
Image Editor, Opening Image Editor, Image Editor display
 |
View all Sony DCR-TRV22 manuals
Add to My Manuals
Save this manual to your list of manuals |
Page 177 highlights
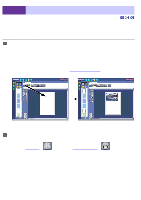
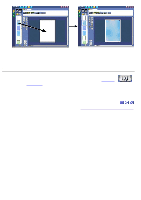
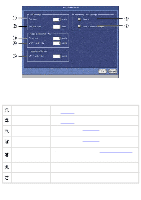
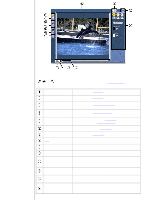
6-1-1 Image Editor Introduction Chapter 1 Before Use Chapter 2 Capture Environment ImageMixer provides you with a variety of tools for editing still pictures. You can start from either the Album Environment or the Layout Environment. Chapter 3 Album Environment Chapter 4 Movie Editing Environment Chapter 5 Layout Environment Chapter 6 Image Editor Opening Image Editor Opening Image Editor Opening Image Editor Image Editor display Undo Tool bar (Mac) Filter Mode Red-eye compensation Auto enhance Brightness/Contrast Hue, Saturation Sharpness Blur Draw Mode Brush Pen Eraser Paint Airbrush Crop/Rotate/Flip Mode Cropping Rotating/Flipping Image Resizing Mode Mask Mode (Win) Gradation masks Stencil masks Drawn masks Chroma Key Mode (Mac) Create Shadow Mode (Win) Blend Mode (Win) From Album Environment 1. Open ImageMixer. 2. Click the Environment. button on the Main Selector or Mode Select Bar to open the Album 3. Select the thumbnail of the still picture you want to work with. Change album if necessary. 4. Click the Image Edit button. From Layout Environment 1. Open ImageMixer. 2. Click the [Layout Environment] Bar to start the Layout Environment. button on the Main Selector or Mode Select 3. Start layout (create a new layout or open a saved layout). 4. Arrange a still picture object in the layout area if necessary. Chapter 7 Video Disc Environment 5. Select the picture object you want to work with. Chapter 8 ImageMixer Easy Video CD (Win) 6. Click the Image Edit button. The same process can be repeated by clicking other picture objects. Image Editor display
-
 1
1 -
2
-
3
-
4
-
5
-
6
-
7
-
8
-
9
-
10
-
11
-
12
-
13
-
14
-
15
-
16
-
17
-
18
-
19
-
20
-
21
-
22
-
23
-
24
-
25
-
26
-
27
-
28
-
29
-
30
-
31
-
32
-
33
-
34
-
35
-
36
-
37
-
38
-
39
-
40
-
41
-
42
-
43
-
44
-
45
-
46
-
47
-
48
-
49
-
50
-
51
-
52
-
53
-
54
-
55
-
56
-
57
-
58
-
59
-
60
-
61
-
62
-
63
-
64
-
65
-
66
-
67
-
68
-
69
-
70
-
71
-
72
-
73
-
74
-
75
-
76
-
77
-
78
-
79
-
80
-
81
-
82
-
83
-
84
-
85
-
86
-
87
-
88
-
89
-
90
-
91
-
92
-
93
-
94
-
95
-
96
-
97
-
98
-
99
-
100
-
101
-
102
-
103
-
104
-
105
-
106
-
107
-
108
-
109
-
110
-
111
-
112
-
113
-
114
-
115
-
116
-
117
-
118
-
119
-
120
-
121
-
122
-
123
-
124
-
125
-
126
-
127
-
128
-
129
-
130
-
131
-
132
-
133
-
134
-
135
-
136
-
137
-
138
-
139
-
140
-
141
-
142
-
143
-
144
-
145
-
146
-
147
-
148
-
149
-
150
-
151
-
152
-
153
-
154
-
155
-
156
-
157
-
158
-
159
-
160
-
161
-
162
-
163
-
164
-
165
-
166
-
167
-
168
-
169
-
170
-
171
-
 172
172 -
 173
173 -
 174
174 -
 175
175 -
 176
176 -
 177
177 -
 178
178 -
 179
179 -
 180
180 -
 181
181 -
 182
182 -
183
-
184
-
185
-
186
-
187
-
188
-
189
-
190
-
191
-
192
-
193
-
194
-
195
-
196
-
197
-
198
-
199
-
200
-
201
-
202
-
203
-
204
-
205
-
206
-
207
-
208
-
209
-
210
-
211
-
212
-
213
-
214
-
215
-
216
-
217
-
218
-
219
-
220
-
221
-
222
-
223
-
224
-
225
-
226
-
227
-
228
-
229
-
230
-
231
-
232
-
233
-
234
-
235
-
236
-
237
 |
 |