Sony DSC M2 User Guide - Page 55
Change REC.Folder, Copy - with adaptor
 |
UPC - 027242679160
View all Sony DSC M2 manuals
Add to My Manuals
Save this manual to your list of manuals |
Page 55 highlights
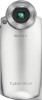
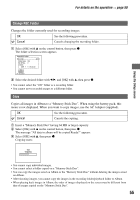
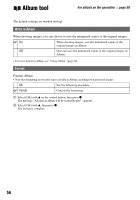
For details on the operation t page 50 Using the Setup screen Change REC.Folder Changes the folder currently used for recording images. OK See the following procedure. Cancel Cancels changing the recording folder. 1 Select [OK] with v on the control button, then press z. The folder selection screen appears. Select REC. Folder 102 2/2 Folder Name: 102 No. Of Files: 0 Created: 2005 1 1 1:05:34 AM OK Cancel BACK/NEXT 2 Select the desired folder with b/B, and [OK] with v, then press z. • You cannot select the "100" folder as a recording folder. • You cannot move recorded images to a different folder. Copy Copies all images in Album to a "Memory Stick Duo". When using the battery pack, this menu is not displayed. When you want to copy images, use the AC Adaptor (supplied). OK See the following procedure. Cancel Cancels the copying. 1 Insert a "Memory Stick Duo" having 64 MB or larger capacity. 2 Select [OK] with v on the control button, then press z. The message "All data in album will be copied Ready?" appears. 3 Select [OK] with v, then press z. Copying starts. 102 Copying • You cannot copy individual images. • You cannot select a folder copied on a "Memory Stick Duo". • You can copy the images saved on Album to the "Memory Stick Duo" without deleting the images saved on Album. • After shooting images, you cannot copy the images in the recording folder/playback folder to Album. • When playing back images in Album, the order of images displayed on the screen may be different from that of images copied on the "Memory Stick Duo". 55
-
 1
1 -
2
-
3
-
4
-
5
-
6
-
7
-
8
-
9
-
10
-
11
-
12
-
13
-
14
-
15
-
16
-
17
-
18
-
19
-
20
-
21
-
22
-
23
-
24
-
25
-
26
-
27
-
28
-
29
-
30
-
31
-
32
-
33
-
34
-
35
-
36
-
37
-
38
-
39
-
40
-
41
-
42
-
43
-
44
-
45
-
46
-
47
-
48
-
49
-
 50
50 -
 51
51 -
 52
52 -
 53
53 -
 54
54 -
 55
55 -
 56
56 -
 57
57 -
 58
58 -
 59
59 -
 60
60 -
61
-
62
-
63
-
64
-
65
-
66
-
67
-
68
-
69
-
70
-
71
-
72
-
73
-
74
-
75
-
76
-
77
-
78
-
79
-
80
-
81
-
82
-
83
-
84
-
85
-
86
-
87
-
88
-
89
-
90
-
91
-
92
-
93
-
94
-
95
-
96
-
97
-
98
-
99
-
100
-
101
-
102
-
103
-
104
-
105
-
106
-
107
 |
 |