Sony DSC M2 User Guide - Page 76
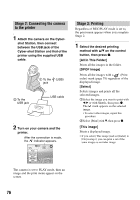
Stage 2: Connecting the camera, to the printer, Stage 3: Printing, All In This Folder]
 |
UPC - 027242679160
View all Sony DSC M2 manuals
Add to My Manuals
Save this manual to your list of manuals |
Page 76 highlights
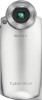
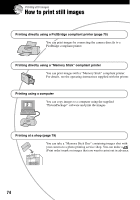
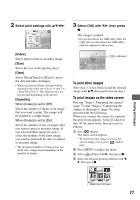
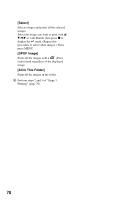
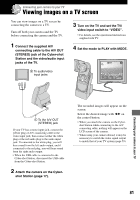
Stage 2: Connecting the camera to the printer 1 Attach the camera on the Cyber- shot Station, then connect between the USB jack of the Cyber-shot Station and that of the printer using the supplied USB cable. 1 To the (USB) jack 2 To the USB jack USB cable 2 Turn on your camera and the printer. After the connection is made, the indicator appears. 101 2/9 1M Print All In This Folder DPOF image Select This image Cancel The camera is set to PLAY mode, then an image and the print menu appear on the screen. Stage 3: Printing Regardless of REC/PLAY mode is set to, the print menu appears when you complete Stage 2. 1 Select the desired printing method with v/V on the control button, then press z. [All In This Folder] Prints all the images in the folder. [DPOF image] Prints all the images with a (Print order) mark (page 79) regardless of the displayed image. [Select] Selects images and prints all the selected images. 1Select the image you want to print with b/B or with Shuttle, then press z. The mark appears on the selected image. • To select other images, repeat this procedure. 2Select [Print] with V, then press z. [This image] Prints a displayed image. • If you select [This image] and set [Index] to [On] in step 2, you can print a set of the same images as an index image. 76
-
 1
1 -
2
-
3
-
4
-
5
-
6
-
7
-
8
-
9
-
10
-
11
-
12
-
13
-
14
-
15
-
16
-
17
-
18
-
19
-
20
-
21
-
22
-
23
-
24
-
25
-
26
-
27
-
28
-
29
-
30
-
31
-
32
-
33
-
34
-
35
-
36
-
37
-
38
-
39
-
40
-
41
-
42
-
43
-
44
-
45
-
46
-
47
-
48
-
49
-
50
-
51
-
52
-
53
-
54
-
55
-
56
-
57
-
58
-
59
-
60
-
61
-
62
-
63
-
64
-
65
-
66
-
67
-
68
-
69
-
70
-
 71
71 -
 72
72 -
 73
73 -
 74
74 -
 75
75 -
 76
76 -
 77
77 -
 78
78 -
 79
79 -
 80
80 -
 81
81 -
82
-
83
-
84
-
85
-
86
-
87
-
88
-
89
-
90
-
91
-
92
-
93
-
94
-
95
-
96
-
97
-
98
-
99
-
100
-
101
-
102
-
103
-
104
-
105
-
106
-
107
 |
 |