Sony DSC-T100/R Cyber-shot® Handbook - Page 69
Viewing images by connecting your camera to a HD TV, Connect the camera to the TV.
 |
View all Sony DSC-T100/R manuals
Add to My Manuals
Save this manual to your list of manuals |
Page 69 highlights
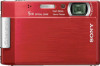
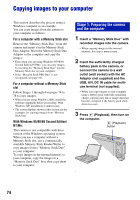
Viewing images on a TV Viewing images by connecting your camera to a HD TV You can view images by connecting the camera to an HD (High Definition) TV with the component cable (not supplied). Turn off both your camera and the TV before connecting the camera and the TV. 1 Connect the camera to the TV. Viewing images on a TV 1 To audio/video input jacks COMPONENT VIDEO IN AUDIO PY Pb Pr White/Red Green/Blue/Red (Playback) button Control button Component cable (not supplied) 2 To the multi connector HOME button • Place the camera with the screen facing upwards. • The cable for video jacks (Green/Blue/Red) is the same color as the respective jacks. 2 Turn on the TV and set the TV/video input switch to "video." • For details, see the operating instructions supplied with the TV. 3 Press to turn on the camera. Images shot with the camera appear on the TV screen. Press b/B on the control button to select the desired image. 69
-
 1
1 -
2
-
3
-
4
-
5
-
6
-
7
-
8
-
9
-
10
-
11
-
12
-
13
-
14
-
15
-
16
-
17
-
18
-
19
-
20
-
21
-
22
-
23
-
24
-
25
-
26
-
27
-
28
-
29
-
30
-
31
-
32
-
33
-
34
-
35
-
36
-
37
-
38
-
39
-
40
-
41
-
42
-
43
-
44
-
45
-
46
-
47
-
48
-
49
-
50
-
51
-
52
-
53
-
54
-
55
-
56
-
57
-
58
-
59
-
60
-
61
-
62
-
63
-
 64
64 -
 65
65 -
 66
66 -
 67
67 -
 68
68 -
 69
69 -
 70
70 -
 71
71 -
 72
72 -
 73
73 -
 74
74 -
75
-
76
-
77
-
78
-
79
-
80
-
81
-
82
-
83
-
84
-
85
-
86
-
87
-
88
-
89
-
90
-
91
-
92
-
93
-
94
-
95
-
96
-
97
-
98
-
99
-
100
-
101
-
102
-
103
-
104
-
105
-
106
-
107
-
108
-
109
-
110
-
111
-
112
-
113
-
114
-
115
-
116
-
117
-
118
-
119
 |
 |