Sony HCD-GSX100W Operating Instructions - Page 13
CD/MP3 – Play, Loading a disc
 |
View all Sony HCD-GSX100W manuals
Add to My Manuals
Save this manual to your list of manuals |
Page 13 highlights
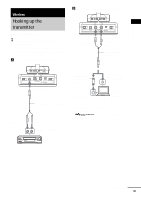
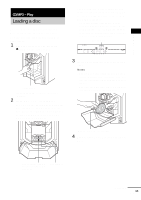
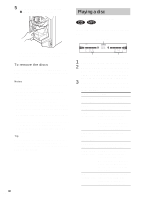
CD/MP3 - Play CD/MP3 - Play Loading a disc You can load up to 60 discs into this unit. Turn on the system before you load discs. You can also load and play discs with MP3 audio tracks. 1 Open the front cover by pressing Z PUSH on the front cover. The disc number* at the loading position appears in the display. As you press DISC + or - (or turn DISC SELECT on the unit), the disc number changes. * If you have already loaded discs, the disc number at the playing position appears. When you press DISC + or - (or turn DISC SELECT on the unit), the displayed disc number changes to the one at the loading position. Disc number Front cover * MHC-GSX100W is used for illustration purpose. 2 Press DISC + or - (or turn DISC SELECT on the unit) until you find the disc slot where you want to insert a disc, while checking the disc number (written beside every slot and also indicated in the display). 3 Insert a disc with the label side facing right. Notes • Make sure you have loaded the disc into each slot at a right angle to the rotary table. If the disc is not put in straight, it may damage the unit or the disc. • Make sure the rotary table comes to a complete stop before loading or removing discs. With the label side facing right 4 Repeat steps 2 and 3 to load additional discs. Disc slot at the loading position (located at the very front) Disc number continued 13GB
-
 1
1 -
2
-
3
-
4
-
5
-
6
-
7
-
 8
8 -
 9
9 -
 10
10 -
 11
11 -
 12
12 -
 13
13 -
 14
14 -
 15
15 -
 16
16 -
 17
17 -
 18
18 -
19
-
20
-
21
-
22
-
23
-
24
-
25
-
26
-
27
-
28
-
29
-
30
-
31
-
32
-
33
-
34
-
35
-
36
-
37
-
38
-
39
-
40
-
41
-
42
-
43
-
44
 |
 |
