Sony HDR HC7 Operating Guide - Page 85
Playing back on TV, Dubbing/Editing/Connecting to, other devices, SEARCH] or Rec Review. - dv camcorder reviews
 |
UPC - 027242701458
View all Sony HDR HC7 manuals
Add to My Manuals
Save this manual to your list of manuals |
Page 85 highlights
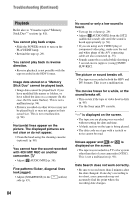
• There is a blank section between recorded sections of the tape. This is not a malfunction. No picture appears during [END SEARCH] or Rec Review. • The tape was recorded in both HDV and DV formats. This is not a malfunction. appears on the LCD screen. • This appears when you play back a tape recorded on other recording devices using a 4ch microphone (4CH MIC REC). This camcorder does not comply with the 4ch microphone recording standard. Playing back on TV You cannot view the picture on the TV connected with the i.LINK cable. • You cannot view the picture in the HD (high definition) image quality on the TV which is not compatible with the HDV1080i specification (p. 35). Refer to the instruction manuals supplied with your TV. • Down convert the pictures recorded in HDV format to DV format and play back in SD (standard definition) image quality (p. 60). • Play back pictures using another connecting cable (p. 35). You cannot view the picture or hear the sound on the TV connected with the component video cable. • Set [COMPONENT] on the (STANDARD SET) menu according to the requirements of the connected device (p. 60). • When you are using the component video cable, make sure the red and white plugs of the A/V connecting cable are connected (p. 35). You cannot view the picture or hear the sound on the TV connected with the HDMI cable. • Pictures in the DV format are not output from the HDMI OUT jack, if copyright protection signals are recorded in the pictures. • DV format pictures input to the camcorder via i.LINK cable (p. 68) cannot be output. • This occurs if you record on a tape in both HDV and DV formats. Disconnect and connect the HDMI cable, or slide the POWER switch to turn on your camcorder again. The picture appears distorted on a 4:3 TV. • This happens when viewing a picture recorded in the 16:9 (wide) mode on a 4:3 TV. Set [TV TYPE] on the (STANDARD SET) menu (p. 60) and play back the picture. Black bands appear at the top and bottom on a 4:3 TV. • This happens when viewing a picture recorded in 16:9 (wide) mode on a 4:3 TV. This is not a malfunction. Dubbing/Editing/Connecting to other devices Pictures from connected devices cannot be zoomed. • You cannot zoom pictures from connected devices on your camcorder (p. 31). Time code and other information appear on the display of the connected device. • Set [DISP OUTPUT] to [LCD PANEL] while connected with an A/V connecting cable (p. 62). Troubleshooting Continued , 85
-
 1
1 -
2
-
3
-
4
-
5
-
6
-
7
-
8
-
9
-
10
-
11
-
12
-
13
-
14
-
15
-
16
-
17
-
18
-
19
-
20
-
21
-
22
-
23
-
24
-
25
-
26
-
27
-
28
-
29
-
30
-
31
-
32
-
33
-
34
-
35
-
36
-
37
-
38
-
39
-
40
-
41
-
42
-
43
-
44
-
45
-
46
-
47
-
48
-
49
-
50
-
51
-
52
-
53
-
54
-
55
-
56
-
57
-
58
-
59
-
60
-
61
-
62
-
63
-
64
-
65
-
66
-
67
-
68
-
69
-
70
-
71
-
72
-
73
-
74
-
75
-
76
-
77
-
78
-
79
-
 80
80 -
 81
81 -
 82
82 -
 83
83 -
 84
84 -
 85
85 -
 86
86 -
 87
87 -
 88
88 -
 89
89 -
 90
90 -
91
-
92
-
93
-
94
-
95
-
96
-
97
-
98
-
99
-
100
-
101
-
102
-
103
-
104
-
105
-
106
-
107
-
108
-
109
-
110
-
111
-
112
-
113
-
114
-
115
-
116
-
117
-
118
-
119
-
120
-
121
-
122
-
123
-
124
-
125
-
126
-
127
-
128
-
129
-
130
-
131
 |
 |
