Sony HMZ-T3 Reference Guide
Sony HMZ-T3 Manual
 |
View all Sony HMZ-T3 manuals
Add to My Manuals
Save this manual to your list of manuals |
Sony HMZ-T3 manual content summary:
- Sony HMZ-T3 | Reference Guide - Page 1
Head Mounted Display Reference Guide 4-471-977-11(1) HMZ-T3W Before Initial Use Refer to the "Startup Guide" for instructions on connecting the system, wearing the unit, and completing initial settings. - Sony HMZ-T3 | Reference Guide - Page 2
shock to persons. This symbol is intended to alert the user to the presence of important operating and maintenance (servicing) instructions in the call upon your Sony dealer regarding this product. Model No. HMZ-T3W Processor Unit HMZ-T3W-P Head Mounted Unit and Battery Unit HMZ-T3W-H Serial No. - Sony HMZ-T3 | Reference Guide - Page 3
use attachments/accessories specified by all servicing to qualified service personnel. Servicing is sale in the U.S.A. Other versions may not comply with FCC technical regulations. NOTE: This equipment has been tested frequency energy and, if not installed and used in accordance with the instructions - Sony HMZ-T3 | Reference Guide - Page 4
Name: SONY Model No.: HMZ-T3W Responsible Party: Sony Electronics Inc person's body (excluding extremities: hands, wrists, feet and ankles). For Battery Unit This equipment complies with FCC/IC radiation exposure limits set forth for an uncontrolled environment and meets the FCC radio frequency - Sony HMZ-T3 | Reference Guide - Page 5
for safety, performance or data integrity reasons require a permanent connection with an incorporated battery, this battery should be replaced by qualified service staff only. To ensure that the battery and the electrical and electronic equipment will be treated properly, hand over these products at - Sony HMZ-T3 | Reference Guide - Page 6
www.sony-asia.com/support/ Correct Use • Ensure that you are wearing the head mounted unit correctly. - For instructions on wearing the unit, refer to the "Startup Guide." - To avoid watching with the screens skewed, check screen alignment by referring to the confirmation screen displayed initially - Sony HMZ-T3 | Reference Guide - Page 7
power off. Only pressing the power button on the head mounted unit or the processor unit will not turn the supplied with the system and follow the connecting instructions specified by the device to be connected. initial use. Consult your nearest Sony service center. • The completely discharged - Sony HMZ-T3 | Reference Guide - Page 8
natural materials that generate less static electricity. Lens Care • Handle the lenses on the head mounted unit carefully to avoid smears or scratches. If the lenses become dirty, wipe them gently with a soft lenscleaning cloth. • Do not use liquid solutions, such - Sony HMZ-T3 | Reference Guide - Page 9
60 GHz frequency band used by this system employs the OFDM system for modulation. • If 3 or more pairs of 60 GHz band wireless devices including For customers using the HMZ-T3W sold in the EU or other European countries, Turkey, Australia, or New Zealand The wireless communication function of this - Sony HMZ-T3 | Reference Guide - Page 10
Precautions 7 Supplied Accessories 11 Parts and Controls 12 Charging the Battery 15 Using in Wireless Communication 16 Using in Wired Communication 18 Using with a Portable Device 19 Fitting the Head Mounted Unit 20 Confirming Screen Alignment 25 System Settings 27 Troubleshooting 38 When - Sony HMZ-T3 | Reference Guide - Page 11
contact your Sony dealer or a local authorized Sony service center. For installation of the supplied accessories, refer to the "Startup Guide." • AC (1) • Micro USB cable (for AC-UD10) (1) • Earbuds (1 set) Medium-sized earbuds are initially attached, at the time of purchase. • Carrying case (1) • - Sony HMZ-T3 | Reference Guide - Page 12
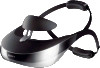
Parts and Controls For connection and wearing of the system, refer to the "Startup Guide." Head Mounted Unit Top headband adjuster Forehead supporter Top headband strap Bottom headband strap Bottom headband adjuster VOL +/- buttons Attachment sensor Do not block the sensor hole. Lens span - Sony HMZ-T3 | Reference Guide - Page 13
Battery Unit (Front) Ventilation slot (top) Ventilation slot (rear) (Power) indicator WIRELESS (Wireless Link) indicator Processor Unit (Front/Top) / (Power On/Standby) button INPUT button POWER indicator HDMI IN/MHL jack Micro USB jack PASS THROUGH indicator HDMI - Sony HMZ-T3 | Reference Guide - Page 14
Lit in blue Wireless link established Fast flashing in blue Wireless link established (with no video input to the selected input jack) Flashing in blue Establishing Wireless link Unlit Wireless link off For alerts by the indicators, see "Warning by the indicator" in "Troubleshooting" (page 46 - Sony HMZ-T3 | Reference Guide - Page 15
details on charging, refer to the "Startup Guide." Connect the AC-UD10 AC adaptor ( while charging. This is not a problem for safety. If the battery unit or wireless communication conditions are poor. Checking the remaining battery capacity Press the MENU button on the head mounted unit to display - Sony HMZ-T3 | Reference Guide - Page 16
and Communication Distance The processor unit and the battery unit of this system each has an antenna for wireless communication on the side with the SONY logo. When wirelessly connecting the processor unit and the battery unit, install them referring to the following installation examples. The gray - Sony HMZ-T3 | Reference Guide - Page 17
mounted unit to display the menu, then select "Information." The strength of radio waves appears on the top right of the Information screen (page 28). Strength of radio waves Level of radio wave strength 4 3 2 1 0 2 Place the battery unit facing the SONY logo side toward the processor unit - Sony HMZ-T3 | Reference Guide - Page 18
the same rack • In the following cases, the condition of wireless communication is temporarily degraded owing to a change in the environment, If the panel with the SONY logo of the processor unit or the battery unit is blocked by a human body or some object - If a person, animal, or object (e.g. - Sony HMZ-T3 | Reference Guide - Page 19
the battery unit in the pocket and fix the head mounted unit with the hook and loop fastener. Head mounted unit Battery unit HDMI IN/ MHL Battery unit any other place where radio wave transmission is prohibited, be sure to set "Wireless Connection" in "General Setup" to "Off" (page 37). • With - Sony HMZ-T3 | Reference Guide - Page 20
ways to ensure a personalized, comfortable fit. For a more comfortable fit, always adjust the head mounted unit before putting it on. When fitting the head mounted unit for the first time after purchase, refer to the "Startup Guide." Adjusting the forehead supporter The forehead supporter can be - Sony HMZ-T3 | Reference Guide - Page 21
Attaching the connecting cord holder To keep the connecting cords of the head mounted unit out of the way, use the supplied connecting cord holder and possible to attach the light blockers when wearing some sorts of glasses. • If external light is still distracting with the light blockers on, dim - Sony HMZ-T3 | Reference Guide - Page 22
loosen To tighten Bottom headband Wear the head mounted unit so that it feels balanced between the forehead supporter and bottom headband, and after repositioning • The circles on the headband adjusters are the caps for the accessory fixing screw holes for future use. They are not buttons and are - Sony HMZ-T3 | Reference Guide - Page 23
, try replacing them with the supplied large or small earbuds. Earbud sizes are color-coded and can be identified by the color inside. To of snugly fitting earbuds may strain your ears. If you experience discomfort, discontinue use. • The pressure-relieving urethane cushion is extremely soft. If it - Sony HMZ-T3 | Reference Guide - Page 24
When these consumables break or show signs of wear, consult your nearest Sony dealer or Sony service center. * Optional replacement earbuds can be ordered from your nearest Sony dealer. Replacing the forehead supporter cushion or headband adjuster cushion The cushion is attached with doubleback tape - Sony HMZ-T3 | Reference Guide - Page 25
alignment by referring to the confirmation screen displayed initially after lens span adjustment. Screens on the head mounted unit are described below, with an explanation of how to confirm alignment. The display section of the head mounted unit consists of two small screens, on the left and right - Sony HMZ-T3 | Reference Guide - Page 26
the head mounted unit correctly, referring to the "Startup Guide." If they still do not intersect, stop using the system. as the head mounted unit may have been bent out of shape, or it may be damaged. If this condition occurs, contact your nearest Sony dealer or local authorized Sony service center - Sony HMZ-T3 | Reference Guide - Page 27
of system settings, such as video picture quality, audio output format, and 3D display format. To view the menus, press the MENU button on the head mounted unit. Basic Menu Operations 1 Press the MENU button on the head mounted unit. Note • After 90 seconds of inactivity, the setting menu will - Sony HMZ-T3 | Reference Guide - Page 28
your eyes (interpupillary distance), for an optimal viewing experience. Use the lens span adjusters on the head mounted unit for adjustment. For details, refer to the "Startup Guide." Notes • Without the lens span adjusted correctly, you cannot enjoy an optimal viewing experience. Always adjust - Sony HMZ-T3 | Reference Guide - Page 29
3D Settings Reset 3D Display Resets all "3D Settings" items to the original default values. Manually select the display format for 3D content. Available settings vary depending on whether the source signal includes a 3D format identification signal, as follows. Example of 3D display For 3D content - Sony HMZ-T3 | Reference Guide - Page 30
during viewing. This operation is not available when the setting menu is displayed. Restores all the values (except for values of "Display Size," "Screen," "24p True Cinema," "Cinema Conversion," "Overscan," and "Wide Mode" in "Display") of the selected mode in the "Picture Mode" menu to the default - Sony HMZ-T3 | Reference Guide - Page 31
. Off: Deactivates this function. Display Size Selects the image display size. 100%: Displays the image in full-screen. 90%/80%/70%: The display size is reduced to 90%, 80%, or 70%, respectively. Screen Normal: Displays the original image. Not available during 3D Theater1: Outputs the image - Sony HMZ-T3 | Reference Guide - Page 32
Deactivates this function. 24 fps video signals are displayed after upconversion to 60 fps. Cinema Conversion Overscan Not available during 3D playback. Wide Mode Not available during 3D playback. Note • When "Panel Drive Mode" is set to "Clear," the screen may appear to flicker (depending on the - Sony HMZ-T3 | Reference Guide - Page 33
setting, providing a spacious sound stage for a range of content. Cinema: Emphasizes a natural sound stage rivaling the impressive acoustics of movie theaters each channel blended naturally. A good choice for movies. Game: Ideal for games. Provides pinpoint sound localization, for a clear sense of - Sony HMZ-T3 | Reference Guide - Page 34
Performs Cinema-mode processing of DTS Neo:6. Music: Performs Music-mode processing of DTS Neo:6. Off: Deactivates the matrix decoder. Note • "DTS Neo:6" is fixed at "Off" if the "Dolby Pro Logic IIx" setting is not "Off." Treble Adjusts high-frequency audio output. Bass Adjusts low-frequency - Sony HMZ-T3 | Reference Guide - Page 35
the password input screen Selects the input to the processor unit. The signal input to the selected input jack is displayed on the head mounted unit. HDMI1 on a TV or other display device when the system is in standby mode. For details, refer to the "Startup Guide." Off: Deactivates this function. - Sony HMZ-T3 | Reference Guide - Page 36
Menu Display On: Activates control for HDMI CEC (Consumer Electronic Control)-compatible equipment connected to the system using the buttons (page 12) on the head mounted unit be adjusted while this setting is configured. 3D: Displays the menu in 3D format. 2D: Deactivates the 3D format of the menu - Sony HMZ-T3 | Reference Guide - Page 37
viewer warning On: Activates automatic display of a startup warning. Off: Deactivates this function. Wireless Connection On: Turns on wireless connection of the battery unit. Off: Turns off wireless connection of the battery unit. Wireless up the head mounted unit in wireless operation. Off - Sony HMZ-T3 | Reference Guide - Page 38
Troubleshooting If the following symptoms occur when using the system, check the cause and action before requesting service. If the issue persists, contact your Sony dealer or local authorized Sony service center. For the troubles with video or audio, see through the multiple sections below. • - Sony HMZ-T3 | Reference Guide - Page 39
Guide." 2 Adjust the lens span while checking the display. Refer to "3 Setup and View" in the "Startup Guide Guide." Confirm that the battery is charged (page 15). Hold down the (Power On/Standby) button on the head mounted is supported with this system. is not supported with this instruction manual - Sony HMZ-T3 | Reference Guide - Page 40
at 1080FP (Frame Packing), change the resolution to 720FP. Also check section Audio/Video (in common), or Wireless. Refer to the "Startup Guide" and confirm that the AC adaptor and HDMI cable are connected correctly, and that you are wearing the head mounted unit correctly. The lens span - Sony HMZ-T3 | Reference Guide - Page 41
perception varies by viewer. If the "3D Settings" menu is displayed but images are not shown in 3D, try restarting the connected equipment used for 3D playback. The system does not support 2D to 3D conversion (simulated 3D). Viewing anaglyphic images in 3D requires anaglyphic glasses (with red - Sony HMZ-T3 | Reference Guide - Page 42
buttons on the head mounted unit. Insert the headphone plug securely (Refer to "1 Connect" in the "Startup Guide."). The playback sound the AV amplifier (receiver) or other equipment. For details, refer to the instruction manual of the equipment used. When the headphone jack on the processor unit - Sony HMZ-T3 | Reference Guide - Page 43
less), and orient the two units with their SONY logos facing each other. Wireless communication quality degrades if the panel with the SONY logo (the side with antenna installed) of if more than three wireless devices using the same frequency band (60 GHz), including this system, are used. 43 - Sony HMZ-T3 | Reference Guide - Page 44
authorized Sony service center. HDMI Control Symptom Connected equipment cannot be controlled using the buttons on the head mounted unit Cause/Action Make sure the "Control for HDMI" setting in "General Setup" is set to "On" (page 36). Make sure the connected equipment supports the HDMI - Sony HMZ-T3 | Reference Guide - Page 45
unresponsive "DEMO" appears in the upper-right corner of the setting menu screen Cannot adjust "Language setting" because the setting menu is in an unfamiliar language Discomfort in the nose or forehead from contact with the head mounted unit Cause/Action Refer to the instruction manual supplied - Sony HMZ-T3 | Reference Guide - Page 46
Repeats flashing three times every 3 seconds Battery error. Stop using the system and contact your Sony dealer or local authorized Sony service center. Contact your Sony dealer or local authorized Sony service center. The processor unit may be damaged. Temperature error in the processor unit. Leave - Sony HMZ-T3 | Reference Guide - Page 47
When Disposing of the System For environment protection, remove the built-in lithium-ion battery from the system. Before removing the battery, drain the battery by removing the AC adaptor and using the system only with the battery. • Take out the lithium-ion battery for recycling. Do not open the - Sony HMZ-T3 | Reference Guide - Page 48
°F)) Battery operating time Head mounted unit and battery unit: Approx. 3 hours (in wireless operation at 23 °C Head mounted unit: Approx. 320 g (12 oz) (including top light blockers, and excluding connecting cords) Battery unit: Approx. 210 g (7.5 oz) (excluding connecting cord) Display resolution - Sony HMZ-T3 | Reference Guide - Page 49
distance Approx. 7 m (23 feet)* * The communication distance varies depending on the conditions of use. Headphones Frequency response: 4 Hz - 27,000 Hz Impedance: 16 Ω (1 kHz) AC adaptor AC-UD10 (for the head mounted unit and battery unit) Rated input 100 V - 240 V AC, 50 Hz/60 Hz, 0.2 A Rated - Sony HMZ-T3 | Reference Guide - Page 50
. 170 g (6 oz) Supplied accessories See "Supplied Accessories" (page 11). System specifications and Game mode, which produces a sound stage specifically designed for games with multi-channel surround-sound effects. Game mode sound stage design for this system was supervised by sound designers at Sony - Sony HMZ-T3 | Reference Guide - Page 51
Computer Entertainment Inc. Also, "PS3" is a trademark of the same company. • "VPT," Virtualphones Technology is a trademark of Sony Corporation. • Other system and product names are generally trademarks or registered trademarks of the manufacturers. ™ and ® marks are not indicated in this document - Sony HMZ-T3 | Reference Guide - Page 52
© 2013 Sony Corporation Printed in Japan 4-471-977-11(1)
-
 1
1 -
 2
2 -
 3
3 -
 4
4 -
 5
5 -
 6
6 -
 7
7 -
8
-
9
-
10
-
11
-
12
-
13
-
14
-
15
-
16
-
17
-
18
-
19
-
20
-
21
-
22
-
23
-
24
-
25
-
26
-
27
-
28
-
29
-
30
-
31
-
32
-
33
-
34
-
35
-
36
-
37
-
38
-
39
-
40
-
41
-
42
-
43
-
44
-
45
-
46
-
47
-
48
-
49
-
50
-
51
-
52
 |
 |

4-471-977-
11
(1)
HMZ-T3W
Head
Mounted
Display
Reference Guide
Before Initial Use
Refer to the “Startup Guide” for instructions on
connecting the system, wearing the unit, and
completing initial settings.