Sony HTSS360 Operating Instructions
Sony HTSS360 - HT Home Theater System Manual
 |
UPC - 027242753938
View all Sony HTSS360 manuals
Add to My Manuals
Save this manual to your list of manuals |
Sony HTSS360 manual content summary:
- Sony HTSS360 | Operating Instructions - Page 1
4-130-033-41(1) Home Theatre System Operating Instructions HT-SS360 ©2009 Sony Corporation - Sony HTSS360 | Operating Instructions - Page 2
accordance with the installation instructions. For customers in Sony dealer regarding this product. Model servicing) instructions in the literature accompanying the appliance. Important Safety Instructions 1) Read these instructions. 2) Keep these instructions. 3) Heed all warnings. 4) Follow all instructions - Sony HTSS360 | Operating Instructions - Page 3
manual could void your authority to operate this equipment. To reduce the risk of electric shock, the speaker cord should be connected to the apparatus and the speakers in accordance with the following instructions. 1) Disconnect the AC power cord from the MAINS. 2) Strip 10 to 15 mm of the wire - Sony HTSS360 | Operating Instructions - Page 4
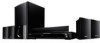
The HT-SS360 consists of: • Receiver • Speaker systema) - Front speaker - Center speaker - Surround speaker - Subwoofer STR-KS360 SS-MSP36S SS-CNP36 SS-SRP36S SS-WP36 a) Be sure to use only the supplied speakers. • The instructions in this manual describe the controls on the supplied remote. You - Sony HTSS360 | Operating Instructions - Page 5
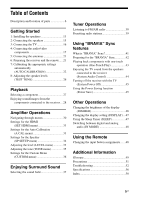
and location of parts 6 Getting Started 1: Installing the speakers 13 2: Connecting the speakers 15 3: Connecting the TV 16 4: Connecting the audio/video components 17 5: Connecting the antennas 21 6: Preparing the receiver and the remote..... 21 7: Calibrating the appropriate settings - Sony HTSS360 | Operating Instructions - Page 6
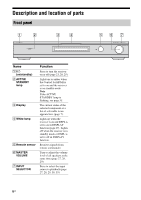
lamp is flashing, see page 55. The current status of the selected component or a list of selectable items appears here (page 7). Lights up when to off in DISPLAY function. Receives signals from remote commander. Turn to adjust the volume level of all speakers at the same time (page 27, 28, 29 - Sony HTSS360 | Operating Instructions - Page 7
activated (page 47). The letters (L, C, R, etc.) indicate the channels being played back. The boxes around the letters vary to show decoding Dolby Digital signals. Note When playing a Dolby Digital format disc, be sure that you have made digital connections. Lights up when a playback component is - Sony HTSS360 | Operating Instructions - Page 8
SPEAKERS section Connects to the supplied speakers and subwoofer (page 15). B DMPORT DMPORT jack Connects to a DIGITAL MEDIA PORT adapter (page 17, 20). L L DIGITAL TV ANTENNA R R AUTO AUDIO IN AUDIO IN AUDIO IN COAX IN CAL MIC VIDEO 1 TV SA-CD/CD VIDEO 2 DC5V 700mA MAX HDMI DMPORT BD - Sony HTSS360 | Operating Instructions - Page 9
the Sony audio/video components that the remote is assigned to operate (page 48). RM-AAU057 ws wa w; ql qk qj qh qg TV ?/1 TV INPUT DMPORT AV ?/1 ?/1 SYSTEM STANDBY VIDEO1 VIDEO2 BD DVD SAT TV SA-CD/CD TUNER BD/DVD TOP MENU MENU F1 F2 JUMP PICTURE WIDE FAVORITES THEATER 123 GUIDE 456 - Sony HTSS360 | Operating Instructions - Page 10
Press to turn on or off the Sony audio/video components that the remote is assigned to operate (page 48). Press A ?/1 and B TV ?/1/AV ?/1 at the same time to turn off the receiver and all other components that the remote is assigned to operate (SYSTEM STANDBY). H ENTER Press to enter the selection - Sony HTSS360 | Operating Instructions - Page 11
Remote Button Function K MUTING Press to turn off the sound. L TV +/- Press to adjust the volume. M MENU/HOME Press to allow you to select channels or input sources and change the settings for your TV. N TV CH +/- Selects the next (+) or previous (-) channel. To scan quickly through channels - Sony HTSS360 | Operating Instructions - Page 12
the top menu or disc menu. To control the SAT Remote Button Function F GUIDE Press to display the guide menu. M MENU/HOME Press to display the menu. Q , V/v/B/b Press to select Therefore, depending on the component, the above operation may not be possible or may operate differently than - Sony HTSS360 | Operating Instructions - Page 13
Started 1: Installing the speakers This receiver allows you to use a 5.1 channel speaker system. To fully enjoy theater-like multi channel surround sound, be sure to connect all the speakers (two front speakers, a center speaker, and two surround speakers) and a subwoofer (5.1 channel). You can - Sony HTSS360 | Operating Instructions - Page 14
attach the screws securely to a beam and fasten them to the wall. Install the speakers on a vertical and flat wall where reinforcement is applied. • Contact a screw shop or installer regarding the wall material or screws to be used. • Sony is not responsible for accident or damage caused by improper - Sony HTSS360 | Operating Instructions - Page 15
jack FRONT R FRONT L SUR R SUR L CENTER SUBWOOFER To connect the speakers correctly Check the speaker type by referring to the speaker label* at the rear panel of the speakers. Character on speaker label L R SL SR Speaker type Front left Front right Surround left Surround right * The center - Sony HTSS360 | Operating Instructions - Page 16
IN AM OUT A Audio cord (not supplied) B Optical digital cord (not supplied) C HDMI cable (not supplied) We recommend that you use a Sony HDMI cable. Notes • Be sure to turn on the receiver when the video and audio signals of a playback component are being output to a TV via the receiver. Unless - Sony HTSS360 | Operating Instructions - Page 17
IN SAT OPT IN SAT IN TV B DIGITAL MEDIA PORT adapter A Audio cord (not supplied) B Video cord (not supplied) * The type of connector varies depending on the DIGITAL MEDIA PORT adapter. For details, refer to the operating instructions supplied with the DIGITAL MEDIA PORT adapter. continued 17US - Sony HTSS360 | Operating Instructions - Page 18
. By connecting Sony "BRAVIA" Sync compatible components using HDMI cables, ""BRAVIA" Sync Features" makes operations simpler (page 41). HDMI features • A digital audio signals transmitted by HDMI can be output from the speakers connected to the receiver. This signal supports Dolby Digital, DTS and - Sony HTSS360 | Operating Instructions - Page 19
make certain settings on the image resolution of the player before you can enjoy multi channel Linear PCM. Refer to the operating instructions of the player. • Refer to the operating instructions of each component connected for details. • We do not recommend using an HDMI-DVI conversion cable. When - Sony HTSS360 | Operating Instructions - Page 20
into place. • Do not bend or tie optical digital cords. • Be sure to connect the video output of the DVD player, DVD recorder and VCR to the TV, so that the image is displayed on the TV. Refer to the operating instructions of each connected component for details. • You cannot do recording on the - Sony HTSS360 | Operating Instructions - Page 21
FM wire antenna (supplied) AM loop antenna (supplied) 6: Preparing the receiver and the remote Connecting the AC power cord (mains lead) Connect the AC power cord (mains lead) to a wall outlet. AC power cord (mains lead) L L DIGITAL TV ANTENNA R R AUDIO IN AUDIO IN AUDIO IN COAX IN VIDEO - Sony HTSS360 | Operating Instructions - Page 22
in the RM-AAU057 Remote Commander. Observe the correct polarity when installing batteries. Notes • Do not leave the remote in an extremely receiver is equipped with DCAC (Digital Cinema Auto Calibration) Technology which speaker levels manually according to your preference. For details, see "8: Adjusting - Sony HTSS360 | Operating Instructions - Page 23
face the speaker towards the optimizer microphone, you will get a more accurate measurement. Performing Auto Calibration TV ?/1 TV INPUT DMPORT AV ?/1 ?/1 SYSTEM STANDBY VIDEO1 VIDEO2 BD DVD SAT TV SA-CD/CD TUNER BD/DVD TOP MENU MENU F1 F2 JUMP PICTURE WIDE FAVORITES THEATER 123 GUIDE 456 - Sony HTSS360 | Operating Instructions - Page 24
below shows the display when measurement starts. Measurement for Speaker existance Speaker gain, distance, frequency response Subwoofer gain and distance process: - Press ?/1 or MUTING. - Press input buttons on the remote or INPUT SELECTOR on the receiver. - Change the volume level. Confirming - Sony HTSS360 | Operating Instructions - Page 25
the acceptable range. • The optimizer microphone or subwoofer may be damaged. Contact your Sony dealer or local authorized Sony service facility. ERROR F 33 The front speakers are not connected. Check that the front speakers are connected properly. ERROR SR 33 Either the surround left or surround - Sony HTSS360 | Operating Instructions - Page 26
the "SP SETUP" setting. • "SR LVL" and "SL LVL" do not appear when you set "SUR N" in the "SP SETUP" setting. 6 Press V/v to adjust the speaker level, not output from the speakers • The speaker cords may not be connected securely. • The speaker cords may have the short-circuit problem. • The test - Sony HTSS360 | Operating Instructions - Page 27
selected input appears on the display. Selected input Components that can [Display] be played back DMPORT [DMPORT] DIGITAL MEDIA PORT adapter connected to the DMPORT jack VIDEO1 or VIDEO2 [VIDEO 1 or VIDEO 2] VCR, etc., connected to the VIDEO 1 or VIDEO 2 jack BD [BD] Blu-ray disc player - Sony HTSS360 | Operating Instructions - Page 28
Enjoying sound/images from the components connected to the receiver Input buttons TV TV ?/1 TV INPUT DMPORT AV ?/1 ?/1 SYSTEM STANDBY VIDEO1 VIDEO2 BD DVD SAT TV SA-CD/CD TUNER BD/DVD TOP MENU MENU F1 F2 JUMP PICTURE WIDE FAVORITES THEATER 123 GUIDE 456 SOUND FIELD 789 AMP MENU 0 - Sony HTSS360 | Operating Instructions - Page 29
in multi channel PCM, if possible. Enjoying a VCR 1 Turn on the TV. 2 Turn the VCR player and the receiver on. 3 Press VIDEO1 or VIDEO2. You can also use INPUT SELECTOR on the receiver to select "VIDEO 1" or "VIDEO 2". 4 Change the TV input. For details, refer to the operating instructions of the - Sony HTSS360 | Operating Instructions - Page 30
menus, you can make various adjustments to customize the receiver. , V,v,B,b GUIDE 456 SOUND FIELD 789 CLEAR DISPLAY AMP MENU 0 ENTER TOOLS/ OPTIONS MUTING TV VOL MASTER VOL AMP MENU RETURN/EXIT MENU/HOME TV CH - TV CH + PRESET - REPLAY ADVANCE PRESET + .< > < TUNING - m TUNING - Sony HTSS360 | Operating Instructions - Page 31
on navigating through menus, see page 30. Menu [Display] HDMI settings [SET HDMI] (page 33) Auto Calibration settings [A.CAL] (page 33) Speaker settings [SP SETUP] (page 34) Parameters [Display] Settings Control for HDMIa)b) [CONTROL FOR HDMI] CTRL ON, CTRL OFF Volume limitsa) [VOL LIM] MAX - Sony HTSS360 | Operating Instructions - Page 32
setting T. TONE N FL 0.0 dB Center speaker level [CNT LVL] CNT -6 dB to CNT +6 dB (0.5 dB step) CNT 0.0 dB Front right speaker level [FR LVL] FR -6 dB settings Digital broadcast language [CUSTOM] selectiona) (page 36) [DUAL] MAIN, SUB, MAIN/SUB MAIN Synchronizes audio with video outputa) - Sony HTSS360 | Operating Instructions - Page 33
menu parameters x CONTROL FOR HDMI (Control for HDMI) Lets you turn the Control for HDMI function on or off. For details, see "Preparing for the "BRAVIA" Sync" (page 42). x VOL LIM (Volume limits) Lets you set the volume limit of your receiver. For details, see "Using the Volume Limit function - Sony HTSS360 | Operating Instructions - Page 34
"Overview of the menus" (page 31). SP SETUP menu parameters x CNT SP (Center speaker) Lets you select the center speaker. x SUR SP (Surround speaker) Lets you select the surround speakers. x FL DIST (Front left speaker distance) x FR DIST (Front right speaker distance) Lets you set the distance from - Sony HTSS360 | Operating Instructions - Page 35
LVL" and "SL LVL" do not appear when you set "SUR N" in the "SP SETUP" setting. Adjusting the tone (TONE menu) You can use the TONE menu to adjust the tonal quality (bass/treble level) of the speakers. Select "TONE" in the amplifier menus. For details on adjusting the parameters, see "Navigating - Sony HTSS360 | Operating Instructions - Page 36
speaker and sound of the sub language will be output through the front right speaker simultaneously. x A/V SYNC (Synchronizes audio with video output low volumes late at night. Dynamic range compression is possible with Dolby Digital sources only. • DRC OFF The dynamic range is not compressed. • - Sony HTSS360 | Operating Instructions - Page 37
, this mode can reproduce sound in 5.1 channel for watching videos of overdubbed or old movies. Performs Dolby Pro channel left/right signals from all speakers. Movie MOVIE-D.C.S.- * [MV-D.C.S.-] The system reproduces the sound characteristics of the Sony Pictures Entertainment "Cary Grant Theater - Sony HTSS360 | Operating Instructions - Page 38
is input. - the multi channel Linear PCM signals are received via an HDMI IN jack. • The sound is not output from multiple speakers depending on the source. • BD/DVD TOP MENU MENU F1 F2 JUMP PICTURE WIDE FAVORITES THEATER 123 GUIDE 456 SOUND FIELD 789 AMP MENU 0 ENTER CLEAR DISPLAY TOOLS/ - Sony HTSS360 | Operating Instructions - Page 39
a station is received. To stop the automatic tuning manually, press TUNING + or -. If an FM program stereo effect, but reception will improve. 1 Press MENU/HOME. 2 Press V/v repeatedly until "FM MODE" appears F2 JUMP PICTURE WIDE FAVORITES THEATER 123 GUIDE 456 SOUND FIELD 789 CLEAR DISPLAY - Sony HTSS360 | Operating Instructions - Page 40
AM tuning interval can be set to either 10 kHz or 9 kHz. 1 Press TUNER/BAND repeatedly until "AM" appears in the display. 2 Press MENU/HOME. 3 Press V/v repeatedly until "AM STEP" appears in the display, then press or b. "9K STEP" or "10K STEP" appears in the display. 4 Press . "COMPLETE" appears - Sony HTSS360 | Operating Instructions - Page 41
station name is stored. 8 Press MENU/HOME. Viewing the station name or frequency BRAVIA" Sync features What is "BRAVIA" Sync? "BRAVIA" Sync is compatible with a Sony speaker or the speakers connected to the receiver. • System Power Off: When you turn off the TV, the receiver and connected components - Sony HTSS360 | Operating Instructions - Page 42
receiver and all the connected components are simultaneously turned on. During setup, "SCANNING" appears in the display, and once setting is completed, "COMPLETE" will appear. Wait until the setup is complete. For details on setting the TV, refer to the operating instructions supplied with the TV - Sony HTSS360 | Operating Instructions - Page 43
components components do not support the Control for HDMI-Easy Setting, you need to set the Control for HDMI function for the connected components System Audio Control setting is set to on. Watching a DVD/Blu-ray disc by simple operation You can also select a connected component components that are - Sony HTSS360 | Operating Instructions - Page 44
Control) You can enjoy the TV sound from the speakers connected to the receiver by a simple operation. You can operate System Audio Control function using the TV menu. For details, refer to the operating instructions supplied with the TV. When System Audio Control function is turned on, the receiver - Sony HTSS360 | Operating Instructions - Page 45
and the connected components turn off automatically. You can also use the receiver's remote to turn off the TV. TV ?/1 TV INPUT DMPORT AV ?/1 ?/1 SYSTEM STANDBY VIDEO1 VIDEO2 BD DVD SAT TV SA-CD/CD TUNER BD/DVD TOP MENU MENU F1 F2 JUMP PICTURE WIDE FAVORITES THEATER 123 GUIDE 456 SOUND - Sony HTSS360 | Operating Instructions - Page 46
Notes • The power saving function may not work for some TVs compatible with the "BRAVIA" Sync. In this case, set "P.SAVE" to "SAVE OFF." • Depending on your components, it may take time before image or sound is output. • This function is available only when the Control for HDMI function is set to on - Sony HTSS360 | Operating Instructions - Page 47
Changing the display setting (DISPLAY) You can change the display setting. 1 Press AMP MENU. "SET HDMI" appears on the display. 2 Press V/v repeatedly until "CUSTOM" appears, then press or b. 3 Press V/v repeatedly until "DISPLAY" appears, then press or b. 4 Press V/v repeatedly to change the - Sony HTSS360 | Operating Instructions - Page 48
and optical) connections. x OPT Specifies the digital audio signals input to the DIGITAL SAT OPT IN jack. Using the Remote Changing the input button assignments You can change the factory settings of the input buttons to suit the components in your system. For example, if you connect a Blu-ray - Sony HTSS360 | Operating Instructions - Page 49
and DMPORT at the same time. The remote is reset to its factory settings. Additional Information Glossary x Digital Cinema Sound (DCS) A unique sound reproduction technology for home theater developed by Sony, in cooperation with Sony Pictures Entertainment, for enjoying the exciting and powerful - Sony HTSS360 | Operating Instructions - Page 50
/decoding technology for theaters developed by DTS, Inc. It compresses audio less than Dolby Digital, delivering a higher quality sound reproduction. x HDMI (High-Definition Multimedia Interface) HDMI (High-Definition Multimedia Interface) is an interface that supports both video and audio on - Sony HTSS360 | Operating Instructions - Page 51
AC power cord must be changed only at a qualified service shop. On heat buildup Although the receiver heats up components, be sure to turn off and unplug the receiver. If you encounter color irregularity on a nearby TV screen The center speaker is magnetically shielded to allow it to be installed - Sony HTSS360 | Operating Instructions - Page 52
difficulties while using the receiver, use this troubleshooting guide to help you remedy the problem. Audio There is no sound, no matter which component is selected, or only a very low-level sound is heard. • Check that the speakers and components are connected securely. • Check that both the - Sony HTSS360 | Operating Instructions - Page 53
center/ surround speakers. • Select a MOVIE-D.C.S.- mode (page 37). • Adjust the speaker level (page 26). • Check that the speakers are connected DIGITAL MEDIA PORT adapter and/or component. • Check the DIGITAL MEDIA PORT adapter and/or component device to make sure it supports this receiver. Video - Sony HTSS360 | Operating Instructions - Page 54
operating instructions of the connected component. • Repeat the procedures of "Preparing for the "BRAVIA" Sync" if you change the HDMI connection, connect/disconnect the AC power cord, or there is a power failure (page 42). No sound is output from the receiver and TV speaker while using the System - Sony HTSS360 | Operating Instructions - Page 55
you select the correct input on the remote. Error messages If an error message appears while you perform Auto Calibration, see "When error codes appear" (page 25) to solve the problem. If you are unable to remedy the problem using the troubleshooting guide Clearing the receiver's memory may remedy - Sony HTSS360 | Operating Instructions - Page 56
both channels driven, from 170 - 20,000 Hz; rated 84 watts per channel power output for front, center, surround speakers and subwoofer. Depending on the sound field 87.5 - 108.0 MHz Antenna FM wire antenna Antenna terminals 75 ohms, unbalanced DIGITAL MEDIA PORT) DC OUT: 5 V, 700 mA MAX 56US - Sony HTSS360 | Operating Instructions - Page 57
(Approx.) 5.6 kg (12 lb 6 oz) Supplied speakers Front speaker (2) Center speaker (1) Surround speaker (2) Subwoofer (1) Supplied accessories Operating Instructions (this manual) Quick Setup Guide (1) FM wire antenna (1) AM loop antenna (1) Remote commander • RM-AAU057 (1) R6 (size-AA) batteries - Sony HTSS360 | Operating Instructions - Page 58
HDMI 33 SP SETUP 34 TONE 35 Muting 27 O One-Touch Play 43 P Power Save 45 R Remote commander 9 S Satellite tuner/Set-top box connecting 18 enjoying 28 Selecting component 27 Sleep Timer 47 Speakers connecting 15 Super Audio CD player connecting 17 playback 29 System Audio Control 44 System Power Off - Sony HTSS360 | Operating Instructions - Page 59
- Sony HTSS360 | Operating Instructions - Page 60
(1) Sony Corporation Printed in Malaysia
-
 1
1 -
 2
2 -
 3
3 -
 4
4 -
 5
5 -
 6
6 -
 7
7 -
8
-
9
-
10
-
11
-
12
-
13
-
14
-
15
-
16
-
17
-
18
-
19
-
20
-
21
-
22
-
23
-
24
-
25
-
26
-
27
-
28
-
29
-
30
-
31
-
32
-
33
-
34
-
35
-
36
-
37
-
38
-
39
-
40
-
41
-
42
-
43
-
44
-
45
-
46
-
47
-
48
-
49
-
50
-
51
-
52
-
53
-
54
-
55
-
56
-
57
-
58
-
59
-
60
 |
 |

©2009 Sony Corporation
4-130-033-
41
(1)
Home Theatre
System
Operating Instructions
HT-SS360