Sony HTSS360 Operating Instructions - Page 14
Installing the speakers on the, The screws should protrude
 |
UPC - 027242753938
View all Sony HTSS360 manuals
Add to My Manuals
Save this manual to your list of manuals |
Page 14 highlights
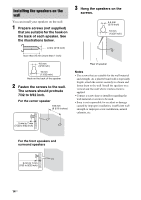
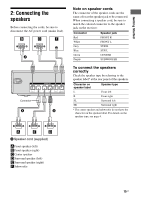
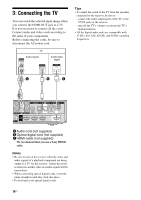
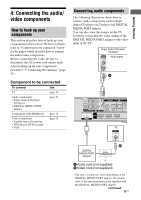
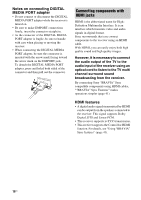
Installing the speakers on the wall You can install your speakers on the wall. 1 Prepare screws (not supplied) that are suitable for the hook on the back of each speaker. See the illustrations below. 4 mm (3/16 inch) more than 25 mm (more than 1 inch) 4.6 mm (3/16 inch) 10 mm (13/32 inch) Hook on the back of the speaker 2 Fasten the screws to the wall. The screws should protrude 7/32 to 9/32 inch. For the center speaker 160 mm (6 5/16 inches) 3 Hang the speakers on the screws. 4.6 mm (3/16 inch) 10 mm (13/32 inch) Rear of speaker Notes • Use screws that are suitable for the wall material and strength. As a plaster board wall is especially fragile, attach the screws securely to a beam and fasten them to the wall. Install the speakers on a vertical and flat wall where reinforcement is applied. • Contact a screw shop or installer regarding the wall material or screws to be used. • Sony is not responsible for accident or damage caused by improper installation, insufficient wall strength or improper screw installation, natural calamity, etc. 5 mm to 7 mm (7/32 to 9/32 inch) For the front speakers and surround speakers 5 mm to 7 mm (7/32 to 9/32 inch) 14US
-
 1
1 -
2
-
3
-
4
-
5
-
6
-
7
-
8
-
 9
9 -
 10
10 -
 11
11 -
 12
12 -
 13
13 -
 14
14 -
 15
15 -
 16
16 -
 17
17 -
 18
18 -
 19
19 -
20
-
21
-
22
-
23
-
24
-
25
-
26
-
27
-
28
-
29
-
30
-
31
-
32
-
33
-
34
-
35
-
36
-
37
-
38
-
39
-
40
-
41
-
42
-
43
-
44
-
45
-
46
-
47
-
48
-
49
-
50
-
51
-
52
-
53
-
54
-
55
-
56
-
57
-
58
-
59
-
60
 |
 |
