Sony HTSS360 Operating Instructions - Page 24
Confirming/saving the, measurement results, Press, to start the, measurement., Confirm the measurement - remote codes
 |
UPC - 027242753938
View all Sony HTSS360 manuals
Add to My Manuals
Save this manual to your list of manuals |
Page 24 highlights
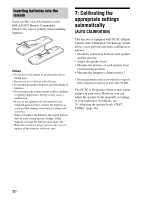
4 Press to start the measurement. Measurement starts in 5 seconds. While the time is counting down, stand away from the measurement area to avoid measurement error. The measurement process will take approximately 30 seconds to complete. The table below shows the display when measurement starts. Measurement for Speaker existance Speaker gain, distance, frequency response Subwoofer gain and distance Display TONE T.S.P. WOOFER Note If "CHK MIC" appears, you cannot perform the Auto Calibration. Connect the calibration mic, then restart the Auto Calibration. Tips • When Auto Calibration starts: - Stand some distance from the speakers and the listening position to avoid measurement failure. This is because test signals are output from the speakers during measurement. - Avoid making noise to get a more accurate measurement. • The Auto Calibration function will be canceled when you do the following during the measurement process: - Press ?/1 or MUTING. - Press input buttons on the remote or INPUT SELECTOR on the receiver. - Change the volume level. Confirming/saving the measurement results 1 Confirm the measurement result. When the measurement ends, a beep sounds and the measurement result appears on the display. Measurement Display Explanation result When the measurement process completes properly SAVE Proceed to step 2. When the measurement process fails ERROR XXXX See "When error codes appear" (page 25). 2 Press V/v repeatedly to select the item. Then, press . Item SAVE WRN CHK DIST LEVEL EXIT Explanation Saves the measurement results and exits the setting process. Displays warning concerning the measurement results. See "When you select "WRN CHK"" (page 25). Displays the measurement result for speaker distance. Displays the measurement result for speaker level. Exits the setting process without saving the measurement results. Note After "SAVE" is displayed for 50 seconds, the measurement result is saved automatically, without the need to save the procedure. 3 Save the measurement result. Select "SAVE" in step 2. The measurement results are saved. 24US
-
 1
1 -
2
-
3
-
4
-
5
-
6
-
7
-
8
-
9
-
10
-
11
-
12
-
13
-
14
-
15
-
16
-
17
-
18
-
 19
19 -
 20
20 -
 21
21 -
 22
22 -
 23
23 -
 24
24 -
 25
25 -
 26
26 -
 27
27 -
 28
28 -
 29
29 -
30
-
31
-
32
-
33
-
34
-
35
-
36
-
37
-
38
-
39
-
40
-
41
-
42
-
43
-
44
-
45
-
46
-
47
-
48
-
49
-
50
-
51
-
52
-
53
-
54
-
55
-
56
-
57
-
58
-
59
-
60
 |
 |
